It's Probably Pirates
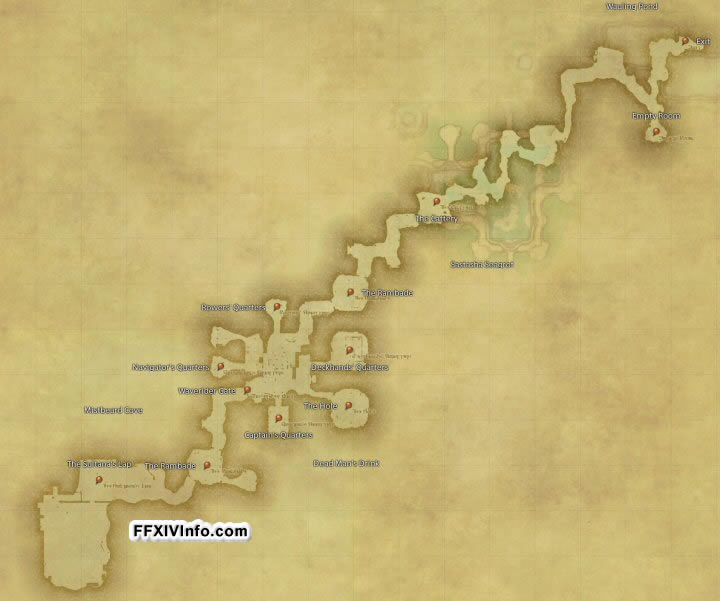
Sastasha Seagrot
B aderon and Commodore Reyner have requested your assistance with an investigation. A strange ship has been sighted off the coast of Aleport, and the subsequent appearance of a dangerous-looking group of men at the Sastasha Seagrot has the Yellowjackets greatly concerned.
After a period of relative silence following the Calamity, the Serpent Reavers have once again taken to terrorizing the inland hamlets of La Noscea, killing the men, kidnapping the women and children, plundering the storehouses and burning what little they leave behind. For years, it was not known how the pirates were able to raid areas so far from the coast, until a local shepherd sighted a band of painted ruffians entering the Sastasha Seagrot, carrying large quantities of sacks and crates. Could it be that there is more to this cave than meets the eye?
Encounter 1: Wauling Pond
This area serves as the entrance to the Sastasha Seagrot. It is a linear path that curves above the waters below, leading to the Seagrot proper. There is a branch in the path that leads to the Empty Room. The path along is lined with bioluminescient coral, providing dim light. 3 Bats and a Cave Aurelia can be found here. The Jellyfish that reside in this cave are usually unagressive unless they feel threatened, though they are highly perceptive hunters, and usually feed on the bats. The bat's will only attack if their sleep is disturbed.
Encounter 2: Empty Room
This small room contains a bloody memo (DC 13 investigation check) among discarded and broken bits of chests and other tools that should be examined by a member of the. This note contains a piece of information regarding the coral formations found in The Cattery, informing the party of which they should touch so as to avoid triggering the trap. The note will state that "The Capten lykes" an object and its color, indicating the correct color coral formation to pick: "his sees Bloo," "his wyne Redd", and "his kebbage Greene". Roll 1d4, rerolling on a roll of 4. If 1, Blue. 2 is Red, and 3 is green.
Encounter 3: The Cattery
This large, open area is filled with water, which must often be crossed to reach one's destination. 6 Giant Clams are spread evenly throughout this pathway, nestled among the coral and in various alcoves throughout the path. Inside each clam is 1d4 - 1 wisps which have developed a symbiotic relationship with the clams, protecting the clam, and draining the lifeforce of whatever food the clam eats. If the clams are disturbed, they open and release their wisps, which will attack whatever threatens the clams. This leaves the clam vulnerable for 1 round before closing. 1d6 more land jellyfish can be found here, along with 2d4 crabs. The jellyfish share the same behavior as the one from Encounter 1. The end of the area appears to be a dead end, but in fact has a secret door undetectable without a DC 13 Investigation (Int) check. In order to open the door, the party must first select the correct coral formation as indicated in the earlier memo. Pressing the wrong coral formation results in a poison needle trap activating. Alternatively, a successful DC DC 14 nature check (wis) determines which coral is not poisonous.
Waiting behind the hidden door rests Chopper, the Serpent Reavers pet Couerl. It guards the entrance to Dead Man's Drink, the main dwelling of the Serpant Reavers, and attacks anyone it doesn't recognize unless they are accompanied by a Reaver. Chopper is wearing a well made leather collar with a silver name tag worth at least 25 gil. After defeating Chopper, the party is free to move on to the next passage in Dead Man's Drink.
Encounter 4: Dead Man's Drink Entrance
Dead Man's Drink enompasses most of the Sastaha Cavers, starting with the 90 feet narrow winding room leading from the secret passage. Resting at the end of this small narrow room is two Serpant Reavers and their Scurvy Dogs. Serpent Reavers in this area have Bandit stat, and the dogs have the Mastiff statblocks from the Monster Manual. The Reaver races have a 1/2 chance of being a Midlander Hyur or Sea Wolf Roegadyn. In a group of 3 or more, every third Reaver will focus on ranged attacks in favor of melee. The moment they see the adventurers, they target the men, intending to keep any female PCs alive(gross). Beyond this door is The Rambade, Where Captain Madison is located currently.
1
Encounter 5: The First Rambade
Captain Madison is the Captain of the Serpant Reavers, whom are a band of pirates enthralled by Leviathan, working alongside the Sahagin to further the Primal God's goals. He has the stats of a Bandit Captain in the monsters manual, with Midlander Hyur racial features (16 Strength, Speaks Common, Roegadyn, and Sahuagin , wtih the Bandit Captain Variant below. He is paired with two Bandit Serpant Reavers.
Variant: Defensive Bandit Captain
Some Bandit Captains tend to fight more cautiously, and thus employ a shield in their arsenal to better survive attacks. Their Challenge rating remains unchanged, but have the following changes to their abilites.
- The Bandit Captain's AC increases to 17 (Studded Leather, and Shield)
- The Bandit Captain's Multiattack feature instead reads: The captain makes two melee attacks: Two with it's scimitar, or two with it's dagger, or the captain makes two ranged attacks with it's daggers.
Madison is surprised at the sudden intrusion, and a coward, and will flee at the first man that drops, or the first time a PC deals damage to him. To aid in his escape, he wears Boots of Speed to aid in his escape, using all of his actions to get away, or drinking one of his two Potions of Greater Healing if he is wounded to badly. He'll alert the Reavers in Dead Man's Drink on the way. Should he die, he carries a sack of 13 gold gil should he be searched. He'll attempt to escape through the Waverider Gate using the main waverider key, and locking it behind him. He keeps a spare key located in the Captain's Quarters.
Encounter 6: Dead Man's Drink
This large, wood-covered area contains the living quarters of the Serpent Reavers, and shoots off into a number of side passages. The key to Waverider Gate is located in the Captain's Quarters, though the other side rooms do contain treasure. To access the Captain's Quarters, the party must pick up the key dropped by a Shallowscale Reaver in this area, or pick the lock (See Encounter 7). Another Option is to pick the Waverider Gate (See Encounter 8). This Encounter pits the party against 1d6 Serpant Reavers and 2 Scurvy Dogs. Searching the bodies with a DC 11 Investigation Check turns up 20 Silver Gils, and the Key to the Captain's Quarters. There are several captive women serving the pirates, and will cheer the adventurers on, even helping if it seems the adventurers will succeed, picking up fallen weapons from the dead reavers and attempting to fight back with them.
Optional Encounters in Dead Man's Drink
- Rower's Quarters The Rowers' Quarters is a small room containing a few of the Serpent Reavers.
- Navigator's Quarters This area is a small room off to the side of Dead Man's Drink, containing only a couple of Serpent Reavers and a small treasure coffer. The coffer contains 10 Silver gil, and 10 Gold gil, along with a Potion of Healing
- The Hole is the area in which the Serpent Reavers keep their captive women before giving them to their Sahagin masters. The area is sealed off from the rest via a gate, with a key found next to the door by a few Reaver guards.
- Deckhands' Quarters The Deckhands' Quarters is a side passage in Dead Man's Drink containing 6 Serpent Reavers. Luckily, when the party enters the room, the group begins drunkenly fighting among themselves, allowing the adventurers to loot the coffer in the area without drawing attention. The coffer contains a sizeable amount of treasure: 700 Copper Gil, 50 Silver Gil, and 10 gold gil, along with 5 gems worth 50 gold pieces each, and finally, an Ether.
Ether
Potion, rare
You regain 1 spell slot (up to 3rd level) when you drink this red potion. You can drink up to 3 ethers before you can't use another Ether of this variety until you finish a long rest.
Credit to Sly_Owlbeard on DnDBeyond Homebrew
Encounter 7: Captain's Quarters
The Captain's Quarters are unlocked by a key obtained from a Reaver in Dead Man's Drink, or a Successful Dexterity check (DC 15) to pick the lock. They do not, as one might expect, contain the Captain, but instead a First Mate Haerstymm, A Sea Wolf Roegadyn with the basic Bandit Captain Stats, except he wields a basic battleaxe instead of the standard Scimitar. He carries the spare key to the Waverider Gate that Captain Madison fled through. Should Madison die before reaching this point, Replace him with Haerstymm in Encounter 8.
Encounter 8: Waverider Gate
This gate is guarded by two Reavers and leads from the Dead Man's Drink out to the second Rambade. It must be unlocked by a key found in the Captain's Quarters, or a successful DC 15 Dexterity check to pick the lock. This short curving path leads to the Second Rambade, where Captain Madison has fortified himself.
Encounter 9: The Second Rambade
If Madison survived, he will have fortified himself in this 60x60 square foot room after recieving healing alongside two more Reavers. They each carry one Potion of Healing and whatever Greater Healing Potions Madison has left. If Madison died, Haerstymm from Encounter 8 takes his place. The two reavers have readied actions to fire crossbows at whoever enters the room, regardless of friend or foe. If reduced to half their healh, Madison (or Haerstymm) orders one of the Reavers to unleash their 4 Scurvy Dogs locked up on the eastern side room, while he attempts to flee.
2
The dogs are trained to protect The First Mate or Captain, and first attack whomever threatens them the most, while Madison or Haerstymm make their retreat.
Encounter 10: Mistbeard Cove
The final area of this cove encompasses the Second Rambade's exit, along with The Sultana's Lap. This time Madison or Haerstymm will not attempt to alert the Reavers in this area, making straight for The Sultana's Lap. There are a dozen Reavers located here spread out in various states of rest or drunkeness in trios or pairs, along with a couple scurvy dogs. Only 3 of the Reavers have enough wits about them, lazing along the left side of the cavern from the entrance to threaten the adventurers as they make their way through in pursuit of Madison or Haerstymm, or attempt to alert any Reavers nearby. Various sacks of goods ranging from exotic vegetables to ever valuable salt populate this wide area. The Serpant Reavers's ship can be spotted at anchor outside the cove, with wooden walkways built from the sea leading into the cove.
Encounter 11: The Sultana's Lap
Denn the Orcatoothed (see Monsters of Sastasha) resides in this final Area. He is a Sahagin in charge of the Serpant Reavers, and has grown tired of their repeated failures. As the party arrives, he will chastise and strike down Madison (or Haerstymm) before turning his spear on the party. He has various Sahagin servants called Baleen guards he will call upon throughout the encounter, that enter through the 4 grates in the floor. If Denn dies before any Baleen Guards, the guards will attempt to flee instead of continuing to fight.
Rewards
If awarding based on experience, and the party started at Level 3, the party should level up partway through Adventure. Otherwise, it's up to the DM's discretion if they level up or not, though it is recommended before encountering Denn if this adventure proved difficult for the adventurers. After reporting to the appropriate authorities, the party also recieves a Gil reward worth 234 gp, alongside any Treasure they keep for themselves in the adventure.
Monsters of Sastasha
Land Jellyfish
Small beast, Unaligned
- Armor Class 13
- Hit Points 7 (2d4 + 2)
- Speed 0ft., fly 20 ft. (hover)
STR DEX CON INT WIS CHA 10 (0) 16 (+3) 12 (+1) 1 (-5) 10 (0) 1 (-5)
- Skills Perception +10, Stealth +10
- Senses Blindsight 40 ft, passive Perception 20
- Languages --
- Challenge 1/8 (25 XP)
Amphibious. The Jellyfish can breath both air and water.
Transparent. Even when the jellyfish is in plain sight, it takes a successful DC 12 Wisdom (Perception) check to spot the creature if it has neither moved nor attacked. A target that tries to enter the jellyfish's space while unaware of the creature takes 4 (1d4+2) lightning damage and is surprised by the creature.
Amorphous. The jellyfish can move through a space as narrow as 1 inch wide without squeezing.
Actions
Irritating Tendrils Melee Weapon Attack: +5 to hit, reach 5ft., one target. Hit 5 (1d4) lightning damage. If it's target is medium or smaller, the target must succceed on a DC 11 Constitution saving throw, or the target is stunned until the end of its next turn.
Wisp
tiny undead (Voidsent), neutral evil
- Armor Class 17
- Hit Points 16(7d4)
- Speed 0 ft., fly 30 ft. (hover)
STR DEX CON INT WIS CHA 1 (-5) 25 (+7) 10 (+20) 11 (+0) 12 (+1) 10 (+0)
- Damage Resistances Bludgeoning, Piercing, and Slashing from Nonmagical Attacks
- Damage Immunities fire, poison
- Condition Immunities Exhaustion, Grappled, Paralyzed, Poisoned, Prone, Restrained, Unconscious
- Senses passive Perception 17
- Languages Understands the languages it knew in life, but cannot speak
- Challenge 1 (200 XP)
Consume Life As a bonus action, the wisp can target one creature it can see within 5 feet of it that has 0 hit points and is still alive. The target must succeed on a DC 10 Constitution saving throw against this magic or die. If the target dies, the wisp regains 4 (1d6) hit points.
Ephemeral. The wisp can't wear or carry anything.
Incorporeal Movement. The wisp can move through other creatures and objects as if they were difficult terrain. It takes 5 (1d10) force damage if it ends its turn inside an object.
Illumination. The wisp sheds bright light in a 15-foot radius and dim light for an additional number of feet equal to the radius.
Actions
Singe Melee Spell Attack: +4 to hit, reach 5 ft., one creature. Hit: 7 (1d8) fire damage.
3
Giant Clam
large beast, unaligned
Armor Class 17 (Natural Armor) 13 AC (closed)
Hit Points 13(3d8)
- Speed 20ft., swim 40 ft.
STR DEX CON INT WIS CHA 14 (+2) 15 (+2) 11 (0) 1 (-5) 9 (-1) 3 (-4)
- Senses Blindsight 30 ft, passive Perception 9
- Languages --
- Challenge 1/4 (50 XP)
Amphibious The clam can breathe air and water.
If attacked from the inside or while the clam is open, it's AC becomes 13.
Actions
Bite. Melee Weapon Attack: +4 to hit, reach 5ft., one target. Hit 5 4 (1d6 + 2) bludgeoning damage, and the target is grappled (escape DC 12).
Swallow The clam makes one bite attack against a Medium or smaller target it is grappling. If the attack hits, the target is also swallowed, and the grapple ends. While swallowed, the target is blinded and restrained, it has total cover against attacks and other effects outside the behir, and it takes 4 (1d8) acid damage at the start of each of the clam's turns. A giant clam can have only one creature swallowed at a time. If the clam dies, a swallowed creature is no longer restrained by it and can escape from the corpse by using 5 feet of movement, exiting prone.
Coeurl
Medium Beast, unaligned
- Armor Class 13
- Hit Points 43 (5d4 + 12)
- Speed 50 ft., climb 40 ft.
STR DEX CON INT WIS CHA 14 (+3) 16 (+3) 14 (+2) 6 (-2) 14 (+2) 8 (-1)
- Skills Perception +4, Stealth +7
- Senses passive Perception 14
- Languages --
- Challenge 2 (450 XP)
Keen Smell. The Coeurl has advantage on Wisdom (Perception) checks that rely on smell.
Pounce. If the Coeurl moves at least 20 feet straight toward a creature and then hits it with a claw attack on the same turn, that target must succeed on a DC 13 saving throw or be knocked prone. If the targt is prone, the panther can make one bite attack against against it as a bonus action.
Actions
Bite. Melee Weapon Attack: +6 to hit, reach 5ft., one target. Hit 5 (1d6 + 3) piercing damage
Claw. Melee Weapon Attack: +6 to hit, reach 5ft., one target. Hit 4 (1d4 + 2) slashing damage.
Charged Whisker (5-6) The Coeurl unleashes a reserve of charged up electricity from the two long whiskers on it's head in a 15 foot radius centered around it. Each creature in that area except the coeurl must make a DC 12 Constitution saving throw or take 1d8 lightning damage and be paralyzed for 1 minute. A creature can repeat the saving throw at the end of each of its turns, ending the effect on itself on a success.
4
5
Denn, The Orcatoothed
Medium humanoid (Sahuagin), Neutral Evil
- Armor Class 16 (Natural Armor)
- Hit Points 71(13d8 + 13)
- Speed 30ft., Swim 40 ft.
STR DEX CON INT WIS CHA 16 (+3) 14 (+2) 12 (+1) 12 (+1) 13 (+1) 9 (-1)
- Skills Perception +5
- Senses Darkvision 120, passive Perception 15
- Languages Sahuagin, Common
- Challenge 3 (700 XP)
Blood Frenzy. Denn has advantage on melee attack rolls against any creature that doesn’t have all its hit points.
Limited Amphibiousness. Denn can breathe air and water, but he needs to be submerged at least once every 4 hours to avoid suffocating.
Shark Telepathy. Denn can magically command any shark within 120 feet of it, using a limited telepathy.
Actions
Multiattack. Denn makes three attacks with his spear, or one attack with his bite and two with his claws.
Spear. Melee or Ranged Weapon Attack: +5 to hit, reach 5 ft. or range 20/60 ft., one target. Hit 6 (1d6 + 3) piercing damage, or 7 (1d8 + 3) piercing damage if used with two hands to make a melee attack.
Bite.. Melee Weapon Attack: +5 to hit, reach 5ft., one target. Hit 5 (1d4 + 3) piercing damage.
Claws. Melee Weapon Attack: +5 to hit, reach 5ft., one target. Hit 6 (1d6 + 3) slashing damage.
Bonus Actions
Hydroball: Once per day, Denn may unleash a breath of explosive water bubbles from his mouth. All creatures in a 15 ft cone must make a dexterity saving throw or take 2d6 points of cold damage.
Villain Actions
Denn Will use each action once per round after one of the player character's turns, going in numerical order, and starting over after Round 3.
Round 1. The Grates begin rippling unnaturally! The player with the highest passive perception notices the water in the floor grates is beginning to ripple violently, and Sahagin hands can be seen attempting to force the grates open. These Sahagin have 8 HP each, and can be forced to flee by taking damage before the next villain action
Round 2. Baleen Guards to me! Any Sahagin not chased off use half their movement to climb out of the grates, and move towards whoever is closest to their respective grates.
Round 3. Sahagin Frenzy Each Baleen Guard may move 30 ft to the closest enemy, or make one bite attack against an enemy if they are already in melee range.
Recommended Dialogue
This optional set of dialogue can be used to spice up an encounter or be used as a reference point on what npcs will say to the adventurers
Captain Madison (first encounter): "How did you find us!" upon fleeing "Try and catch me, ya landlubbers!"
Captain Madison (Second Encounter): ""Back for more, eh? I sharpened me blade just for the occasion!"
Captive Women in The Hole: "Please Let me out! I promise I won't bite again!" "Mother what did I do to deserve this" "Slit them between the legs. Every Last one"
Captive Women in Captian's Quarters: "I'm not one of them! I swear on what little remains of me virtue!"
Denn the Orcatoothed: To Captain Madison before running him through "Psshhh. You sssully our Spawning Groundsss, Shorewalker!" *Too the Adventurers: "Pshhh! Finleshhh fools! The Lord of the Whorl shall sssup upon your sssouls."