Star Wars: Dawn of Defiance
Episode I - The Traitor's Gambit
The Traitor’s Gambit is the first adventure in the Dawn of Defiance campaign, which will take heroes from 1st level all the way through 20th level in a continuous storyline designed to give both players and Gamemasters a complete SW5e experience. This first adventure will get the heroes together and launch them down a path to making a big difference in the galaxy, and the heroes should advance to 3rd level by the conclusion of the adventure.
Over the course of this adventure, the heroes should become acquainted with one another, meet up with famous Senator Bail Organa, and travel to the remote planet of Felucia to recover a former Imperial Admiral who has information about a secret project that the Empire has hatched in the months since its rise.
What is Dawn of Defiance?
Dawn of Defiance is the name given to a series of 10 linked adventures that Gamemasters can use to create an entire campaign for their players. Set in the months after the events of Revenge of the Sith, the adventures in the Dawn of Defiance campaign are designed to provide players and GMs with the iconic SW5e experience, set against the backdrop of the tyranny of the Galactic Empire. The Dawn of Defiance campaign takes the heroes all the way from 1st level up to 20th level, and features an ongoing storyline that progresses over the course of the campaign. Each adventure can also be played individually, and should provide the heroes with ample challenges to gain two levels per adventure. Gamemasters should feel free to use the Dawn of Defiance adventures either as an entire campaign or as fillers for their own home campaigns.
If you are a Gamemaster wishing to run the campaign, read the GM’s Primer, which summarizes the overall plot of the campaign and the events of each adventure. Other resources related to the Dawn of Defiance campaign include the official campaign standards and an FAQ.
Warning! If you will be playing in a Dawn of Defiance campaign or in a campaign utilizing its adventures, read no further.
Starting the Campaign
The Dawn of Defiance campaign opens some months after the rise of the Empire, with the Clone Wars a very recent and vivid memory for most beings in the galaxy. The Empire has begun tightening its grip on star systems throughout the galaxy, and Darth Vader stands at the newly declared Emperor’s right hand, crushing any opposition and hunting down the last remnants of the Jedi Order. In these short months since the fall of the Republic, many have joined the Empire willingly, including the Core Worlds whose Human nobles stand to benefit a great deal from its tyranny. Similarly, many others have begun rebelling against Imperial oppression, finding themselves driven out of their homes (or worse) and forced to live in a galaxy that tolerates no opposition to the Empire. Throughout the Dawn of Defiance campaign, the heroes must deal with the reality that the Empire is a monolithic threat without any kind of organized opposition, and dealing with agents of the Empire can be dangerous.
Despite the difficulties the heroes face in terms of Imperial dominance, they are in a unique position to deal the first significant blow against the Empire. In the first adventure, the heroes will come face to face with the man who will become their clandestine benefactor, Senator Bail Organa. In the new Empire, seditious acts are punished harshly, and as such the heroes will find that they must be extremely cautious in their actions. With nowhere to run and nowhere to hide, the heroes of the Dawn of Defiance campaign may find that a one-way trip to Kessel is the best they can hope for if they fall into the hands of the Empire.
The first act of the campaign (comprised of the first three adventures — The Traitor’s Gambit, A Wretched Hive, and The Queen of Air and Darkness) introduces the heroes to one another and to some of the key figures in the campaign. Over the course of the first arc, the heroes discover that the Empire has a secret project in the works that could have dire consequences for the galaxy if it comes to fruition. Thanks to the help of former Imperial Admiral Nathan Gilder, whom the heroes should rescue at the conclusion to the first adventure, the heroes learn that the Empire’s secret project has left a trail of money and slaves that they can follow to find the truth. During the first three adventures, the heroes travel to famous planets such as Alderaan, Bespin, Cato Neimoidia, and Felucia, fighting Imperial stormtroopers, destroying secret labs and prisons, encountering vile Hutt gangsters, and participating in a dangerous sabacc tournament where the buy-in might be more than they can afford. The first adventure, The Traitor’s Gambit, is relatively straightforward, allowing the heroes to become accustomed to one another and the SW5e rules. Each subsequent adventure leads the heroes down new paths and introduces different playstyles.
Certain kinds of heroes will find it easier than others to flourish in the Dawn of Defiance campaign. First and foremost, the heroes should view the Empire as both a threat and an enemy. As the major villainous entity of the campaign, the Empire represents something that is to be feared and loathed, and characters with Imperial sympathies will likely find themselves in conflict with the overarching plot. Otherwise, the heroes can come from almost any background and profession. As long as they are willing to fight against the Empire (both covertly and openly), they should find the campaign engaging and exciting. Not every hero needs to be an idealistic freedom fighter; smugglers, bounty hunters, and free traders have just as much to gain from weakening the Empire as rebellious troops do. If the heroes’ motivation is personal profit or increasing their own power, they could do worse than to work for Bail Organa. Not only is he rich, but he is also powerful and influential, and his influence could very easily be transferred to any heroes that get on his good side.
Adventure Summary
After a chance encounter on a space station with a desperate agent of Senator Bail Organa of Alderaan, the heroes negotiate with a local crime lord and obtain valuable cargo intended for the Senator. Once they deliver the cargo, the heroes learn that it is actually a man frozen in carbonite who carries secret information for the Senator. Based on this information, the heroes are hired (as friends of Bail Organa, enemies of the Empire, or freelance entrepreneurs) to fly to the planet Felucia and discover the fate of a turncoat Imperial Admiral. If the Admiral still lives, they are to bring him back to Alderaan.
The heroes arrive to find Felucia under tight Imperial control. After a brief skirmish with some Imperial starships in orbit, their ship makes a hard landing on Felucia to avoid detection. The ship is damaged, though Captain Okeefe believes it can be repaired. Once they are prepared, the heroes venture out into Felucia’s jungles in search of signs of civilization. After fighting their way through the local flora and fauna, they discover a hidden village of Felucians that have fled deep into the jungles to escape Imperial oppression.
The heroes negotiate for a guide to take them to a nearby Imperial facility known to the locals as the “Vanishing Place.” In truth, this is a prison for Imperial dissidents and traitors where Admiral Gilder is being held. The heroes prepare to set off for the prison when a cry goes up in the village—a scout trooper has just spotted the village and is headed back to alert the Empire! This leads into a chase scene in which the heroes ride kybucks in pursuit of the scout trooper. Once the trooper has been stopped, the heroes convince the Felucians to lead them to the Imperial base immediately so that they can rescue the Admiral and stop bringing danger to the hidden village.
The heroes and their guide set off for the Imperial prison facility. It is heavily guarded from the outside, but the Felucian guide knows a secret way in. Once inside the base, the heroes find it more lightly guarded (and more along the lines of what they can handle). During the search for Admiral Gilder, the heroes come across a communication from Imperial Naval Command indicating that Inquisitor Varthis en route to Felucia to take custody of the Admiral. The heroes fight their way through the facility and eventually find Admiral Gilder in the detention block. They free him and head back to the secret entrance where their Felucian guide supposedly awaits their return.
Unfortunately, the heroes find trouble instead. Their guide lies dead, and Imperials are gathering outside the facility. About this time, Captain Okeefe sends the heroes a message: She has completed repairs to her ship and can pick them up when they are ready. On their way to the roof, the heroes must deal with the cruel Captain Vischera and his genetically modified bodyguards. Once they reach the roof, they board Okeefe’s ship and blast off from Felucia.
The adventure concludes as the heroes bring Admiral Gilder to the rendezvous point designated by Senator Organa. There, the heroes are introduced to the Nebulon-B frigate Resurgence, which has been commissioned by Organa to serve as a mobile hiding place for the Admiral. Aboard the Resurgence, Admiral Gilder is debriefed and provides the heroes and Senator Organa with information related to a top-secret Imperial project.
Opening Crawl
For Gamemasters who wish to have an opening crawl before their first adventure, consider using the boxed text below to introduce the Dawn of Defiance campaign:
STAR WARS: DAWN OF DEFIANCE
Episode I
THE TRAITOR’S GAMBIT
It is a dark time in the galaxy. The evil Galactic Empire has spread from the Deep Core to the Outer Rim, and everywhere the Empire’s tyranny can be felt.
Fleeing from the oppression of the Emperor’s minions, agents of Senator Bail Organa have run to a remote space station above Brentaal. Known to be a vocal opponent of the Empire, Organa may be the last hope of freedom in the galaxy.
In the hopes of stopping these dissidents before they can reach the Senator, the Empire has alerted its forces on Sel Zonn Station, where the struggle for liberty rages on, and the first sparks of rebellion have begun to burn...
Part 1: Prelude to Defiance
The Dawn of Defiance campaign opens on an unsuspecting space station orbiting the Core World of Brentaal. Sel Zonn Station is little more than a travel and cargo port, just like dozens of others in orbit around the world. However, the station is also home not only to the Empire and its lackeys among the nobility of Brentaal, but also to the beginnings of the first major resistance group — that of your heroes. In part 1 of The Traitor’s Gambit, the heroes arrive on Sel Zonn Station to find that enemies of the Empire have been struggling to gather a valuable piece of cargo and make their way to Alderaan. When the heroes become embroiled in the plot, they find that they are rescuing an undercover agent frozen in carbonite who has valuable information for Senator Bail Organa. After some run-ins with local information brokers and Imperial agents, the heroes leave Brentaal and head for the scenic planet of Alderaan.
Before the adventure opens, you (the GM) should determine whether the heroes already know one another or whether they are on Sel Zonn Station by chance. If the heroes already know one another, they have simply come to the station for the same reason as many other travelers—to rest, relax, refuel, and prepare for the next leg of their journey. If the heroes do not know one another before the adventure begins, discuss in advance what has brought each hero to Sel Zonn Station. They might be criminals escaping justice on Brentaal, fugitive Jedi on the run from the Empire, legitimate traders or business people passing through, or nobles who have traveled to Brentaal to investigate their financial interests.
Sell Zonn Station
Sel Zonn Station is one of over a dozen XQ2 Space Platforms in orbit around Brentaal. Manufactured by Bengel Shipbuilders some years before the beginning of the adventure, Sel Zonn Station has not flourished since the rise of the Empire. Though it still sees a great deal of traffic from Brentaal and from travelers, the Empire has allowed large sections of the station to languish and fall apart. Thanks to the rise of anti-alien sentiment, especially on the Core Worlds, the more run-down sections of Sel Zonn Station are now inhabited by aliens. As such, a rift divides the station—wealthy, privileged Human Imperial loyalists occupy the nicer sections of the station, while all others are relegated to worn and sometimes dangerous secondary sections.
If the heroes arrive at Sel Zonn Station together aboard the same ship, read the following boxed text aloud.
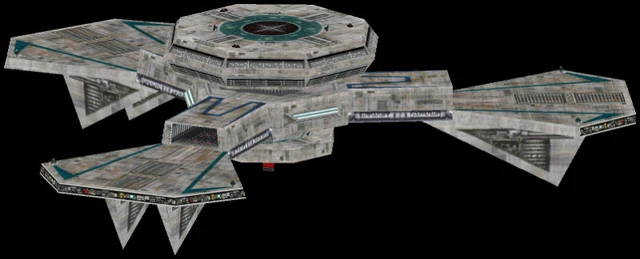
Seemingly motionless among a sea of starships and satellites above the twinkling world of Brentaal, Sel Zonn Station grows larger in your view every second. A central pylon forms the bulk of the station’s mass, and three landing platforms leading to docking bays extend from the central section, equidistant from one another and jutting out into space. The dorsal side of the station features a discshaped secondary structure, on top of which blinking lights indicate the presence of a landing platform reserved for wealthy patrons.
The interior of the space station conforms to the Imperial standard. Since Sel Zonn Station orbits a Core World, it is far better maintained than other structures of its age, and the main areas see constant renovations and repairs. However, a few steps off of the beaten path quickly reveal that the station is rotting from the inside out. A short walk away from the main venues leads to decrepit sections of the station, filled with broken lights, tarnished metal walls, missing deck plates, and all manner of suspicious aliens that have been driven out of the nicer sections by the Empire.
Aboard Sel Zonn Station, all doors and walls are made of metal and conform to the standard statistics for objects. Slicing the station’s central computer system has a DC of 27 and the computer will trace any failed slicing attempt to the terminal from which it was made. The station’s information terminals can be found at regular intervals throughout public areas and in private rooms. These terminals can provide basic information on the layout and facilities of the station, but not much else. Each terminal is connected to the central computer system.
In addition to providing boarding and supply services, Sel Zonn Station is host to a number of businesses that cater specifically to travelers. All shopkeepers on Sel Zonn Station sell at the prices listed in the Saga Edition Core Rulebook. Almost all shops are located on the Promenade, though a few are off the beaten path. Some of the most popular establishments include:
- Gundark’s Cantina: Owned and operated by a gruff Human male named “Gundark” Saff, Gundark’s Cantina is a place where people from all walks of life can come to relax. Though Gundark himself shows some anti-alien bias, he does not prevent non-Humans from patronizing his establishment. As such, it is a popular meeting place for nearly anyone on the station, and it features a large number of secluded booths for private conversations.
- The Credit Chip: A local casino that attracts a wide variety of patrons, the Credit Chip is operated by a quiet and brooding Human named Cecil Vane. Vane doesn’t like what the Empire has done to the station, especially since they don’t take it too well when he cheats Imperial officers out of their money. The most popular games in the galaxy, including sabacc and pazaak, see a lot of play here.
- Delgas Medical Supplies: A corporate medical practice and pharmaceutical supplier, Delgas Medical Supplies provides care to those who can afford it. The chief doctor in the practice is Byra Fenn, a talented Human woman with secrets to keep. Dr. Fenn has had extensive dealings with one of thestation’s information brokers, a protocol droid named Switch, and she owes him several favors.
- Mechanical Allies: A droid repair and sales shop, this is one of the few businesses run by a non-Human that hasn’t been hut down by the Empire. Operated by an untrustworthy wi’lek named San, Mechanical Allies sells all manner of droid parts and reconditioned droids. Despite the fact that most of his droids are faulty, San has remained in business thanks to his own savvy and his ability to buy off the Empire from time to time.
There are two primary sources of law enforcement aboard Sel Zonn Station. The Empire has a moderate presence, with a garrison aboard to keep the peace and enforce Imperial law. In addition to stormtroopers and Imperial officers, Brentaal’s planetary security force keeps a watchful eye on everything that happens on Sel Zonn Station. The planetary security force gets along well enough with the Empire, though questions of jurisdiction have caused tension between the two in the past. For the most part, the planetary security force operates out of the local security office, where it keeps a number of cells open for criminals and malcontents. Those captured by the Empire, however, are incarcerated in the security office briefly before being transported via shuttle to the planet’s surface. Customs enforcement is relatively light simply because large cargo haulers cannot dock with the station. As such, usually only a single customs officer is on hand for any cargo inspection.
The main commercial area of Sel Zonn Station is known as the Promenade. Filled with shops of all kinds, as well as large, open seating areas with fountains, plants, and other decorations, the Promenade is where Brentaal’s nobles and other station visitors go to enjoy themselves. Security is tight on the Promenade, and Imperial forces are on hand at all times to keep the peace. Additionally, the Empire tries to keep the area free of aliens, and as such they harass any non-Humans moving about the Promenade. Although they won’t go so far as to arrest anyone, they often try to start fights with aliens just to have an excuse to lock them up. For this reason, most non-Humans tend to stay clear of the Promenade, except on rare occasions.
First Contact
When The Traitor’s Gambit opens, the heroes are congregating (either together or by chance) in the Promenade, where their destinies await them. It is a typical day on the Promenade, with a slightly sparser crowd than usual. When the heroes arrive, read the following text aloud:
The Promenade is filled with the bustle of revelry and commerce. Spilling out of the gambling halls are the sounds of victory and the moans of defeat, while the music of local bands issues from the cantinas. Only a handful of citizens mill about in the main areas of the Promenade, a few gazing out the massive windows at the planet Brentaal hovering below. Businesspeople hawk their wares to the passersby, and a few security officers make their way down the main avenue of the Promenade on their usual patrol at a leisurely pace.
After the heroes have had a moment to soak in the sights and sounds of the Promenade, give them each a chance to make a DC 10 Perception check. Those who succeed on the roll notice two men loitering on the Promenade who do not appear to be part of the larger crowd. Each seems to be scanning the crowd closely as though looking for someone, though they pay no attention to the heroes. Those who succeed on the Perception check with a roll of 15 or higher also notice that, despite wearing normal traveling clothes, each man is carrying a hold-out blaster tucked into his jacket, and both men are wearing identical garments. Those who succeed on the check with a 20 or higher also notice that both men seem to be whispering to themselves, obviously speaking into hidden comlinks.
Within moments, a slender woman wearing the greasy clothes of a mechanic stumbles down the Promenade. Though she is trying to hide it, she has clearly been wounded somehow, and she looks disheveled. Once the heroes have had a chance to see the woman, the two men make their way toward her, and she turns and runs toward the nearest hero (or toward the heroes who are closest to one another). She pleads for assistance, offering credits to anyone who will help her. The two men give chase, and the first encounter begins.
The woman is Maya, an Alderaanian Security agent, and the men are undercover informants for the Empire.
Promenade Shootout - CR 1
Setup
The open area of the Promenade features few places to hide during this encounter. The heroes find themselves boxed into a small, enclosed area when combat begins. Disperse the heroes throughout the Promenade, place the two security officers near the south entrance, and place the two Imperial informants at the north entrance.
Read-Aloud Text
After the heroes make their Perception checks to notice the two Imperial informants (whether they succeed or fail), introduce Maya, the stumbling Alderaanian Security agent who approaches the heroes and pleads for assistance:
A woman with short black hair and the greasy uniform of a mechanic comes stumbling onto the Promenade, clutching her midsection as though injured. She struggles to make her way across the floor in your direction, though clearly she is having difficulty walking.
“Please, help me,” she calls out to you. “There are credits in it for you, just help me!”
Mere seconds later, two security officers burst into the area from the south end of the Promenade. They raise their blasters, aiming them at the woman, and shout through their helmet speakers, “Step away from that woman. You are all under arrest in the name of the Emperor!”
Sell Zon Station Security Officers (2)
The Empire doesn’t send its best and brightest to Sel Zonn Station; instead, the post is usually patrolled by badly paid security officers. Though armed with blaster carbines and light armour, these officers don’t have the experience that other troops do, and are prone to missing their targets under fire.
Security Officer
Medium humanoid, lawful balanced
- Armor Class 12 (Heavy Combat Suit)
- Hit Points 9 (2d8)
- Speed 30 ft.
STR DEX CON INT WIS CHA 12 (+1) 11 (+0) 11 (+0) 10 (+0) 10 (+0) 10 (+0)
- Senses passive Perception 12
- Languages Galactic Basic
- Challenge 1/8 (25 XP)
Actions
Blaster Carbine. Ranged Weapon Attack: +2 to hit, range 60/240 ft., one target. Hit 3 (1d6) energy damage. Reload 16.
Suppress. The security officer sprays a 10-foot-cube area within normal range of its carbine with shots. A creature in the area takes the weapon's normal damage, or half damage on a successful DC 10 Dexterity saving throw. This action consumes 8 ammunition.
Stock Strike. Melee Weapon Attack: +3 to hit, reach 5ft., one target. Hit: 3 (1d4+1) kinetic damage.
Security Officer Tactics
These security officers are solely concerned with capturing Maya, the Alderaanian Security agent. They are trigger happy, though, and are more than willing to shoot anyone who stands in their way. When the encounter begins, they attempt to stun Maya but use lethal force against any other opponents.
Imperial Informants (2)
Recruited to report on suspicious activity on Sel Zonn Station, the Imperial informants are regular citizens who have thrown their loyalty over to the Empire. These informants don’t have the same kind of training that other Imperial agents do. In fact, they are little more than eager civilians who have been given a blaster and some basic combat training. They wear plain clothes, carry hold-out blaster pistols, and keep a comlink buttoned on the inside of their collars at all times.
Dressed in traveler’s clothes and carrying poorly concealed hold-out blaster pistols, these civilians seem as though they are keeping a watchful eye on nearly everyone at the same time.
Imperial Informant
Medium humanoid, lawful dark
- Armor Class 10
- Hit Points 9 (2d8)
- Speed 30 ft.
STR DEX CON INT WIS CHA 12 (+1) 10 (+0) 10 (+0) 11 (+0) 13 (+1) 11 (+0)
- Senses passive Perception 13
- Languages Galactic Basic
- Challenge 1/8 (25 XP)
Actions
Hold-Out. Ranged Weapon Attack: +2 to hit, range 30/120 ft., one target. Hit 2 (1d4) energy damage. Reload 6.
Vibrodagger. Melee Weapon Attack: +3 to hit, reach 5ft., one target. Hit: 3 (1d4+1) kinetic damage.
Imperial Informant Tactics
The Imperial informants have bought into the Empire’s propaganda and are willing to risk their lives to help bring enemies of the state to justice. Unlike the security officers, they don’t realize that Maya is wanted alive and use lethal force against her. However, when the heroes intervene, the informants ignore Maya and focus solely on the heroes.
Maya, ALderaanian Security Agent
The woman begging the heroes for help is Maya, an agent of Alderaanian Security who has been grievously wounded in a run-in with the Empire on Sel Zonn Station. She has four levels of exhaustion (presented as the first statistics block below), meaning she doesn’t have much fight left in her. Maya desperately reaches out to the heroes for help.
This slender, black-haired woman wears a blue uniform like that worn by many mechanics and repair crews aboard Sel Zonn Station. Her face and clothes are smudged with grease, and her look suggests that she has been in more than a few firefights.
Maya (Wounded)
Medium humanoid, chaotic Light
- Armor Class 14 (Combat Suit)
- Hit Points 2 (1d8+1)
- Speed 30 ft.
STR DEX CON INT WIS CHA 10 (+0) 16 (+3) 12 (+1) 14 (+2) 10 (+0) 14 (+2)
- Saving Throws Dex +5, Int +4
- Senses passive Perception 12
- Languages Galactic Basic, Huttese
- Challenge 1/8 (25 XP)
Sneak Attack (1/Turn). Maya deals an extra 3 (1d6) damage when she hits a target with a weapon attack and has advantage on the attack roll, or when the target is within 5 feet of an ally that isn't incapacitated and she doesn't have disadvantage on the roll.
Actions
Blaster Pistol. Ranged Weapon Attack: +5 to hit (disadvantage), range 40/160 ft., one target. Hit 5 (1d6+3). Reload 12.
Vibrodagger. Melee Weapon Attack: +2 to hit (disadvantage), reach 5ft., one target. Hit: 2 (1d4) kinetic damage.
Maya (Normal)
Medium humanoid, chaotic Light
- Armor Class 14 (Combat Suit)
- Hit Points 5 (1d8+1)
- Speed 30 ft.
STR DEX CON INT WIS CHA 10 (+0) 16 (+3) 12 (+1) 14 (+2) 10 (+0) 14 (+2)
- Saving Throws Dex +5, Int +4
- Senses passive Perception 12
- Languages Galactic Basic, Huttese
- Challenge 1/2 (100 XP)
Sneak Attack (1/Turn). Maya deals an extra 3 (1d6) damage when she hits a target with a weapon attack and has advantage on the attack roll, or when the target is within 5 feet of an ally that isn't incapacitated and she doesn't have disadvantage on the roll.
Actions
Blaster Pistol. Ranged Weapon Attack: +5 to hit, range 40/160 ft., one target. Hit 5 (1d6+3). Reload 12.
Vibrodagger. Melee Weapon Attack: +2 to hit, reach 5ft., one target. Hit: 2 (1d4) kinetic damage.
Maya's Tactics
Maya’s chief concern is survival. She tries to find cover and hide, hoping that the heroes will take care of the Imperial agents that are after her. She will assist when possible, but her persistent condition makes her good for little besides encouragement and motivation. Maya fights defensively on every round, taking no attacks, and always tries to hide behind something to gain cover from attackers.
Encounter Map

Conclusion
When the encounter ends, the heroes should realize that reinforcements are likely on the way. In fact, 10 rounds after combat ends, a squad of stormtroopers arrives. If the heroes have departed before this time, they are not pursued.
Development
Once the heroes subdue the Imperial informers and defeat the security officers, they must quickly get to safety before reinforcements arrive. If the heroes did not manage to save Maya, a datapad she carries contains notes on “V14” and “Switch” as clues to the location of some valuable cargo. The heroes should be able to make Investigation checks to learn what those words mean. A successful DC 10 check reveals that V14 is a deep storage bay on the station. A successful DC 15 check reveals that information, plus the fact that Switch is a well-known droid information broker that operates from a secret location within the station. The heroes should be able to figure out that something important (and possibly profitable) is going on, and they should be on the right track to discover V14’s secrets.
If the heroes keep Maya from being killed in the fracas, she directs them to safe quarters where they can talk. She is still grievously wounded and has four levels of exhaustion that can be removed only with surgery or a dip in a bacta tank. However, despite her injuries, she tells the heroes enough to set them on the right path. They need to get to deep storage bay V14, where a droid named Switch can provide them with the location of some very valuable cargo. According to Maya, Switch was responsible for receiving and storing this cargo, which was shipped all the way from the Deep Core. Maya was supposed to contact Switch, recover the cargo, and deliver it to Senator Bail Organa of Alderaan. She reveals that she is a member of Alderaanian Security and part of Organa’s personal security detail, and that she was waylaid by the Empire mere hours after arriving on the station. Apparently, the fact that she works for a vocal opponent of the Emperor has flagged her as a troublemaker, and the Empire wants her off the station one way or the other.
If the heroes agree to help her further, Maya assures them that Bail Organa will be happy to reward them for their efforts, and she emphasizes that the work they are helping her with could save the lives of many innocent beings. She doesn’t go into more detail than that, but she assures the heroes that her mission advances the cause of good. If the heroes can procure the cargo from Switch, she will provide them with transport from Sel Zonn Station to Alderaan. Unfortunately, due to the recent confrontation, the heroes will need to keep a low profile, and Maya herself must remain safe in her quarters until fully healed.
If the heroes take her up on her offer, Maya entrusts them with directions to bay V14 and tells them to contact her when they procure the cargo.
Deep Storage Bay V14
If the heroes want to learn more about the deep storage bay V14, they can do so in a variety of ways. Any informational computer terminal on the station can confirm that bay V14 is on a level that is off limits to non-Imperial personnel. If the heroes attempt to access further information on V14 it can be obtained with the technology skill at a DC of 15. A successful check reveals that bay V14 is in a section of the station that has been quarantined for over a year and a half, yet no maintenance requests have been made for repairs to that section. Additionally, the terminal reveals that deep storage bay V14 is located along one of the station’s primary exhaust systems, meaning that exhaust conduits should be running right through the storage bay.
An Investigation check regarding storage bay V14 has a DC of 10 and counts as learning local news or rumors. Success reveals that despite the fact that V14 is in a quarantined zone, a large number of aliens are often seen going into that zone. Rumor has it that the aliens operate some kind of criminal organization out of that section of the station, and that a contingent of Gamorreans is always on guard near the deep storage bay.
An attempt to learn secret information about bay V14 has a DC of 20 and reveals that since the quarantine was put into place, the station manager has been taking bribes to keep it that way. The bribes are delivered to the manager on a monthly basis by an unsavory-looking Twi’lek, and though the Empire doesn’t like it, the local security forces ensure that Imperials never get too close to the quarantined areas.
When the heroes finally arrive in the vicinity of deep storage bay V14, they find that they have entered a very neglected part of the station. Many of the lights have burned out, and blaster marks and carbon scoring mar the walls, ceiling, and floor. The area reeks of ozone and electrical fires, and pools of coolant litter the hallways at regular intervals. After winding their way through a near-labyrinth of decrepit corridors, the heroes come upon bay V14, which is guarded by a pair of Gamorreans wielding vibro-axes. (Use the generic thug statistics on page 44 of the SW5e Monster Manual for the Gamorreans.)
If the heroes approach openly, the Gamorreans take no hostile actions and seem concerned only with blocking the doors. If the heroes approach stealthily, the Gamorreans are not likely to notice and seem more interested in conversing in their grunting language than in watching for outsiders.
If the heroes attempt to persuade the guards to let them in to see Switch, they might find it easier than they suspect. Provided that the heroes do not attack them on sight, if the heroes make a successful DC 11 Persuasion check, the guards let them inside. A bribe of at least 50 credits grants the heroes a +5 circumstance bonus on any Persuasion checks against the guards.
Once the heroes enter bay V14, read the following text aloud:
The deep storage bay is as run-down as the hallways leading up to it, with entire metal plates missing from the floor and a huge, open exhaust shaft near the back of the room. Large crates litter the area, creating the appearance of a haphazard mess, and the air has a distinct smell of sweat and fumes that makes the entire area unpleasant. Flickering lights provide modest illumination, and a burst pipe along the ceiling leaks blue fluid down one wall.
Near the center of the room is an item that seems very out of place — a large, finely crafted desk made of Japor ivory wood, which means that the desk is both priceless and rare. Sitting peacefully behind the desk is a protocol droid with shiny, ebony coverings that seem to soak up light and offer only the slightest reflection. The droid’s eyes flicker slightly, as though imitating a person blinking rapidly.
At first glance, Switch, the protocol droid information broker, appears to be the only occupant of the storage bay, but several of his thugs and associates are also spread throughout the room. Three bodyguards hide behind crates scattered around the room, and the heroes can make Perception checks (opposed by the thugs’ Stealth checks) to notice them. Additionally, Switch’s most valued companion - a blue-and-red astromech droid with the designation R5-B8 - beeps and burbles quietly besides the protocol droid, seemingly lost in its own world. Lastly, Switch’s majordomo, a Twi’lek thug, stands quietly off to one side, not actively hiding but also not clearly visible until the heroes approach the desk.
Meeting with Switch
Switch is a curious protocol droid that has clearly gone a long time since his last memory wipe. A self-fashioned information broker and budding crime lord, Switch has aspirations to sophistication that are likely remnants of his protocol droid programming. With a male personality and a Coruscanti-Imperial accent, Switch could fit in among Brentaal’s nobility if he were not a droid. When he speaks, he does so cheerfully and lightly, as though his power and prestige leaves him without a care in the world. It is unclear how a protocol droid managed to convince a number of living beings that he should be their leader, but the fact that the thugs follow Switch loyally is a testament to his persuasive skills and his acumen as a crime lord.
When the heroes arrive in bay V14, Switch greets them warmly and welcomes them to his domain, regardless of how they enter. Even if the heroes killed the Gamorreans to get inside, Switch seems unfazed. As a protocol droid, he has no concept of the fragility or the value of life, a fact that makes him both easy to get along with and incredibly dangerous. After introducing himself and R5-B8, Switch offers the heroes a drink from his extensive collection of beverages; for a droid that does not consume, he has exceptionally refined tastes. Once his guests have been made comfortable, Switch explains that his services are available to anyone who can pay, and he implores the heroes to tell him why they have come.
The heroes have several challenges throughout their encounter with Switch, though only one is critical to the ongoing plot of the adventure. They must convince the droid to reveal the location of the cargo he is keeping for Maya and to turn that cargo over to them. The following encounter challenges demonstrate how the heroes can affect the outcome of the encounter:
Critical Challenge
The heroes need to get their hands on whatever cargo Switch is holding for the Alderaanian Security officer, Maya. If they can make a DC 17 persuasion check, Switch acknowledges that he is holding cargo for Maya but does not tell them where. If they manage to get Switch talking, however, their options expand greatly.
Once Switch has been persuaded to admit possession of Maya's cargo, he is willing to accept payment to release it to the heroes. For the “eminently reasonable” sum of 1,000 credits, they can take the cargo wherever they wish. If the heroes don’t have that much money, or if they don’t want to spend that much, Switch is willing to accept less, provided that one or more of the heroes agrees to supply him with information on a regular basis from wherever their travels may take them. Each hero who agrees to this deal reduces the required payment by 200 credits. Of course, the heroes can agree with no intentions of sending information to Switch in the future, but doing so might have dire repercussions. (Any such consequences are beyond the scope of this adventure, but feel free to include your own adventures and enemies later in the campaign.) On the other hand, the heroes might like the idea of working for a droid crime lord, even indirectly, which can open up plot hooks of its own.
Once Switch is satisfied, he reveals that the cargo is in the main docking bay on Blue Deck, a section of the station heavily traveled by Imperial loyalists and one of the few places where Imperial ships dock. If the heroes fail to convince Switch to give them the cargo, they might have another chance to succeed; see the development section of “Arrival of Ganga Lor” (below).
Auxhiliary Challenge 1
Whether or not Switch agrees to turn the cargo over to the heroes, he does not freely volunteer the nature of the valuable goods. However, a simple bribe of 50 credits is enough to get him to reveal the secret. The cargo is, in fact, another agent of Alderaanian Security who has been frozen in carbonite for transport from the Deep Core world of Empress Teta. The agent had himself frozen so that he could be transported as cargo rather than as a passenger, reducing the chance that the Empire would find and arrest him.
Auxhiliary Challenge 2
After learning that they will be obtaining a person frozen in carbonite, the heroes might press Switch for more information on why the agent was smuggling himself from Empress Teta. This information requires a bribe of 200 credits, which the droid accepts only if the heroes were able to persuade him. If the bribe is paid, Switch reveals that the Alderaanian Security agent was spying on the Empire’s secret interests in the Deep Core. In the months since the rise of the Empire, hundreds of warships have sealed off the few known trade routes into the Deep Core, only allowing wealthy Imperial loyalists in or out of that region of space. Over the last few months, the Empire has set up the Deep Core Security Zone, and Emperor Palpatine himself has overseen the transfer of large amounts of resources and nobles loyal to the Empire into the Deep Core. The frozen security agent had been scouting one of the dozens of worlds that the Empire had discovered during its recent expansion into the Deep Core.
Auxhiliary Challenge 3
In addition to the possibility of working for Switch, the heroes have a chance to make the droid a permanent contact and ally in the Core Worlds. If the heroes managed to persuade him, Switch is open to the idea of providing information the heroes need, wherever they may be. However, convincing Switch that this is a good idea is a bit more difficult. A down payment of 500 credits is enough to convince the droid that a deal is in his best interests. Other kinds of compensation work as well, provided that any items offered have a market value of roughly 500 credits.
Auxhiliary Challenge 4
Once the heroes convince Switch to turn over Maya’s cargo, they also have the opportunity to make a bit of a profit. In addition to the cargo he is holding for Maya, Switch has a crate of bottles of Corellian ale that is bound for Alderaan. If, over the course of their conversations with the protocol droid, the heroes mention that they have access to a ship, Switch offers them a small fee to deliver the ale to Alderaan, with the promise of 500 additional credits on delivery. The Corellian ale is stored in the same docking bay as the frozen security officer, in a crate that can be carried by a single person. If the heroes agree to deliver the crate, they can do so without complications once they arrive on Alderaan. The credits will be sent to an account that Switch sets up on Alderaan, from which the heroes can easily retrieve their payment.
Ad-Hoc XP Award
If the heroes successfully negotiate with Switch for the frozen Alderaanian Security agent, award them experience points as if they had defeated a CR 2 opponent.
Switch
Medium droid, neutral balanced
- Armor Class 10 (Combat Armor)
- Hit Points 13 (3d8)
- Speed 30 ft.
STR DEX CON INT WIS CHA 8 (-1) 9 (-1) 10 (+0) 13 (+1) 13 (+1) 14 (+2)
- Saving Throws Dex +1, Int +3
- Condition Immunities Poison, Disease
- Resistances Necrotic, Psychic
- Vulnerabilities Ion, Lightning
- Senses passive Perception 13
- Languages All Registered
- Challenge 1/4 (50 XP)
Actions
Hold-Out. Ranged Weapon Attack: +1 to hit, range 30/120 ft., one target. Hit 1 (1d4-1) energy damage. Reload 6.
Arrival of Ganga Lor
Once the heroes have concluded their business with Switch, an unexpected visitor arrives. If the heroes left the Gamorrean guards alive, they now die squealing amid a hail of blaster bolts, which can easily be heard from inside bay V14. Bursting into the room is Ganga Lor, a Chevin gangster, and a handful of his thugs. When he pushes his way into the room, Ganga Lor shouts in Basic, “So you thought you could hide your deal with the offworlders from me, droid? I’m tired of not getting my cut! Turn him into a scrap heap, boys!” With that, Ganga Lor’s thugs attack Switch and the heroes, who are now caught up in a gang fight.
Ganga Lor's Grudge - CR 3
Setup
The heroes, Switch, and his thugs should be set up away from the door, behind some of the crates near the middle and back of bay V14. When the encounter begins, Ganga Lor and his thugs enter through the same double doors the heroes came through.
Read-Aloud Text
Read the following text aloud when the Chevin and his enter the bay.
Blaster fire sounds from outside in the hall, and suddenly the blast doors leading into the storage bay slide open to reveal a number of armed thugs outside. In the midst of the rabble is a large Chevin, his trunk hanging low to the ground and his mouth twisted in a snarl.
“So you thought you could hide your deal with the offworlders from me, droid? I’m tired of not getting my cut! Turn him into a scrap heap, boys!”
Ganga Lor
Ganga Lor is a Chevin petty crime lord who has been engaged in a rivalry with Switch for years. Ganga Lor came to the station around the same time as Switch, and the two have never gotten along.
This massive Chevin looks old, even for his species. His trunk hangs low and scars cross his face, giving him a weathered look that matches his leathery skin. His clothes are little more than rags, and a large blaster pistol pokes out from beneath his vest as though ready to be drawn on a moment’s notice.
Ganga Lor
Medium humanoid, chaotic dark
- Armor Class 14
- Hit Points 37 (5d8+15)
- Speed 30 ft.
STR DEX CON INT WIS CHA 10 (+0) 8 (-1) 16 (+3) 12 (+1) 14 (+2) 15 (+2)
- Condition Immunities None
- Senses passive Perception 14
- Languages Galactic Basic, Chevin, Huttese, Rodese, Shyriiwook
- Challenge 1/2 (100 XP)
Actions
Blaster Pistol. Ranged Weapon Attack: +1 to hit, range 40/160 ft., one target. Hit 2 (1d6-1) energy damage. Reload 12.
Thick Skull. Melee Weapon Attack: +2 to hit, reach 5ft., one target. Hit 3 (1d6) kinetic damage.
Ganga Lor's Tactics
Ganga Lor is no fool, but he is a coward. He immediately seeks cover when the fight begins, letting his thugs take risks in his place. If the heroes seem to be targeting him specifically, Ganga Lor takes the dodge action. If the heroes don’t seem to be paying any attention to him, he stays at range and uses his blaster pistol.
He is carrying a datapad and 300 credits.
Thugs (7)
Thug
Medium humanoid, chaotic balanced
- Armor Class 13 (Heavy Combat Suit)
- Hit Points 11 (2d8+2)
- Speed 30 ft.
STR DEX CON INT WIS CHA 13 (+1) 11 (+0) 12 (+1) 8 (-1) 9 (-1) 10 (+0)
- Senses passive Perception 11
- Languages Galactic Basic
- Challenge 1/8 (25 XP)
Actions
Blaster pistol. Ranged Weapon Attack: +2 to hit, range 40/160 ft., one target. Hit: 3 (1d6) energy damage. Reload 20.
Vibroaxe. Melee Weapon Attack: +3 to hit, reach 5 ft., one target. Hit: 7 (1d12+1) kinetic damage.
Thug Tactics
The thugs have no real strategy to their actions; they are straight-up fighters who care little for complex tactics. However, Switch’s own thugs take pains not to hit Ganga Lor’s goons—the Chevin secretly paid them to miss on purpose so that he could take Switch down more easily. If Ganga Lor sees that the fight is going badly for him, he calls upon Switch’s thugs to switch sides, which they do. (This is a good opportunity to increase the challenge of the encounter later in the fight. On the other hand, if the fight is going poorly for the heroes, or if it might go either way, don’t have Switch’s thugs change sides at all.)
Features of the Area
Switch’s hideout in deep storage bay V14 follows along an exhaust conduit running through the bowels of the station. As such, a large chasm cuts through the back of the bay, leading down into the station’s central reactor core. Anyone falling into the chasm is likely killed, taking maximum falling damage and lethal doses of radiation from the reactor core.
Conclusion
When the encounter ends, Switch thanks the heroes for their assistance and tells them that Ganga Lor brought all of his cronies to the fight. Thus, the heroes have little to fear in the way of reprisals from the Chevin’s organization.
Development
Switch is most grateful for the heroes’ assistance in the fight. If they had not yet convinced the droid to turn over Maya’s cargo, he agrees to do so now (otherwise, he agrees to one of the auxiliary challenges free of charge). Additionally, if the heroes need medical attention, he promises to call in a favor with Dr. Fenn of Delgas Medical Supplies to get them treated free of charge.
If Switch does not survive the encounter, the heroes can learn the location of Maya’s cargo by slicing into the computer in his desk (DC 18).
When the encounter with Switch is concluded, the heroes can head to Blue Deck’s main docking bay and retrieve the cargo.
Encounter Map

Blue Deck
Blue Deck is one of the nicest and most dangerous sections of Sel Zonn sation. Reserved almost exclusively for Imperial loyalists and off-duty personnel, Blue Deck is a combination of luxury and fanatical devotion to the Empire. Everything on Blue Deck is pristine and well maintained, with none of the technical problems seen elsewhere on the station. Propaganda posters for Emperor Palpatine cover the walls, and the insignia of the Empire is found almost everywhere the eye can see. Security officers guard every entrance and exit to Blue Deck, and while they examine everyone closely, they make no move to stop anyone from coming or going - at least, not often.
The anti-alien bias encountered on the Promenade is even worse here. Shopkeepers steadfastly refuse to serve non-Humans, and cantina bouncers prevent them even from entering the establishments. Very few aliens walk the halls of Blue Deck, and those that do are usually servants or slaves of nobles and Imperial agents.
When the heroes arrive on Blue Deck, read the following text aloud:
As the turbolift doors slide open and you step out onto Blue Deck, it is like entering a wholly different space station. The floors are polished and possess a metallic sheen, and the massive windows along one wall grant the most magnificent view of Brentaal available on the station. Maintenance and service droids flit about from one place to the next, keeping everything clean and ordered.
Moving about the halls of Blue Deck are large numbers of Humans, most of them wealthy by all appearances. They pay little attention to the few aliens found in the area, except, perhaps, to sneer as they pass.
When the heroes reach Blue Deck, they might head directly to the main docking bay, which is fine but leaves them ignorant of developments in the hangar bay. If the heroes take the time to make a DC 10 investigation check to retrieve local news and rumors, they discover that the Empire has just sent an entire squad of security officers to the main docking bay to check out some suspicious cargo. If the heroes do not try to make an investigation check, they can learn the same information by making a successful DC 20 Perception check to overhear two nobles talking about the situation.
Skig Banos, Imperial Informant
As the heroes make their way across Blue Deck, they see a face that might be familiar. Any heroes who managed to notice the two Imperial informants on the Promenade before Maya approached them now also notice a similarly dressed man on Blue Deck. In fact, any hero who succeeds on a DC 15 Perception check realizes that this man was on the Promenade earlier but fled at the first sign of blaster fire. The man is Skig Banos, an Imperial informant and world-class coward. With a mop of greasy black hair and a physique that is little more than skin hanging off bones, Skig looks a bit on the pathetic side. His beady eyes and oversized nose give him a more sinister edge, causing him to resemble a wild womp rat eager to escape captivity.
If the heroes confront Skig, he immediately tries to escape. If the heroes manage to stop him without making too much of a ruckus, they should be able to interrogate him and get a bit more information about what is going on. Skig is too afraid of being harmed by the heroes to raise an alarm, and though he acts unfriendly at first, a successful DC 17 Persuasion check can make him more amenable. Similarly, a successful DC 12 intimidation check can make him more helpful.
If either of these checks succeed, Skig is willing to tell the heroes almost anything so that they will let him go. This includes lying to them - he makes Deception checks every round at +2 until caught in a lie - and Skig’s lies include that the Empire has discovered them, that the Empire has killed Maya, and that he’s just a merchant out for a walk on Blue Deck. An indifferent Skig simply wants to get away, and he does everything he can to escape without getting killed or raising an alarm. Truthfully, Skig is equally scared of the Empire and fears that they will betray him at any time.
If Skig can be made friendly, he actually volunteers useful information. He knows that the Imperials were recently tipped off about contraband in the main docking bay (by one of Ganga Lor’s toadies looking to make a few quick credits, though Skig doesn’t know that) and have gone to investigate. He saw at least three security officers and their sergeant head toward the docking bay, though he thinks there may be more in the bay. Additionally, Skig saw them moving a repulsor sled into the main docking bay, meaning that they have some heavier weapons at their disposal. With this information in hand, the heroes should be a bit better prepared for the fight ahead of them.
Main Docking Bay
The main docking bay on Blue Deck is used by the Empire to ferry cargo and personnel from the station to the surface of Brentaal and back. Switch managed to get Maya’s cargo stored here by calling in some favors, reasoning that the Empire would not think anyone would be bold enough to hide contraband right under their noses.
The main docking bay is a large, open area with a control room and two side storage rooms.
Frozen Goods - CR 3
Setup
When the encounter begins, all of the enemies except for the security officer on the repulsor sled are in the main hangar. Two officers flank the middle door on the western side of the hangar, waiting for the repulsor sled to move out and drag the carbonite block with it. The repulsor sled is in the upper storage room, towing the carbonite block, and emerges on the first round. The remaining two officers stand by the crates on the eastern side of the hangar bay, with their captain standing a few steps away giving orders.
Read-Aloud Text
Read the following aloud when the heroes enter the main docking bay:
The massive hangar smells of exhaust fumes and spilled coolant and appears to have seen quite a bit of activity recently. Crates stand stacked up throughout the hangar, waiting for whatever shuttle is to transport them down to the surface. Three doors lead off the left side of the room; the bottom two are close together, and the top door leads into a control room with a transparent window overlooking the hangar itself.
Sell Zon Station Security Officers (4)
Security Officer
Medium humanoid, lawful balanced
- Armor Class 12 (Heavy Combat Suit)
- Hit Points 9 (2d8)
- Speed 30 ft.
STR DEX CON INT WIS CHA 12 (+1) 11 (+0) 11 (+0) 10 (+0) 10 (+0) 10 (+0)
- Senses passive Perception 12
- Languages Galactic Basic
- Challenge 1/8 (25 XP)
Actions
Blaster Carbine. Ranged Weapon Attack: +2 to hit, range 60/240 ft., one target. Hit 3 (1d6) energy damage. Reload 16.
Suppress. The security officer sprays a 10-foot-cube area within normal range of its carbine with shots. A creature in the area takes the weapon's normal damage, or half damage on a successful DC 10 Dexterity saving throw. This action consumes 8 ammunition.
Stock Strike. Melee Weapon Attack: +3 to hit, reach 5ft., one target. Hit: 3 (1d4+1) kinetic damage.
Imperial Tactics
By the time the heroes arrive, the Empire has discovered the Alderaanian Security agent’s carbonite block, and a security officer is using the repulsor sled to move it from one of the storage rooms into the main docking bay. When the heroes burst onto the scene, the sergeant immediately moves to take cover behind the nearest crates and calls for backup. When necessary he activates his Leadership ability. The officer piloting the repulsor sled releases the tow cable pulling the hovering block of carbonite, and the other officers move to take down the heroes as quickly as possible.
Features of the Area
This encounter features a large, open hangar bay with a number of places to hide and seek cover. Additionally, part of the encounter involves recovering an Alderaanian agent frozen in carbonite. The carbonite block has its own repulsors and hovers at roughly waist height on a Human. The block can be moved as a free action when someone else moves with it, though the person moving the block must remain adjacent to it throughout its movement. The carbonite block has DR 10, 20 hit points. If the block is reduced to 0 hit points, the agent inside is killed.
Sell Zonn Security Sergeant
Security Sergeant
Medium humanoid, lawful dark
- Armor Class 10 (Combat Suit)
- Hit Points 22 (5d8)
- Speed 30 ft.
STR DEX CON INT WIS CHA 10 (+0) 8 (-1) 10 (+0) 12 (+1) 11 (+0) 13 (+1)
- Senses passive Perception 13
- Languages Galactic Basic, High Galactic
- Challenge 1/4 (50 XP)
Brave. The Security Chief has advantage on saving throws against being frightened.
Actions
Blaster Pistol. Ranged Weapon Attack: +2 to hit, range 40/160 ft., one target. Hit 2 (1d6-1) energy damage. Reload 12.
Stunbaton. Melee Weapon Attack: +3 to hit, reach 5ft., one target. Hit: 3 (1d6) subdual damage.
Reactions
Leadership (Recharges after a Short or Long Rest). The Sergeant can utter a special command or warning whenever a nonhostile creature that it can see within 30 feet of it makes an attack roll or a saving throw. The creature can add a d4 to its roll provided it can hear and understand the Sergeant. A creature can benefit from only one Leadership die at a time.
Security Officer on Repulsor Sled
Repulsor Sled
Large construct, unaligned
- Armor Class 14 (Armor Plating)
- Hit Points 32 (5d10+5); DR 5
- Speed 0 ft., fly 60 ft.
STR DEX CON INT WIS CHA 16 (+3) 16 (+3) 13 (+1) 10 (+0) 10 (+0) 10 (+0)
- Saving Throws Dex +5, Con +3
- Damage Vulnerabilities ion, lightning
- Damage Resistances necrotic, psychic
- Condition Immunities poison, disease
- Senses passive Perception 12
- Languages Galactic Basic
- Challenge 1 (200 XP)
Piloted. The construct requires an active pilot to take any actions, and if the pilot is subjected to any conditions that the construct is not immune to, the construct is also subjected to those conditions. The pilot may take their own action or one of the actions granted by the construct.
Actions
Multiattack. The construct makes two attacks.
Medium Blaster Cannon. Ranged Weapon Attack: +5 to hit, range 60/240 ft., one target. Hit 7 (1d10+2) energy damage.
Shock-Net. Ranged Weapon Attack: +5 to hit, range 60/240 ft., 10 ft. square. Hit 8 (2d4+3) lightning damage and restrained. DC 13 str check to break free.
Reactions
Redirect. If the construct's pilot takes damage from a source the pilot is aware of and can see, the construct can use its reaction to instead take that damage.
Conclusion
Even if the heroes defeat the Imperial agents in this room, they probably have only a few rounds before reinforcements arrive. A squad of six stormtroopers arrives 10 rounds after combat begins, so if the heroes have not escaped by that time, the fight escalates. Once the heroes call Maya, it takes 5 rounds for their escape ship to arrive. Unless they finish off the security officers quickly (or call Maya before the fight is over), there might be a few tense moments in which the heroes must fight stormtroopers as they climb into the Banshee.
Development
Once the heroes obtain the agent frozen in carbonite, it quickly becomes time to get away from the Imperial presence on Sel Zonn Station. If the heroes managed to save Maya, she awaits their call on the comlink and sends one of her allies to pick them up. A short 5 rounds after the heroes call Maya for assistance, a large Baudo-class Star Yacht named the Banshee drifts into the main docking bay and lowers its ramp. Over the loudspeaker, the ship’s captain, a woman named Sirona Okeefe, calls out to the heroes that Maya sent her to fetch them. When the heroes all board the ship, Captain Okeefe blasts off from Sel Zonn Station and makes a quick jump to hyperspace, headed for Alderaan.
If the heroes did not save Maya, you (the GM) have several options. The heroes might have met Captain Okeefe previously on the Promenade, or she might have been referred to them by Switch, who knew that they would need transport off the station. Failing that, the heroes might need to take their cargo and find a place to hide on the station until they can hire passage to Alderaan or stow away on a ship. Regardless, the heroes should take the frozen agent to Alderaan as quickly as possible.
(Note, escaping Sel Zonn station should be considered a level-up milestone.)
Encounter Map

Rendezvous on Alderaan
Eventually, the heroes should make their way to Alderaan to rendezvous with Bail Organa. Captain Okeefe can take the characters to meet with the Senator, and she encourages them to relax and recuperate during the journey to the peaceful planet of Alderaan. Feel free to use this time to allow the heroes to return to full health and take care of anything they need to do during the trip through hyperspace. The journey to Alderaan goes off without a hitch, and as the Banshee soars over the planet, the heroes enjoy a great view of the beautiful landscape of the world. Any heroes near the cockpit overhear Aldera’s spaceport control tower clearing the ship to land at the Royal Palace’s landing pad.
When the heroes disembark, they are immediately greeted by several Alderaanian honor guards and one of Bail Organa’s servants, who escorts them into the palace and to the Grand Hall—an ornately decorated chamber where the royalty of Alderaan holds court. The heroes are given refreshments and asked to wait on Organa’s arrival. During this time, the Senator’s servants unload the precious cargo from the Banshee and set about releasing the Alderaanian Security agent from the carbonite. The heroes aren’t kept waiting long; Senator Organa arrives soon.
Meeting with Bail Organa
The encounter with Bail Organa should be short and should set the heroes on the path that will carry them throughout the Dawn of Defiance campaign. The meeting should impress upon them the magnitude of their discovery. To be invited into the palace of an Imperial Senator and famous diplomat like Bail Organa is something that most citizens can only dream about, and the discussion that follows is all the more remarkable for the simple fact that the Senator’s power can shape the lives of billions. Be sure to emphasize the gravity of the situation and how exceptional it is for a Senator to request the aid of unknowns.
When the heroes have made themselves comfortable in the palace, read the following text aloud:

The doors to the Grand Hall open, and in strides a middle-aged man who has a well-kept goatee and is wearing Senatorial robes. Easily recognizable as Bail Organa, he smiles and nods to the servants before turning to you. “Welcome to Alderaan,” he says. “I had hoped we might meet under more pleasant circumstances, but unfortunately the Empire makes almost everything unpleasant. Still, I am glad to see that the... difficulties at the spaceport above Brentaal didn’t impede you too much.
“I’ve asked you to join me today because the agents of mine that you rescued seem to think you can be trusted. Since you worked hard to help them, I believe I can put my faith in you as well. I have a task that needs to be completed, but unfortunately my status as a Senator prevents me from taking care of it myself, or even from sending someone directly associated with the Royal Family.
“The planet Felucia was ravaged during the Clone Wars, but once the fighting was over, the Empire set up a permanent facility on the world. Nothing large—just a small garrison where they could keep prisoners out of the way. Some months ago, I was contacted by an Imperial Admiral who was disillusioned with the way the Empire had twisted the once-great Republic, and he began feeding me sensitive information. A little over a week ago, that communication stopped. My agents tell me that the Admiral has been taken to Felucia, where he is being held against his will. I’d like you to learn what has become of him, and rescue him if you can.”
After Organa delivers his proposition, the heroes probably have a number of questions. Here are some possible answers to likely questions:
- Who is this admiral? “Admiral Nathan Gilder is a veteran of the Clone Wars and an honorable man. He commanded one of the ships at the Battle of Coruscant and was promoted for bravery. His loyalty to the Empire seemed unwavering, but once you’ve seen what he has seen . . .”
- What kind of opposition will we face? “The Imperial presence on Felucia is light. The facility itself is a secret, so they do not advertise its presence with large numbers of troops. Our knowledge of the facility’s existence is our greatest advantage. Additionally, you shouldn’t be going anywhere near the planet’s major cities, so you should be able to travel largely undetected.”
- What is Felucia like? “Dense overgrowth, huge fungi, and massive creatures are the order of the day on Felucia. It’s a wild, untamed planet, and you should be careful to avoid much of the local wildlife.”
- What’s in it for us? “Each of you will receive 2,000 credits, and if things go well, I will guarantee more work when you return. Additionally, if the Admiral has as much information as I believe he does, this could be an excellent chance to strike a blow at the Galactic Empire.”
Sirona O'Keefe and the Banshee
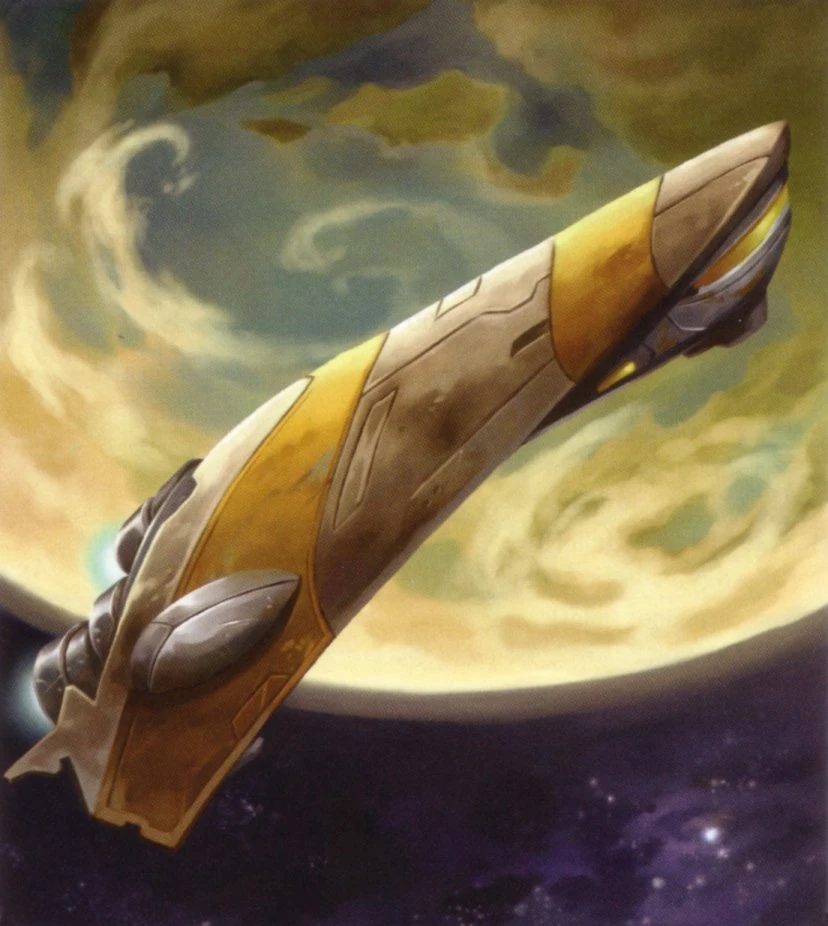
If the heroes agree to discover the fate of Admiral Varth, Senator Organa tells them that he has arranged transport aboard a vessel owned and operated by one of his longtime friends. Sirona Okeefe is a free trader and transport pilot who frequently works for Organa and his agents — most recently, Maya. On retainer from the Senator, Captain O'Keefe is a beautiful middle-aged woman who knows her way around the galaxy. For the first arc of the Dawn of Defiance campaign, her modified Baudo-class Star Yacht, the Banshee, will serve as the heroes’ primary mode of transportation. Captain O'Keefe is fiercely loyal to Senator Organa and trusts the heroes only because he does.
The captain is something of a black sheep in her family (which hails from Brentaal) and doesn’t care to speak about her past. She does mention that she has a niece who aspires to follow in her footsteps. Otherwise, O'Keefe always keeps the conversation light and flirty. Captain O'Keefe is also very fond of her droid copilot, an RX-13 pilot droid nicknamed “Crash,” who is curmudgeonly and prefers to gripe about nearly everything rather than go about his duties. Still, the two make a good pair — the Banshee runs smoothly and has a number of special modifications that make it more than a match for Imperial patrols.
Sirona O'Keefe
Medium humanoid, chaotic light
- Armor Class 14 (Combat Suit)
- Hit Points 27 (6d8)
- Speed 30 ft.
STR DEX CON INT WIS CHA 8 (-1) 16 (+3) 10 (+0) 19 (+4) 12 (+1) 14 (+2)
- Saving Throws Dexterity +6, Intelligence +7
- Senses passive Perception 14
- Skills Deception +5, Insight +4, Mechanic's Kit +10 (Expertise), Perception +4, Persuasion +5, Piloting +10 (Expertise), Security Kit +10 (Expertise), Sleight of Hand +6, Slicer's Kit +10 (Expertise), Technology +10 (Expertise)
- Languages Galactic Basic, Huttese, Binary
- Challenge 5 (1800 XP)
Bad Feeling. When Captain O'Keefe rolls for initiative, she can move up to her speed. This movement happens before the initiative order is determined. Once she has used this feature, she can’t use it again until she finishes a long rest.
Cunning Action. Captain O'Keefe can take a bonus action on each of her turns in combat. This action can be used only to take the Dash, Disengage, or Hide action.
Defiant. Captain O'Keefe can add a d4 to a skill check or saving throw, after rolling but before the outcome is known. She must then finish a short or long rest before she can use this feature again.
Sneak Attack. Once per turn, Captain O'Keefe can deal an extra 3d6 damage to one creature she hits with an attack if she has advantage on the attack roll. The attack must use a finesse or a ranged weapon. She does not need advantage on the attack roll if another enemy of the target is within 5 feet of it, that enemy isn’t incapacitated, and she does not have disadvantage on the attack roll.
Techcasting (3/Rest). Captain O'Keefe is a 6th-level techcaster. Her techcasting ability is Intelligence (power save DC 15, +7 to hit with power attacks).
At-will: Encrypted Message, Mending
1st level: Detect Enhancement, Repair Droid, Tracker Droid Interface
Uncanny Dodge. When an attacker that Captain O'Keefe can see hits her with an attack, she can use her reaction to halve the attack’s damage against her.
Actions
Blaster Pistol. +6 to hit, range 40/160 ft., one target. Hit 6 (1d6+3) energy damage. Reload 12.
Vibrodagger. Melee Weapon Attack: +6 to hit, reach 5ft., one target. Hit: 3 (1d4+3) kinetic damage.
Hidden blade. Melee Weapon Attack: +6 to hit, reach 5ft., one target. Hit: 5 (1d4+3) kinetic damage.
RX-13, aka “Crash”
Medium droid, chaotic light
- Armor Class 12 (Combat Armor)
- Hit Points 16 (3d8+3)
- Speed 25 ft.
STR DEX CON INT WIS CHA 10 (+0) 14 (+2) 12 (+1) 18 (+4) 14 (+2) 8 (-1)
- Condition Immunities poison, disease
- Resistances necrotic, psychic
- Saves Constitution +3, Intelligence +5
- Skills Investigation +6, Lore +6, Medicine +4, Nature +6, Mechanic's Kit +6, Perception +4, Piloting +6, Slicer's Kit +6, Technology +8 (Expertise)
- Senses passive Perception 14, darkvision 30 ft.
- Languages Binary, Galactic Basic (Understand), Huttese (Understand)
- Challenge 2 (450 XP)
Rapid Reconstruction. As a bonus action, Crash can choose to spend one of his hit dice to recover hit points.
Potent Aptitude. Crash may use a bonus action on your turn to choose one creature other than himself within 60 feet of him who can hear him. That creature gains one Potent Aptitude die, a d6. Once within the next 10 minutes, the creature can roll the die and add the number rolled to one ability check, attack roll, or saving throw it makes. The creature can wait until after it rolls The D20 before deciding to use the Potent Aptitude die, but must decide before the DM says whether the roll succeeds or fails. Once the Potent Aptitude die is rolled, it is lost. A creature can have only one Potent Aptitude die at a time. Crash can use this feature a number of times equal to his Intelligence modifier. He regains any expended uses when he finishes a long rest.
Infuse Itemn. At the end of a long rest, Crash can touch one unenhanced object that is a suit of armor or a simple or martial weapon. Until the end of his next long rest or until he dies, the object becomes an enhanced item, granting a +1 bonus to AC if it’s armor or a +1 bonus to attack and damage rolls if it’s a weapon. Once he's used this feature, he can’t use it again until he finishes a long rest.
Tool Understanding. Crash has advantage on any ability check he makes that uses tinker's tools or astrotech tools.
Alarm Protocol. Crash gains a +5 bonus to initiative and cannot be surprised while conscious.
Sensor Augmentation. Crash has advantage on Wisdom (Perception) and Intelligence (Investigation) checks made to detect the presence of secret doors. He has advantage on saving throws made to avoid or resist traps. He has has resistance to the damage dealt by traps. He can search for traps while traveling at a normal pace, instead of only at a slow pace.
Techcasting (6/Rest). Crash is a 3rd-level techcaster. His techcasting ability is Intelligence (power save DC 14, +6 to hit with power attacks).
At-will: Electroshock, Encrypted Message, Light, Mending
1st level: Detect Enhancement, Energy Shield, Repair Droid
2nd level: Detect Traps, Smuggle
Actions
Blaster carbine. Ranged Weapon Attack: +4 to hit, range 60/240 ft., one target. Hit 5 (1d6+2) energy damage. Reload 16.
Vibrodagger. Melee Weapon Attack: +4 to hit, reach 5ft., one target. Hit: 4 (1d4+2) kinetic damage.
The Banshee
Medium starship, unaligned
- Armor Class 15 (lightweight armor)
- Shield Regeneration Rate 5
- Shield Points 30 (quick-charge shield)
- Hit Points 60 (6d8+6)
- Speed 30 ft.
- Turning Radius 10 ft.
STR DEX CON INT WIS CHA 11 (+0) 14 (+2) 12 (+1) 19 (+4) 14 (+2) 14 (+2)
- Hyperdrive Class 2 (Backup Class 7)
- Crew 2
- Passengers 8
- Cargo 35 tons
- Consumables 1 month
- Skills Perception +4, Piloting +10
- Senses passive Perception 14
- Languages Galactic Basic, Huttese, Binary
- Challenge 6 (2300 XP)
Armaments
Double Light Laser Cannon (Pilot)
Capacitor (Co-Pilot)
Interdiction Drive (Co-Pilot)
Quad Laser Cannon (Port Gunner)
Quad Laser Cannon (Starboard Gunner)Actions
Capacitor (Recharge 6). The freighter routes power between the shields, engines, and weapons. While balanced, each feature functions normally. While power is shifted to one of the features, the efficacy of that feature is doubled (shields take half damage and regenerate at double their speed, engines generate twice the speed, weapons deal double damage) while the other two are halved (shields take double damage and regenerate at half speed, engines generate half the speed, weapons deal half damage). These effects last until the capacitor is toggled again.
Light Laser Cannon. Ranged Weapon Attack: +6 to hit, range 30/60 ft., one target. Hit: 7 (2d4+2) energy damage. Two attacks.
Quad Laser Cannon. Ranged Weapon Attack: +4 to hit, range 45/90 ft., one target. Hit: 9 (2d6+2) energy damage. Two attacks.
Bonus Action
Interdiction Drive (Recharge 6). As a bonus action, the freighter can engage the interdiction drive. All ships within 30 feet of your starting point must make a DC 14 Constitution saving throw. On a failed save, their speed is halved until the beginning of the freighter's next turn. The freighter then launches forward 30 feet.
Part 2: Arrival at Felucia
Senator Organa gives the heroes as much time as they need to prepare for their journey and sees them off. The journey from Alderaan to Felucia is relatively uneventful and should give the heroes plenty of downtime before their mission begins.
Felucia is an out-of-the-way jungle world where massive mushrooms dominate the landscape. The native Felucians retreated into hiding many years ago when Gossam colonists came to the world. Though the fierce battles of the Clone Wars made their way to the planet eventually, Felucia was left largely unscathed, and once the Separatist forces were defeated, the newly created Empire mostly withdrew from the system. As Bail Organa explained to the heroes, the Imperial presence on Felucia is based primarily around protecting the small prison facility left on the world. The few cities on Felucia have Imperial garrisons, and the Gossam colonists remaining on the world after the Clone Wars must deal with Imperial persecution.
However, the heroes won’t be going anywhere near the cities. The prison facility, which does not exist on any official maps, is located deep in the Felucian jungle. If not for the Alderaanian Security agent frozen in carbonite, neither Bail Organa nor the heroes would have any knowledge of the facility’s location. The Banshee has the coordinates in its nav computer, and the course plotted by RX-13 should bring the ship out of hyperspace on the side of the planet nearest to the prison facility.
Evasive Maneuvers
As the Banshee emerges from hyperspace, Crash informs Captain Okeefe that their trajectory was perfect and that they are approaching in a vector that will take them to the Imperial prison facility. Almost instantaneously, the sensor board lights up with contacts — Imperial contacts. The massive, dagger-shaped visage of a Victory-class Star Destroyer looms above the planet, and within seconds the flickering sensor board indicates that the capital ship has turned to intercept the Banshee. Captain Okeefe orders everyone to strap in so that she can make evasive maneuvers.
When the heroes comply, read the following text aloud:
As the blue tunnel of hyperspace fades away and the pinpoints of stars fill the windows of the cockpit, you get a brief glimpse of the planet Felucia hanging just below your ship. Almost instantly your eyes are drawn to the dagger-shaped starship looming ahead of you — an Imperial Star Destroyer.
“Hold on,” Captain Okeefe says, “We’re in for a bumpy ride.”
With that, the captain slams the control stick forward, sending the ship tumbling rapidly into the atmosphere of the planet. As the Banshee passes through the thin cloud layer, you get a good look at the fungal swamps and jungles of Felucia, where towering mushrooms reach up into the air like skyscrapers. It would be beautiful if it weren’t rushing up at you so quickly.
_
Eventually, Captain Okeefe pulls the ship out of its dive, a move accompanied by the sounds of metal shearing from somewhere in the rear of the ship. The transport lurches, nearly throwing each of you to the ground, and dips sickeningly down toward the fungal canopy. Another massive bump jostles the ship before the captain brings the vessel to a screeching halt, resting deep within the mushroom jungles.
Searching for Civilization
When the dust settles, Captain Okeefe and Crash quickly move around the ship, assessing the damage and ensuring that no one is injured. After a few minutes, the captain opens the hatch and steps outside into the jungle. The thick, humid air seeps into the ship almost immediately, and soon she returns with less than stellar news. While the Banshee has survived the landing mostly intact, it won’t be taking off any time soon. Okeefe thinks she can make the repairs, and fortunately the ship is hidden by the Felucian jungle’s canopy. However, she cannot give the heroes an estimate of when the work will be done. She suggests (if the heroes don’t do so themselves) that they make their way through the jungle toward the prison. The ship’s navigational systems brought the vessel down near the prison facility, so it shouldn’t take them more than a day or so to trek through the jungle and discover the ultimate fate of Admiral Varth.
Although supplies are limited, Captain Okeefe offers to give the heroes whatever food or water she has. There are enough removable supplies on the ship to provide water and nourishment for a week’s journey, though the heroes certainly shouldn’t be gone that long. The captain provides them with the directions to the prison facility, which she can upload into any datapads carried by the heroes. This should give them the location of the Imperial prison facility and the relative location of the Banshee so they can make their way back.
When the heroes first step off of the Banshee, read the following text aloud:
Your first steps onto the soil of Felucia make it clear that this planet is truly alive. Massive mushrooms tower overhead, their overhanging edges creating a canopy that blocks out much of the planet’s sunlight. Every step on Felucian soil turns up insects and other fungi just beneath the surface. The noise of the jungle is loud and alien, full of the sounds of a hundred insects and animals moving through the mushroom swamps, all part of a living and vibrant ecosystem.
Traveling through the jungle toward the Imperial prison requires frequent Survival checks to stay on course and avoid hazards. The journey requires at least 12 hours’ worth of successful progress from the Banshee to the facility. The heroes must make a DC 15 Survival check each hour of travel. Success indicates that they make progress toward their destination, whereas failure results in no progress. If the hero making the Survival check fails the check by 5 or more, the group might encounter a hazard. Sample hazards are described below, but you should feel free to include any other jungle hazards appropriate to the planet.
- Acid Pool (CR 1): Acid pools are dangerous hazards on Felucia because they resemble pools of standing water. Each acid pool can be detected with a successful DC 10 Perception check. Any hero who fails this Perception check steps in a pool of acid, taking 1d6 points of acid damage. Each round thereafter, the acid makes an attack roll against the hero’s Fortitude Defense at a +2 attack bonus, dealing an additional 1d6 points of damage when successful. The acid stops attacking the target whenever it fails an attack roll against the target, or if the hero washes the acid off with water.
- Exploding Fungus Bloom (CR 2): These blooms are filled with chemicals that become highly explosive and flammable when combined. When the heroes encounter this hazard, one hero at random bumps into an exploding fungus bloom. The bloom explodes, making a ranged attack with a +3 attack bonus and dealing 2d6 points of energy damage as a flash incinerates the fungus.
- Razor Mushroom (CR 2): These fungi are extremely dangerous and, like the exploding fungus blooms, activate only when someone gets too close. If the heroes encounter this hazard, one hero at random passes too close to a razor mushroom. The mushroom bursts outward with spines and razor-sharp tendrils, making a melee attack against that hero with a +3 attack bonus and dealing 1d6+2 points of damage on a successful attack.
- Sinkhole (CR 1): Throughout the jungle are a number of sinkholes, created when the roots of a massive fungus rot away but leave detritus in the ground. Spotting a sinkhole requires a DC 10 Perception check, and success means the sinkhole is avoided. Any hero who fails this check falls into the sinkhole, which is 3 squares deep and leads to a pit with a thin layer of sludge at the bottom. Any hero who falls in takes normal falling damage.
In the Wilds
Once the heroes have made at least 6 hours’ worth of progress toward their destination, they encounter a group of natives—a Felucian scout party, just returning from patrol. Of late, the Felucian villages have been plagued by Imperial agents capturing their scouts, and as a result the Felucians are extremely wary of outsiders. As the heroes enter a clearing, four Felucian scouts emerge from the underbrush, thinking them to be more Imperial agents.
Felucian Hospitality
The clearing is a swampy area with small islands of solid ground interspersed throughout a shallow pool of water. Each of the four Felucian scouts is lying prone on a different island, making Stealth checks with advantage to remain hidden from the heroes.
When the heroes enter the area, read the following text aloud:
The cacophony of noise created by insects and other animals makes it nearly impossible to hear the splash of your footsteps through the Felucian swamp. The open area you walk into resembles a large, shallow pool of water with narrow islands rising out of the water, looking like stepping stones that are slightly too far apart to jump across. A faint mist hangs over the swampy ground, drifting over the still pool of water.
Felucian Scout (4)
Four young Felucian scouts lie in wait in this area, having heard the heroes coming from some distance away. The scouts don’t have any real malicious intent for the heroes, but they are young and impulsive and believe that the heroes are Imperial agents come to snatch others from their village. The Felucians are hiding on swampy islands in the shallow pool, and they wait until the heroes are in their midst before revealing themselves. Alternatively, if one of the heroes moves into the same square as a scout, all four scouts make themselves known. The Felucians only want to protect their village and will communicate with the heroes if possible, possibly even taking them to their village. However, if provoked they will attack.
Tall and muscular, this bipedal being seems to be a member of the native Felucian species. The long, slender form of a rancor’s jawbone juts down from the Felucian’s hand, and the scout’s body is barely covered by a leafy loincloth. A tangle of tendrils around his face makes it impossible to see his eyes, and the mud and other foliage plastered to his body camouflages him against the backdrop of the swamp.

Felucian
Medium humanoid, neutral balanced
- Armor Class 11
- Hit Points 22 (4d8+4)
- Speed 30 ft.
STR DEX CON INT WIS CHA 14 (+2) 13 (+1) 14 (+2) 8 (-1) 15 (+2) 8 (-1)
- Skills Stealth +3
- Senses passive Perception 14
- Languages Felucianese
- Challenge 1/8 (25 XP)
Amphibious. Felucians breathe air and water.
Mask of the Wild. Felucians may attempt to hide even when they are only lightly obscured by foliage, heavy rain, falling snow, mist, and other natural phenomena.
Actions
Skullblade. Melee Weapon Attack: +4 to hit, reach 5ft., one target. Hit 6 (1d8+2) kinetic damage.
Mighty Swing. The Felucian can spend their bonus action to add an additional damage dice to their melee attack. This dice is doubled on a critical hit.
Burst. The Felucian causes the earth to burst from beneath their feet. Each creature within 5 ft., other than them, must succeed on a DC 12 Dexterity saving throw or take 1d6 kinetic damage.
Felucian Scout Tactics
The Felucians move to melee range almost immediately, hoping to use their skullblades (with Mighty Swing) whenever possible. If more than one hero is adjacent to one of the scouts, that scout will often retaliate with his Burst power, though the Felucians usually save this for knocking down fleeing and injured enemies.
Conclusion
When all of the Felucian scouts are out of the fight, or if more than half of the heroes have been incapacitated, a man’s voice echoes through the swampy area. “Peace! Please, stop fighting!” Vazus Mandrake (described under “The Translator”) intervenes in the fight, begging the Felucians and the heroes to end the conflict. Mandrake knows that the fight is just a misunderstanding, and he hopes to bring peace between the Felucians and the heroes, who he can see are not agents of the Empire.
Development
After the heroes defeat the Felucians, they should quickly discover that they are on the outskirts of some kind of village. Once the noises of battle die down, the heroes can make out sounds just through the jungle. As they follow these sounds, they find a makeshift village on the other side of the undergrowth populated with more Felucians, as well as a few other surprises.
Felucian Sanctuary
A hidden village deep within the Felucian jungle, this sanctuary is home to more than a dozen Felucian families. Additionally, a former Separatist soldier, now a hermit on the fungal world, resides in the village, hiding from the Empire. The sanctuary has remained a secret in the months since the Empire took over, and it is a place where the Separatist and the Felucians can live without fear of Imperial discovery.
The village provides a place for the heroes to rest and recuperate a bit from their trek through the jungle. Additionally, the sanctuary offers a number of interesting roleplaying opportunities for the heroes, allowing them to interact with the locals and discover more about the conditions on the planet. If the heroes are reluctant to enter the village due to their recent conflict with the Felucian scouts, feel free to use the following to motivate them:
- The former Separatist, an older man named Vazus Mandrake (described under “The Translator”), invites the heroes into the village, explaining that their fight with the Felucian scouts was just a misunderstanding.
- The heroes notice signs that the Felucians aren’t friendly to the Empire—such as an effigy, dressed in stormtrooper armor, hanging outside the village.
- You can impress upon the heroes the fact that the village might be a good place to ensure that their directions are correct and learn about any other hazards leading up to the prison facility.
When the heroes enter the village, read the following text aloud:
The village appears to have been carved almost completely out of the massive mushrooms that dominate the Felucian landscape. Each one looks old and petrified, making the mushroom huts appear far more solid than their still-living counterparts elsewhere in the jungle. In the center of the village, a number of native Felucians gather in a half circle, squatting by a cooking fire and turning to look at you as you enter. Though the village area has been cleared, small mushrooms and other plants still rise up from the ground, as though the jungle itself resisted any attempts at civilization.
While in the village, the heroes are approached cautiously until they convince the residents that they mean no harm. If any of the heroes has (or is) a protocol droid or other droid with a translator unit, they find that most of the villagers are indifferent toward the visitors. Unless the heroes are visibly pretending to be Imperial officials, the villagers are more curious about them than anything else. If the heroes can befriend the Felucians, the natives are happy to take them in and provide them with food and shelter, at least for a short time. Most of the villagers believe any non-Imperial visitors to be victims of Imperial oppression, as they are, and the Felucians are always eager to assist anyone who is not an agent of the Empire.
The encounters described below can occur any time that the heroes are in the village. Feel free to use the location as a place where the heroes can recuperate and interact with the locals. In part 3 of The Traitor’s Gambit, the heroes will confront captured Felucians that have been tormented and twisted by the Empire. Therefore, use this time to let the heroes get to know the natives so that they will be more sympathetic later.
The Translator
Living among the native Felucians is a former Separatist commander named Vazus Mandrake. A middle-aged Human male from Corulag with a scarred face and stringy gray hair, Mandrake was stranded on Felucia during the Clone Wars after his mercenary unit was destroyed by clone troopers. Crawling off into the jungle while grievously wounded, Mandrake managed to escape execution by the clone troopers and nursed himself back to health. When the war ended and the Empire rose, Mandrake decided to make his home among the Felucians, where he has been living ever since. He also tends a small group of kybucks that he imported to the world when his unit was stationed here. Although his unit fell, the kybucks survived, and Mandrake has named them all after his former comrades.
If the heroes do not have a translator droid, Vazus Mandrake approaches them and offers to serve as their go-between with the villagers. Mandrake is an expert in the Felucians’ guttural tongue, and he can converse with them fluently. He is immediately curious about the heroes and their intentions, and if they make it clear that they are not allies of the Empire, he treats them like old friends. Though bitter about his defeat at the hands of the Empire, Mandrake is genial and happily translates for the heroes. He is initially indifferent towards them, but becomes friendly if they mention that they are opposed to the Empire. If the heroes succeed on a DC 10 persuasion check, he will not only translate for them but also attempt to aid another on any Persuasion checks the heroes make on the Felucians.
Mandrake is an important ally for the heroes. In addition to his ability to translate for them, he has some knowledge of the Imperial prison facility. If the heroes mention the facility in Mandrake’s presence, his face darkens and he becomes very serious. Mandrake has wanted to destroy the prison for some time now, though his new life among the Felucians has cooled his passions somewhat and he is no longer so gung-ho about doing the job himself. If he learns of the heroes’ intentions to raid the facility, he begs them to help him with his sabotage. Mandrake produces a large explosive charge and explains that if they can set it in the facility’s communications center, the blast should be powerful enough to destroy the prison and overload Imperial communications on Felucia for some time. That will also make it easier for the heroes to escape from Felucia. If the heroes agree, Mandrake gives them the explosive charge and shows them how to set the timer.
Scrutiny of the Chief
After the heroes have been in the village for a short time, they are approached by an elderly Felucian shaman that Mandrake (or the heroes’ translator droid) describes as the chief. The chief is obviously extremely old, and the tendrils around his head appear to be shrunken and damaged. The shaman has also seen his share of battles; his body is covered in scars, and one arm looks withered and blackened as though infected with some kind of shriveling disease.
The chief comes to the heroes and scrutinizes them, looking them over without saying a word. If any heroes in the party are Force sensitive, the chief pays particular attention to them, and such characters hear faint, guttural whispers as he passes by. On the other hand, if any heroes have a dark power or alignment, the chief appears to scowl at them, his gaze lingering just a bit longer than on the others.
After a brief examination of the heroes, the chief turns to them as a group and begins to speak. Particularly, he wants to know who they are, why they have come to Felucia, and what they intend to do about the Empire. (The chief secretly hopes that they might help discourage the Empire from staying on Felucia, though he shows no signs of it.) This encounter is one of the most important the heroes can have in the village, and much depends on how they treat the chief and how they answer his questions.
Critical Challenge
The most beneficial outcome of the meeting with the chief is that the heroes gain the trust and help of the Felucian village. Specifically, if the heroes succeed in this challenge, the chief appoints a scout from the village to guide them to the Imperial prison facility. To achieve this, the heroes must win the friendship of the chief. Once the chief has been made friendly, he is willing to consider providing them with a guide. The chief speaks of the numerous dangers in the jungle (many of which the heroes might have encountered already) and cautions them not to proceed lightly. Although they have made it this far, there are many hazards that they have not yet faced, among them massive predators such as the Felucian rancor.
If the heroes indicate that they will do something more permanent about the Imperial presence on Felucia (such as planting Mandrake’s explosive charge), the chief agrees to provide them with a scout who can lead them directly to the facility. On the other hand, if the heroes keep their intentions closer to the vest (or if they refused Mandrake’s request), they can win the aid of the chief in other ways.
- If the heroes leave any of their supplies (such as those taken off the Banshee) for the villagers, the chief is grateful and grants his aid.
- Similarly, if the heroes offer to help the village in any other material way (such as by arming the Felucians with advanced weapons or providing them with medicine), the chief is grateful and provides his aid.
- If the heroes discover and heal the sick Felucian children (see the “Sick Children” encounter, below), the chief automatically grants his aid.
Auxhiliary Challenge 1
One other thing the heroes can do during this encounter is learn a bit more about the Imperial prison facility. If the chief can be made friendly to the heroes and any hero asks about the prison, that hero can make a DC 10 Investigation check to learn more about the facility. If successful, the heroes learn that the villagers call it the “Vanishing Place” and steer clear of it whenever possible. The chief explains that many Felucians have disappeared in the area around the Vanishing Place, and when the Felucians sent a few shamans to investigate, they had to leave quickly before they were overwhelmed with pain. The chief believes that many of the missing Felucians are being held in the prison facility, and that the Empire is causing them great pain. The chief also tells the heroes that the source of the pain seems most concentrated on the west side of the facility.
Auxhiliary Challenge 2
Force-sensitive heroes have an opportunity to impress the chief and gain some of his knowledge. If the chief is friendly to the heroes, he can be convinced to give up a bit of Force lore. Any character who acknowledges his or her own Force sensitivity to the chief also gains his interest. The chief is eager to learn more about the ways of the Force, especially from outsiders, and he is willing to trade knowledge. If any hero demonstrates an aptitude for the Force that the chief himself does not have — perhaps in the form of a Force power or other Force ability with visible results — that hero receives some Force tutelage from the chief. Specifically, the hero learns the burst at-will power as an additional known power. Alternatively, this is a chance for you (the GM) to introduce any new Force powers or abilities into the campaign that might be available only to certain Forceusers, especially powers or abilities that differ greatly from those in the SW5e Player's Handbook.
Ad-Hoc XP Award
Ad-Hoc XP Award: If the heroes succeed in the critical challenge of this encounter and obtain a scout, grant them experience points as though they had overcome a CR 4 opponent.
Felucian Chief
Medium humanoid, neutral light
- Armor Class 11
- Hit Points 85 (9d8+9)
- Speed 30 ft.
STR DEX CON INT WIS CHA 8 (-1) 12 (+1) 12 (+1) 13 (+1) 20 (+5) 14 (+2)
- Skills Stealth +5
- Senses passive Perception 19
- Languages Felucianese
- Challenge 1/2 (100 XP)
Amphibious. Felucians breathe air and water.
Mask of the Wild. Felucians may attempt to hide even when they are only lightly obscured by foliage, heavy rain, falling snow, mist, and other natural phenomena.
Force Powers. The Chief knows the following Force Powers: Affect Mind, Force Push/Pull, Give Life, Mind Trick, Spare the Dying, Disperse Force, Heal, Sense Emotion, Sense Force, Calm Emotions, Coerce Mind, Dissuade Mind, Sever Force, Share Life, Telekinesis
Actions
Burst. The Felucian causes the earth to burst from beneath their feet. Each creature within 5 ft., other than them, must succeed on a DC 17 Dexterity saving throw or take 1d6 kinetic damage.
Beast Trick (1/Rest). This power lets the Chief distract a beast. Choose a beast that he can see within range. If the beast’s Intelligence is 4 or higher, the power fails. Otherwise, the beast must succeed on a DC 17 Wisdom saving throw or be charmed by the Chief for 24 hours. If the Chief or one of his companions harms the target, the power ends.
Plant Surge (1/Rest). If the Chief casts this power using 1 action, all normal plants in a 100-foot radius centered on a point become overgrown. Moving through the area spends 4 feet of movement for every 1 foot moved. He can exclude areas of any size within the power's area from being affected. If he casts this power over 8 hours, all plants in a halfmile radius centered on a point yield twice the normal amount of food when harvested for 1 year.
Sick Children
Several of the younger Felucians in the village have fallen ill in recent days, many of them deteriorating to the point of paralysis. The Felucians have hidden these children away in one of their mushroom huts, and only a hero who makes a successful DC 15 Perception check while walking through the village notices their anguished cries. If the hero investigates further, he or she discovers four Felucian children who lie on cots, frail and nearly immobile except when they cry out in pain. In truth, the children have contracted a virus engineered by Captain Vischera in the Imperial prison facility (see Part 3 for more information on Vischera and his experiments). The children’s skin has faded to a sickly gray, and their muscles have thinned to the point that they are visibly too weak to support their weight.
A hero can treat the virus with a DC 10 Medicine check, and curing the children requires 8 hours of tending. Feel free to let the heroes take this time, since there is no real time restraint during this part of the adventure. Although the heroes should feel the illusion of pressure (reaching the prison facility before some ill fate befalls Admiral Gilder), they should not be punished for an altruistic act.
Ad-Hoc XP Award
If the heroes cure the sick children, award them experience points as if they had defeated a CR 2 enemy.
Imperial Scout
Once the heroes have had a chance to interact with the villagers and deal with the encounters above, have them make DC 10 Perception checks. Any hero who succeeds notices a low whine coming from the outskirts of the village, as though a repulsor were passing around its edges. Upon further investigation, the heroes spot a scout trooper on a speeder bike zooming away from the village, headed into the deep jungle. They catch only a glimpse of him before he speeds out of view, but it seems certain that the scout trooper saw them.
If the heroes don’t realize it immediately, Vazus Mandrake does: The scout trooper will report the hidden Felucian village—and the presence of the heroes—to his superiors, and soon after, stormtroopers will descend upon them. Fortunately, though, the mushrooms in the area have chemicals in their stalks that block long-range communications, so there is little chance that the scout trooper could report his findings before reaching his base. Thus, Mandrake begs the heroes to take his kybucks and chase the scout trooper down. He assures them that the kybucks are tame (which is true) and urges them to catch the Imperial scout before it’s too late.
If all of the heroes fail the Perception check above, they still notice the scout trooper, but each hero has disadvantage on his or her Initiative check when the chase sequence begins.
Zone 1: The Chase Begins
The heroes mount their kybucks, and the chase begins! Have each hero roll Initiative as normal; this will determine not only the order in which they act, but also their Initiative score in the encounter at the end of the chase sequence. On the first round of the chase sequence, the heroes can mount the kybucks as normal. As promised, the kybucks are tamed and ready for riding. With a move action, a hero can spur his or her kybuck out of the village and in pursuit of the scout trooper.
Kybucks move very, very quickly, and as the beasts lurch forward, the heroes realize that they’ll have no trouble keeping up with a speeder bike. Large mushrooms and other huge fungi streak by faster than the eye can see, and the ground whips by at an incredible pace. The kybucks provide a relatively smooth ride, and it is clear that the animals know the terrain far better than any of the heroes might. Each kybuck leaps, turns, twists, and dodges between the massive growths of the fungal forest. Throughout the chase sequence, be sure to emphasize the speed at which the heroes are moving.
Kybuck
Medium beast, unaligned
- Armor Class 14
- Hit Points 7 (2d8-2)
- Speed 60 ft.
STR DEX CON INT WIS CHA 12 (+1) 16 (+3) 8 (-1) 2 (-4) 13 (+1) 12 (+1)
- Skills Athletics +3
- Senses passive Perception 13
- Challenge 1/8 (25 XP)
Dash. Unlike many other beasts, kybucks can move at incredibly high speeds overland. They have a maximum velocity of 60 mph.
Actions
Bite. Melee Weapon Attack: +3 to hit, reach 5ft., one target. Hit 5 (1d4+3)
Kick. Melee Weapon Attack: +3 to hit, reach 5ft., one target. Hit 4 (1d3+3)
On the first round of the chase, the heroes streak out of the village and into an area of sparse growth. Although Animal Handling checks are not needed to control the kybucks, have each hero make a DC 10 Animal Handling check during the first round regardless.
- Any hero who succeeds on the Animal Handling check by less than 5 is accepted by his or her kybuck, and the beast dashes through the jungle with no ill effect for the rest of the chase.
- Any hero who succeeds on the Animal Handling check by 5 or more (in other words, with a roll of 15 or higher) also gains advantage on Animal Handling checks for the remainder of the chase sequence.
- Any hero who fails the Animal Handling check by less than 5 can make a DC 10 Persuasion check as a free action to calm his or her kybuck for no ill effect. Failure means the hero has disadvantage on Animal Handling checks made through the next round.
- Any hero who fails the initial Animal Handling check by 5 or more has disadvantage on Animal Handling checks made through the next round.
The scout trooper is almost completely out of Zone 1 when the chase begins. During the first round of combat, the scout trooper is out of line of sight from the heroes. You (the GM) should roll Initiative for the scout trooper as normal, moving him from zone to zone just as the heroes move, though the scout technically begins the chase at the far end of Zone 1. As such, even though a hero might advance to the next zone before the scout trooper does, the scout will always be farther ahead of the heroes in the next zone when the heroes’ turn comes up. On subsequent rounds, the heroes might have a chance to draw closer to the scout trooper on his speeder bike. In any round in which the heroes manage to draw close enough to the scout to stop his progress (with a ranged attack, a Force power, or some other means), another scout trooper zooms ahead from a hidden post, moving into the next zone and out of line of sight immediately. This allows you to keep the chase going while letting the heroes gain experience points for defeating any scout troopers they manage to catch.
After the first round of the chase sequence, all of the heroes who move their mounts into the jungle automatically advance to Zone 2.
Zone 2: The Fungal Swamp
The second zone of the chase is a massive fungal swamp. In this zone, shallow pools of water litter the landscape, and the kybucks send up huge splashes as their hoofed feet pass through the puddles. Large, multicolored fungi droop low over the landscape, and huge birds swoop down to scoop up prey. The fungal swamp is so thick that the heroes can hardly see in front of them; anything beyond 20 squares is out of their line of sight. The kybucks have no difficulty navigating the swampy terrain, though the heroes should feel as though the jungle is closing in on them.
On each hero’s turn, have that character make a DC 10 Animal Handling check.
- Any hero who succeeds on the Animal Handling check by less than 5 manages to lead his or her kybuck out of the fungal swamp.
- Any hero who succeeds on the Animal Handling check by 5 or more also moves within Long range of a blaster pistol (160 ft.) of the scout trooper. If the hero chooses a different path than the scout (see below), he remains within that range for Zone 4 as well.
- Any hero who fails the Animal Handling check by less than 5 can make a DC 10 Perception check as a free action to keep from getting lost in the thick undergrowth. Failure means the hero and his or her kybuck get lost in the fungal swamp and do not advance to the next zone of the chase on the next round. Although this does not have immediate consequences, it can prevent the hero from joining his comrades in the encounter at the end of the chase.
- Any hero who fails the initial Animal Handling check by 5 or more gets lost in the fungal swamp and does not advance, as described above.
Each hero who advances through Zone 2 to the next zone of the chase must choose a path to follow. On each hero’s turn in this zone, describe two paths: one that appears to go through thick foliage, and another that travels through the hollowed-out trunk of a massive Felucian tree. Randomly determine which path the scout trooper takes with his speeder bike. Any heroes who choose the path through the foliage proceed to Zone 3A below. Any heroes who choose the path through the tree proceed to Zone 3B below. Both paths converge again in Zone 4.
Zone 3A: Hazardous Terrain
Any heroes who choose the path covered with thick overgrowth soon find themselves in treacherous terrain. This zone is filled with sinkholes and trenches, causing the kybucks to leap over the small gorges and chasms with bouncing grace. As the animals bound through this zone, the heroes dip and rise along with the terrain, making it difficult to see very far ahead.
On each hero’s turn, have that character make a DC 10 Animal Handling check.
- Any hero who succeeds on the Animal Handling check by less than 5 manages to help direct his or her kybuck to the next zone without any difficulties.
- Any hero who succeeds on the Animal Handling check by 5 or more also gains advantage on Animal Handling checks in the next round.
- Any hero who fails the Ride check by less than 5 is moved down by 2 in the Initiative order for the next round.
- Any hero who fails the Ride check by 5 or more is moved down by 5 in the Initiative order for the next round.
Each hero who advances to the next zone automatically advances to Zone 4. Any hero who managed to close with the scout trooper in the previous zone can make attacks or use Force powers against the scout in this round (but only if the scout followed this path, of course).
Zone 3B: Natural Tunnels
Heroes who choose the path through the hollowed-out tree find themselves traveling through a series of hollow logs and underground tunnels. The heroes and their mounts must lower their heads to prevent scraping the ceiling of these natural passageways. As the kybucks zip through the underground tunnels, chunks of moss and other fungi droop down from above, while breaks in the ceiling let occasional rays of light shine down on the heroes.
On each hero’s turn, have that character make a DC 10 Animal Handling check.
- Any hero who succeeds on the Animal Handling check by less than 5 progresses to the next zone without incident.
- Any hero who succeeds on the Animal Handling check by 5 or more also closes further with the scout trooper, drawing within 160 ft. (if the hero had not closed with the scout on previous rounds) or within 40 ft. (if the hero had previously closed with the scout).
- Any hero who fails the Animal Handling check by less than 5 rides too close to a grasping set of roots that hang down into the tunnel like tentacles. That hero must succeed on an opposed grapple check (versus the roots, which have a +2 bonus) to continue to the next zone. A failed check means that the hero and his or her kybuck becomes stuck in the natural tunnels, and on the following round the hero can take an action to disentangle from the roots.
- Any hero who fails the Ride check by 5 or more runs into the hanging roots at full speed and is knocked off the kybuck. The animal stops and waits for the hero to mount up again the following round, but the hero is delayed in advancing until the following round.
Any hero not snagged in the natural tunnels automatically advances to Zone 4. Any hero who managed to close with the scout trooper in the previous zone can make attacks or use Force powers against the scout in this round (but only if the scout followed this path, of course).
Zone 4: Awakening the Beast
When the heroes advance to Zone 4, they encounter a deadly specimen of Felucian fauna: a rancor. Fortunately, the creature is dying, and its death throes are all that it can bring to bear against the riders.
When the first heroes move into this zone, the ground in front of them erupts. The rancor had buried itself under the dirt and undergrowth, and now it rises up and attempts to grab a hero and a kybuck as a last meal. The rancor is sluggish, but as it rises to its full height, pieces of debris and detritus fall off its body, creating a rain of soil and plants that spatters any heroes who race past.
On each hero’s turn, have that character make a DC 10 Animal Handling check.
- Any hero who succeeds on the Animal Handling check by less than 5 manages to lead his or her kybuck past the dying rancor without being slashed by its claws.
- Any hero who succeeds on the Animal Handling check by 5 or more avoids any attack by the rancor and increases his or her Initiative by +2.
- Any hero who fails the Animal Handling check by less than 5 is attacked by the rancor. However, the attack is a glancing blow, dealing 1d6+5 points of damage on a success.
- Any hero who fails the Animal Handling check by 5 or more is attacked by the rancor. The creature makes a melee attack against the hero at a +8 bonus, dealing 2d6+5 points of damage on a success.
Even if a hero is attacked by the rancor, all heroes who make it through the zone advance to Zone 5, an Imperial outpost.
Zone 5: Valley Outpost
After encountering the rancor, the heroes leave the area of dense fungal growth and move into a clearing with a small river cutting through it. Though the river is shallow, it is relatively wide, and the kybucks splash through the river as it turns north toward a narrow valley. The scout trooper flies through this area just above the river, the speeder bike’s repulsors splitting the water and kicking up a wake. Several large, bulbous mushrooms rise out of the riverbank, creating large obstacles for anyone moving through the zone.
On each hero’s turn, have that character make a DC 10 Animal Handling check.
- Any hero who succeeds on the Animal Handling check by less than 5 advances to the combat encounter with no incidents and no special penalties or bonuses.
- Any hero who succeeds on the Animal Handling check by 5 or more also gains advantage on attack rolls in the first round of combat.
- Any hero who fails the Animal Handling check by less than 5 suffers disadvantage on all saving throws in the first round of combat.
- Any hero who fails the Animal Handling check by 5 or more gives their enemies advantage on attack rolls in the first round of combat.
When the heroes advance through Zone 5, they move into the encounter area, where combat takes place. See “Jungle Watch Outpost” for information on running the encounter.
Jungle Watch Outpost - CR 3
Setup
This area, found at the end of the chase sequence through the jungles of Felucia, is actually a watch post for Imperial scouts and serves as a waystation for Imperial vehicles. Several towering mushrooms litter the area, placing the jungle watch outpost in the middle of a massive forest of fungi. The four Imperial soldiers are stationed near the communications computers, while the two scout troopers are ranging out away from the computers, scouting the area.
Read-Aloud Text
Several huge mushrooms tower over this area, nearly obscuring the Imperial outpost that stands across a narrow stream. The stream winds through the middle of a forest clearing, splitting around both sides of a humongous mushroom whose cap hangs like an awning over much of the battlefield. The outpost consists of little more than a few small barricades and a tall computer system with a rotating satellite dish at its top.
Imperial Soldiers (4)
Imperial Soldier
Medium humanoid, lawful balanced
- Armor Class 12 (Heavy Combat Suit)
- Hit Points 9 (2d8)
- Speed 30 ft.
STR DEX CON INT WIS CHA 12 (+1) 11 (+0) 11 (+0) 10 (+0) 10 (+0) 10 (+0)
- Senses passive Perception 12
- Languages Galactic Basic
- Challenge 1/8 (25 XP)
Actions
Blaster Carbine. Ranged Weapon Attack: +2 to hit, range 60/240 ft., one target. Hit 3 (1d6) energy damage. Reload 16.
Suppress. The security officer sprays a 10-foot-cube area within normal range of its carbine with shots. A creature in the area takes the weapon's normal damage, or half damage on a successful DC 10 Dexterity saving throw. This action consumes 8 ammunition.
Stock Strike. Melee Weapon Attack: +3 to hit, reach 5ft., one target. Hit: 3 (1d4+1) kinetic damage.
Scout Troopers (2)
The scout troopers waiting in this area at the end of the chase sequence ride speeder bikes that are slightly weaker than normal. Due to the increased levels of plant life and airborne particles on Felucia, many of the Empire’s vehicles suffer debilitating malfunctions in their repulsor systems and other mechanical parts. Recent upgrades to air filtering systems have improved the Empire’s capacity to operate vehicles on the planet, but these speeder bikes have not yet received that upgrade. As a result each speeder bike has disadvantage on attack roll and saving throws.
74-Z Speeder Bike
Large construct, unaligned
- Armor Class 14 (Armor Plating)
- Hit Points 39 (6d10+6); DR 5
- Speed 0 ft., fly 60 ft.
STR DEX CON INT WIS CHA 16 (+3) 16 (+3) 13 (+1) 10 (+0) 11 (+0) 8 (-1)
- Saving Throws Dex +6, Con 4
- Damage Vulnerabilities ion, lightning
- Damage Resistances necrotic, psychic
- Condition Immunities poison, disease
- Senses passive Perception 13
- Languages -
- Challenge 1/4 (50 XP)
Piloted. The construct requires an active pilot to take any actions, and if the pilot is subjected to any conditions that the construct is not immune to, the construct is also subjected to those conditions. The pilot may take their own action or one of the actions granted by the construct.
Actions
Multiattack. The construct makes two attacks.
Laser Cannon. Ranged Weapon Attack: +6 to hit, range 60/240 ft., one target. Hit 8 (1d10+3) energy damage.
Reactions
Redirect. If the construct's pilot takes damage from a source the pilot is aware of and can see, the construct can use its reaction to instead take that damage.
Scout Trooper Tactics
The scout troopers attempt to distract the heroes, zooming around the battlefield to make it more difficult for them to approach the outpost. Due to interference caused by chemicals in many of the local fungi, it takes nearly 1 minute to establish communications with the nearest Imperial facility. Thus, the scout troopers try to distract the heroes for 10 rounds, hoping to buy time for one of the soldiers to call for reinforcements. If the heroes fail to defeat the Imperials in this time period, the call goes out, and six more scout troopers on speeder bikes arrive 2 minutes later.
Conclusion
If the heroes defeat the soldiers and seize control of the communications facility, they have an opportunity to wreak some havoc with Imperial communications. A successful DC 15 Technology check tunes the communications array to the same frequency as the interference generated by the Felucian plant life, essentially broadcasting white noise across the entire Imperial communications spectrum. Doing so also scrambles the navigational arrays built into scout trooper armor, which prevents reinforcements from arriving.
Development
If the heroes successfully deal with the Imperial troops and scout troopers at the outpost, they prevent the Imperials from alerting the prison facility about their presence or the existence of the hidden Felucian village. Award the heroes experience points as if they had defeated a CR 3 enemy (in addition to any experience points they earned in combat). At that point, the heroes can return to the village at their leisure and either recuperate further or set out for the facility.
Encounter Map
Features of the Area
The stream that runs through the middle of this area counts as difficult terrain, and any characters lying prone in the water must hold their breath or begin to drown. Additionally, the massive mushrooms in the area can be destroyed by weapons fire. Each mushroom has 50 hit points and no DR, and a destroyed mushroom no longer provides cover to anyone behind it.
Part 3: Imperial Prison Facility
Once the heroes have concluded their visit to the Felucian village (and prevented the Imperials from reporting its location), they can make their way to the Imperial prison facility. Their Felucian scout leads them around obstacles and potential threats and takes them directly to the facility. Their guide doesn’t say much on the journey — and unless the heroes have a translating droid, they won’t understand him, anyway — and simply leads them to their target with solemn determination.
When the heroes arrive, they discover that the prison facility is a relatively squat, two-story building in characteristic Imperial style: gray walls with a slight outward slant, no visible windows, and a plain visage that leaves no room for accoutrements. The second story of the building is visibly smaller than the ground floor, and blinking lights line the top floor’s edges. A large set of blast doors denotes the ground floor entry to the building, while a single gun turret (which appears to be an assault cannon built into the wall) juts out a few meters to the door’s left. Otherwise, there are no other visible entrances or exits to the facility.
Stormtroopers stand guard at the facility’s blast doors, while the low hum of speeder engines indicates that there might be scout troopers on patrol nearby. Additionally, any hero who succeeds on a DC 15 Perception check hears heavy thudding sounds in the distance, along with the noises of plants being crushed, indicating the presence of a walker of some kind.
Fortunately for the heroes, their Felucian scout is aware of a secret entrance. He leads them to the northwest corner of the building, where a ventilation grate barely hangs on its bolts. With the right application of force (dealing at least 10 points of damage to the grate), it can be pried free, giving the heroes a way into the prison facility.
Within the facility, the heroes will find that everything follows the typical Imperial style, with standard metal walls (DR 10, 150 hp) and metal doors (DR 10, 50 hp). Additionally, the facility has a central computer system with a Slicing DC of 20 without the correct code cylinder. All of the doors in the facility’s interior are unlocked by default. However, the exterior blast doors are sealed from the inside. From the outside, the doors can be opened only by slicing the computer (using the terminal and scomp link that provides access to the computer).
An overall map of the first floor appears below. Each detailed encounter in the facility also has its own map.

That Was Too Easy
After entering and making their way through the facility, some heroes may wonder how a secret prison for political malcontents could be infiltrated by novices so easily. In truth, the entire rescue of Admiral Gilder is a setup designed to lure the heroes into complacency and get them to accept the Admiral into their confidences. Gilder is merely pretending to be a traitor. He and Inquisitor Varth are the only two people who know the truth of the ploy. All other members of the Empire, including the Imperials stationed at the prison facility, believe that the Admiral really is a traitor. This level of deception was necessary to ensure that someone as resourceful as Bail Organa didn’t find out about the ruse somehow.
P1: Medical Bay
Originally a standard medical bay intended to heal prisoners who were injured during interrogations, the bay has been transformed into a science lab for the slightly demented Captain Vischera. The room is littered with experimental equipment designed to alter the genetic material of the captain’s test subjects—namely, the Felucians that the Empire has been snatching from the nearby villages. Three filled bacta tanks line the far wall. Currently, the tanks are empty of patients, but wear and scratches on the inside of each tank show that whatever had been floating within had tried to claw its way out.
A former Imperial scientist and now the head of the prison facility, Captain Vischera has been altering the genetic code of Felucians to create mutant warriors. When the Confederacy collapsed, many Separatist secrets fell into the hands of the Empire, among them a few that Captain Vischera found most intriguing. Particularly of interest were experiments performed by the Techno Union on the natives of the planet Nelvaan, transforming them into massive, violent warriors that could be bent to their creator’s will.
After months of experimentation, Vischera has managed to create two such monsters out of Felucian hosts, at the cost of many lives. Additionally, a small number of Felucians that were part of the evolutionary process still remain alive, and they are kept here for further observation.
When the heroes arrive in this room, they must fight the mutated Felucians and the medical attendant. See “Imperial Research Lab” for more information on running this encounter.
Imperial Research Lab - CR 2
Setup
When the encounter begins, the Imperial medical researcher is standing at a computer console next to the large bacta tanks, as is the 2-1B medical droid. When the heroes enter, the researcher slaps a button and releases the two modified Felucians, who are strapped to medical beds.
Read-Aloud Text
When the heroes arrive in this area, read the following text aloud:
This vast chamber seems at first to be a place of healing—at least, until you take a closer look. Large bacta tanks line one border of the room, and other medical equipment is distributed haphazardly throughout the area. Operating tables, many with clamps and other restraint devices, seem to be scattered throughout the room with no real pattern to their arrangement, and the entire room has the same sterile smell of a medical bay.
Imperial Medical Researcher
Employed by Captain Vischera to help conduct medical experiments on the Felucians, this researcher is little more than an aide to the more dangerous Imperial captain. Though he fights if cornered, the researcher prefers to think that he is safe in the facility, and as such he never considers the possibility that anyone would intrude on his work.
Dressed in the sterile white robes of doctors throughout the galaxy, the man seems to be little more than a scientist. The insignia of the Empire sits on a patch on each shoulder, but otherwise he looks like a normal medical researcher.
Medical Researcher
Medium humanoid, lawful dark
- Armor Class 11
- Hit Points 13 (3d8)
- Speed 30 ft.
STR DEX CON INT WIS CHA 8 (-1) 12 (+1) 10 (+0) 15 (+2) 12 (+1) 10 (+0)
- Senses passive Perception 13
- Languages Galactic Basic
- Challenge 1/8 (25 XP)
Actions
Blaster Pistol. Ranged Weapon Attack: +3 to hit, range 40/160 ft., one target. Hit 4 (1d6+2) energy damage. Reload 16.
Imperial Medical Researcher Tactics
Once combat breaks out, the medical researcher tries to let the genetically modified Felucians do his dirty work for him. Additionally, he commands the 2-1B medical droid to engage in combat as well, hoping to throw anything he can at the heroes. If all else fails, he uses his blaster pistol.
2-1B Medical Droid
Switch
Medium droid, neutral balanced
- Armor Class 10
- Hit Points 9 (2d8)
- Speed 30 ft.
STR DEX CON INT WIS CHA 8 (-1) 11 (+0) 10 (+0) 14 (+2) 15 (+2) 9 (-1)
- Condition Immunities Poison, Disease
- Resistances Necrotic, Psychic
- Vulnerabilities Ion, Lightning
- Senses passive Perception 14
- Languages Galactic Basic, Binary and two others
- Challenge 1/8 (25 XP)
Actions
Scalpel. Melee Weapon Attack: +2 to hit, reach 5 ft., one target. Hit 1 (1d3-1) kinetic damage.
Genetically Modified Felucian (2)
Captain Vischera’s early experiments led to the creation of violent Felucians with weapons built into their bodies. By removing their right forearms and causing the bones of their elbows and upper arms to mutate, Vischera created nasty blades out of their arm bones, meaning that the modified Felucians cannot be disarmed. The genetic mutations also made these Felucians stronger and more aggressive. Moreover, the modified Felucians have several chitinous scales (taken from the body of a local breed of rancor) grafted onto their flesh, making them hybrid monstrosities that are barely recognizable as their former selves.
This Felucian has clearly undergone some kind of mutation; its muscles bulge and its body seems to bend in unnatural places. The creature’s right forearm has been removed entirely, and instead a long bone blade extends from the elbow, growing out of the flesh with a ragged, serrated edge. Thick, tough-looking scales grow out of the Felucian’s body.
Genetically Modified Felucian
Medium humanoid, neutral balanced
- Armor Class 11
- Hit Points 38 (4d8+20); DR 5
- Speed 30 ft.
STR DEX CON INT WIS CHA 18 (+4) 13 (+1) 20 (+5) 8 (-1) 11 (+0) 8 (-1)
- Skills Stealth +3
- Senses passive Perception 12
- Languages None
- Challenge 1/4 (50 XP)
Amphibious. Felucians breathe air and water.
Mask of the Wild. Felucians may attempt to hide even when they are only lightly obscured by foliage, heavy rain, falling snow, mist, and other natural phenomena.
Actions
Fused blade. Melee Weapon Attack: +6 to hit, reach 5ft., one target. Hit 8 (1d8+4) kinetic damage.
Mighty Swing. The Felucian can spend their bonus action to add an additional damage dice to their melee attack. This dice is doubled on a critical hit.
Burst. The Felucian causes the earth to burst from beneath their feet. Each creature within 5 ft., other than them, must succeed on a DC 10 Dexterity saving throw or take 1d6 kinetic damage.
Genetically Modified Felucian Tactics
The genetically modified Felucians are little more than brutes. Their minds have been eroded by constant experimentation, and they obey the Imperial medical researcher’s commands even if it results in their deaths. The Felucians use their fused blades to the exclusion of all other tactics, charging in to attack the heroes with reckless abandon.
Features of the Area
This room is filled with medical equipment of all kinds. The beds (where the Felucians are secured until combat begins) provide low cover to anyone standing adjacent to them. Additionally, if any of the bacta tanks takes more than 5 points of damage, it shatters and spills bacta onto the floor. When this happens, unless a character moves at half speed, the character must succeed on an DC 10 Acrobatics check or fall prone.
Development
Once the heroes have dealt with the encounter, they have a chance to recover some experimental medical technology. Though most of the equipment is far too large to carry away, the experiments include a set of healing stimulants that Vischera has been using to stabilize his monstrous creations. There are 10 active samples of stimulants, each loaded into an injector and ready for use. The stimulants are used as a part of a short rest, and each stimulant used allows the recipient to use one additional hit die to heal until the next long rest. However, when a stimulant is used, the recipient receives on level of exhaustion. The stimulants allow for additional healing, but they put a great deal of strain on the body when active.
Encounter Map

P2: Defense Turret
Unaware of the damaged ventilation hatch the heroes used to enter the facility, the Empire focuses most of its defenses on frontal assaults. A modified assault cannon has been mounted into the wall of this area, pointing outward, and an Imperial gunner mans the turret at all times. Additionally, a small number of other personnel remain on duty in the area to assist with spotting enemies and, when necessary, defending the turret from the inside. A turret gunner manning the assault cannon always has three-quarter cover from targets outside the prison facility, and all other targets in the area have total cover and concealment from the outside. The assault cannon can be removed from the wall as an action, though this also decouples the assault cannon from its tripod and power source, which provides it with unlimited ammunition.
If the heroes do not take care to be quiet, or if a fight breaks out elsewhere on the ground floor of the facility, the Imperial personnel in this area will investigate the disturbance. However, most of the doors in the facility block sound relatively well, and as such any combat that takes place behind closed doors usually will not alert the Imperials in the defense turret. See “Defense Turret Controls” for more information on running this encounter.
Defense Turret Controls - CR 3
Setup
The Imperial turret gunner begins combat standing against the wall, holding the assault cannon turret and scanning the area outside the prison. The four soldiers stationed here stand casually around the area. One of the four soldiers is positioned near the common area at the center of the prison facility, allowing him to see the turret area, the entrance to the facility, one side of the turbolift cluster, and possibly even the entrance to the medical bay.
Read-Aloud Text
When the heroes arrive in this area, read the following text aloud:
A narrow band of tinted transparisteel stretches from one side of the outer wall to the other, giving you a dimmed view of the Felucian jungle outside. Built into the wall, facing outward, is a large assault cannon, powered and ready to fire upon anyone approaching the front of the base. The remainder of the room is filled with support equipment for the cannon, including a large power generator and a large bank of computers, apparently to regulate and monitor power.
Imperial Turret Gunner
The Imperial turret gunner is actually a standard Imperial gunner who has been assigned to the specially mounted assault cannon. In addition to manning the turret, the Imperial gunner carries a light repeater that he can use to deter intruders.
Imperial Gunner
Medium humanoid, lawful balanced
- Armor Class 12 (Heavy Combat Suit)
- Hit Points 33 (6d8+6)
- Speed 30 ft.
STR DEX CON INT WIS CHA 10 (+0) 14 (+2) 12 (+0) 11 (+0) 9 (-1) 8 (-1)
- Senses passive Perception 12
- Languages Galactic Basic
- Challenge 1/4 (50 XP)
Actions
Light Repeater Burst. The Imperial gunner sprays a 10-foot-cube area within 80 ft. with shots. A creature in the area takes the weapon's 1d8+2 energy damage, or half damage on a successful DC 13 Dexterity saving throw. The gunner can perform this action 3 times before reloading.
Stock Strike. Melee Weapon Attack: +3 to hit, reach 5ft., one target. Hit: 2 (1d4) kinetic damage.
Imperial Gunner Tactics
The Imperial gunner always tries to use his light repeater to its greatest effect. If the heroes are clustered together, the gunner tries to fire from range to catch multiple heroes in the weapon’s burst area.
Encounter Map

Imperial Prison Guard (4)
Imperial Prison Guard
Medium humanoid, lawful balanced
- Armor Class 12 (Heavy Combat Suit)
- Hit Points 18 (4d8)
- Speed 30 ft.
STR DEX CON INT WIS CHA 12 (+1) 11 (+0) 11 (+0) 10 (+0) 10 (+0) 10 (+0)
- Senses passive Perception 12
- Languages Galactic Basic
- Challenge 1/8 (25 XP)
Actions
Blaster Rifle. Ranged Weapon Attack: +2 to hit, range 100/400 ft., one target. Hit 4 (1d8) energy damage. Reload 12.
Suppress. The guard sprays a 10-foot-cube area within normal range of its rifle with shots. A creature in the area takes the weapon's normal damage, or half damage on a successful DC 10 Dexterity saving throw. This action consumes 6 ammunition.
Stock Strike. Melee Weapon Attack: +3 to hit, reach 5ft., one target. Hit: 3 (1d4+1) kinetic damage.
Frag Grenade. Ranged Weapon Attack: DC 12 Dexterity save, range 35 ft., 10 ft. radius. Hit: 7 (2d6) kinetic damage, half on save.
Conclusion
By the time the fight has concluded, the heroes might have alerted Imperials in other areas of the prison facility to their presence. Although the walls and doors reduce the noise of blaster fire, this encounter takes place in a wide-open area and gives the Imperials a chance to move around. Once the fight is over, the heroes could take control of the assault cannon mounted to the south wall, though toting it around could be troublesome.
Features of the Area
The southern wall contains not only the assault cannon but also a tinted transparisteel window that allows anyone in this room to see outside. However, those outside the facility cannot see in through the window. Reckless heroes could open fire on the stormtroopers guarding the exterior of the building, but doing so would almost certainly draw stormtroopers in through the front entrance, resulting in a very different encounter.
P3: Communications Center
This communications center helps route all of the Imperial communications on Felucia. Originally, the prison facility was a communications station before it was converted into a holding area for political prisoners. As such, a large portion of this room features advanced communications equipment. However, Felucia is a backwater planet, so there is usually little going on to justify any kind of largescale activity, though the communications center does coordinate with the Victory-class Star Destroyer in orbit.
See “Communications Center” for more information on running this encounter. When the heroes enter the room, Lieutenant Aden and the comm operators immediately attempt to sound an alarm.
Communications Center - CR 3
Setup
The three Imperial communications operators sit at their computer stations, two in the circular side of the room and one across from the door. When combat begins, Lieutenant Aden is supervising the two comm operators in the circular section of the room.
Read-Aloud Text
When the heroes arrive in this area, read the following text aloud:
The bulk of this room is taken up by computers and other communications arrays. The far wall juts outward slightly to make room for a massive computer column, which obviously forms the base of the satellite dish attached to the top of the facility. Blinking lights and flashing monitors indicate that the station is obviously in constant communication with someone, and displays show sensor readouts from around the station and elsewhere on Felucia.
Lieutenant Aden
Lieutenant Aden is a young officer who believes that he is on the rise in the Empire. Unfortunately, he’s sadly mistaken. His posting to the backwater world of Felucia is meant to keep him out of the way, just as the secret facility is intended to keep prisoners hidden. Lt. Aden has delusions of grandeur, but he is a violent and ill-tempered man who thinks he has something to prove. A number of commanders transferred him out of their units after he decided to demonstrate his loyalty to the Empire by berating fellow officers for even the smallest offense. Loud and angry, Lt. Aden would like nothing more than to kill some rebellious scum and earn a promotion off of Felucia.
Lt. Aden’s Tactics
Lt. Aden’s zeal sometimes gets the best of him, especially in combat. He activates his Leadership ability as often as possible and fights more aggressively than most Imperial officers. Though he seeks cover when possible, Lt. Aden takes a shot at the heroes each round, even if it exposes him to their attacks.
Lieutenant Aden
Medium humanoid, lawful dark
- Armor Class 10 (Combat Suit)
- Hit Points 22 (5d8)
- Speed 30 ft.
STR DEX CON INT WIS CHA 10 (+0) 8 (-1) 10 (+0) 12 (+1) 11 (+0) 13 (+1)
- Senses passive Perception 13
- Languages Galactic Basic, High Galactic
- Challenge 1/4 (50 XP)
Brave. Lieutenant Aden has advantage on saving throws against being frightened.
Actions
Blaster Pistol. Ranged Weapon Attack: +2 to hit, range 40/160 ft., one target. Hit 2 (1d6-1) energy damage. Reload 12.
Vibrodagger. Melee Weapon Attack: +3 to hit, reach 5ft., one target. Hit: 2 (1d4) kinetic damage.
Reactions
Leadership (Recharges after a Short or Long Rest). Lieutenant Aden can utter a special command or warning whenever a nonhostile creature that it can see within 30 feet of it makes an attack roll or a saving throw. The creature can add a d4 to its roll provided it can hear and understand the Lieutenant. A creature can benefit from only one Leadership die at a time.
Imperial Comm Operator (3)
Each Imperial communications officer is a trained soldier first and foremost. Drawn from the ranks of the Imperial Army, these comm operators are capable of defending the prison facility as well as any other soldier. The operators are in charge of ensuring that communications continue to flow across Felucia and to the Star Destroyer in orbit, and all are entrusted with a higher level of security clearance, allowing them to convey secret messages to their superiors.
This Imperial soldier wears a dark gray uniform and an Imperial Army helmet, and a blaster pistol is holstered at his hip. Additionally, a datapad and other communications equipment is tucked in pouches attached to his belt, giving the impression that he is both a soldier and a technician.
Imperial Comm Operator
Medium humanoid, lawful balanced
- Armor Class 12 (Combat Suit)
- Hit Points 18 (4d8)
- Speed 30 ft.
STR DEX CON INT WIS CHA 11 (+0) 13 (+1) 11 (+0) 10 (+0) 10 (+0) 10 (+0)
- Senses passive Perception 12
- Languages Galactic Basic
- Challenge 1/4 (50 XP)
Actions
Blaster Pistol. Ranged Weapon Attack: +3 to hit, range 40/160 ft., one target. Hit 4 (1d6+1) energy damage. Reload 12.
Vibrodagger. Melee Weapon Attack: +3 to hit, reach 5ft., one target. Hit: 3 (1d4+1) kinetic damage.
Imperial Comm Operator Tactics
Trained by the Imperial Army, each comm operator knows how to fight an intruding enemy—perhaps better than Lt. Aden does. They seek cover behind the computer equipment in the room and attempt to use their blaster pistols at a decent range to drive the heroes back. The comm operators are good shots with their blaster pistols, and they try to hunker down and the keep the heroes from taking advantage of cover as well.
Conclusion
When the encounter concludes, the heroes can access the Imperial network (as described under “P3: Communications Center”). Additionally, they can recover Lt. Aden’s code cylinder, which allows them to use the turbolifts in the common area of the ground floor, granting them access to the command center.
If the heroes agreed to plant the explosives given to them by Vazus Mandrake, they may do so in this room. As long as all of the Imperials have been defeated, the heroes are under no time pressure to set the charges. If they successfully plant the explosives in the communications center, grant them experience points as if they had defeated a CR 3 enemy.
Encounter Map

Features of the Area
The walls of this room are lined with computer consoles, each featuring different communications arrays. Although the consoles provide no special terrain effects, any comm operator can use them to send a message to the command center that there are intruders in the facility. Doing so requires a comm operator to make a successful technology check as a standard action on one of the consoles. If such a message is sent, at the conclusion of combat the heroes can attempt to cancel the alert by similarly using the communications arrays and making a successful Deception check against Captain Vischera.
Development
Once the Imperials in this area have been neutralized, the heroes can plant the explosive device given to them by Vazus Mandrake. In addition, they can learn an important piece of information. Any hero who accesses the computers in this room immediately discovers that a high-priority message was just received from the Victory-class Star Destroyer in orbit. The message reads as follows:
//ROUTED...SECURITY ENCRYPTION CONFIRMED
//FROM PRAKITH CITADEL COMM CENTER VIA HOLONET NODE 6673-ALPHA
//FROM NODE 6673-ALPHA VIA STAR DESTROYER ASSIDUOUS
Priority 1 Message Follows:
Prepare former Admiral Nathan Gilder for transfer to the Citadel. Inquisitor Varth will be arriving within a standard Felucian day/night cycle to take custody of the prisoner. You are instructed to have your medical technicians ensure that Gilder is fully rested and at his highest possible strength.
Interrogation chemicals should be administered to Varth upon notification that the Inquisitor has arrived on Felucia. Gilder will be transferred by shuttle to the Assiduous before Inquisitor Varth takes custody. Time from administration of interrogation chemicals to transfer to the Inquisitor’s personal transport should fall within an acceptable window of 27 to 54 minutes.
//END TRANSMISSION
Inquisitor Varth sent the message to make sure that everyone in the facility believes that Admiral Gilder is a traitor to the Empire. Only Varth and Gilder know the truth of the deception.
P4: Prison Block
The small prison block where Admiral Gilder is being held is unlike most Imperial detention centers. Instead of having individual holding cells, theprison block features an open but secure area where the prisoners share a living space. However, the space is filthy and the prisoners are treated poorly, and a former Imperial Admiral is no exception. Unlike the other locations in the facility, the prison block is closely monitored. As soon as the heroes enter the room, they find themselves under attack from the guards, who have orders to shoot first and ask questions later.
See “Detention Block F-1A” for more information on running this encounter.
Detention Block F-1A
Setup
When the encounter begins, two detention block guards are standing behind the northern barricades, monitoring the prison area. The two warden droids stand at opposite ends of the narrow hallway leading to the holding area. Four prisoners, including Admiral Gilder, mill about in the holding area.
Read-Aloud Text
When the heroes arrive in this area, read the following text aloud:
A narrow corridor flanked on each side by smaller chambers leads to massive double doors made of heavy steel. Beyond the doors lies a large holding area where several prisoners linger anxiously. Each of the two smaller rooms flanking the hall seem built for defense, both against intruders and against escaping prisoners.
Imperial Detention Block Warden (2)
Charged with ensuring that none of the Empire’s political prisoners escape from the facility, these detention block wardens are excellent close-quarters combatants and are deadly with blaster pistols. Each warden is trained to pacify rioting prisoners, and though technically they are members of the Imperial Army, they have also received rudimentary training in prisoner psychology from Imperial Intelligence.
Imperial Detention Block Warden Tactics
The guards prefer to let the warden droids engage intruders in melee combat, while the guards fire over the droids.
Detention Warden
Medium humanoid, lawful balanced
- Armor Class 12 (Combat Suit)
- Hit Points 18 (4d8)
- Speed 30 ft.
STR DEX CON INT WIS CHA 11 (+0) 13 (+1) 11 (+0) 10 (+0) 10 (+0) 10 (+0)
- Senses passive Perception 12
- Languages Galactic Basic
- Challenge 1/4 (50 XP)
Actions
Blaster Pistol. Ranged Weapon Attack: +3 to hit, range 40/160 ft., one target. Hit 4 (1d6+1) energy damage. Reload 12.
Stun Baton. Melee Weapon Attack: +3 to hit, reach 5ft., one target. Hit: 4 (1d6+1) subdual damage.
Prisoners (3)
Besides Admiral Gilder, three other Imperial prisoners await their fates in the detention block. The captives are more than happy to help the heroes overthrow the guards, though they are unarmed and their abilities are quite limited.
Prisoner
Medium humanoid, chaotic balanced
- Armor Class 11
- Hit Points 16 (3d8)
- Speed 30 ft.
STR DEX CON INT WIS CHA 11 (+0) 13 (+1) 12 (+1) 8 (-1) 9 (-1) 10 (+0)
- Senses passive Perception 11
- Languages Galactic Basic
- Challenge 1/8 (25 XP)
Actions
Unarmed. Melee Weapon Attack: +3 to hit, reach 5ft., one target. Hit: 3 (1d4+1) kinetic damage.
Warden Droid (2)
The warden droids are specialized security droids designed to patrol Imperial detention centers. Each warden droid is programmed to capture escaping prisoners, putting down riots and rebellions with nonlethal force. Though they are powerful, warden droids are designed to recapture prisoners alive, leaving the task of doling out punishment to flesh-and-blood prison guards.
This tall, angular droid has a thin body and long, spindly arms. The tips of its hands spark occasionally with blue energy, and its large, glowing eyes seem to scan the room with vigilant awareness.
Warden Droid
Medium droid, unaligned
- Armor Class 13 (Armor)
- Hit Points 27 (6d8)
- Speed 30 ft.
STR DEX CON INT WIS CHA 14 (+2) 13 (+1) 10 (+0) 10 (+0) 11 (+0) 7 (-2)
- Condition Immunities Poison, Disease
- Resistances Necrotic, Psychic
- Vulnerabilities Ion, Lightning
- Senses passive Perception 13
- Languages Galactic Basic, Binary
- Challenge 1/4 (50 XP)
Stun claws. The warden droid may make a second claw attack as a bonus action.
Actions
Stun claws. Melee Weapon Attack: +5 to hit, reach 5 ft., one target. Hit 5 (1d6+2) subdual damage.
Warden Droid Tactics
The warden droids are experts in nonlethal tactics and specialize in melee combat. As such, they are best used as front-line combatants. They rush at any unauthorized beings who enter the detention block, trying to stun the intruders into submission. Since the warden droids have no ranged attacks, they constantly try to maneuver themselves between the heroes and the detention block guards, providing the guards with cover while the guards fire shots at the heroes.
Conclusion
When the encounter has concluded, the heroes can free Admiral Gilder from the holding area with little difficulty. The other three prisoners are also eager to leave. They would prefer to make a break for it through the front door and flee into the Felucian jungle—a dangerous prospect at best. However, the prisoners will agree to help their liberators if the heroes offer a solid plan for escape and make at least some guarantees as to their safety.
Features of the Area
The cell door leading into the holding area can be opened only by using one of the computer consoles above the northern barricade. If the door is opened, the prisoners can move out into the antechamber, or the heroes (or Imperials) can move inside to take advantage of the larger combat area.
Encounter Map

Development
Admiral Gilder is a slightly overweight man with close-cropped gray hair and a bushy mustache. He has clearly seen better days; his right eye is swollen and bruised, and a trail of dried blood stains the corner of his mouth.
If the heroes manage to free Gilder, he is grateful but confused as to the identity of his rescuers. He expected to be freed by Bail Organa’s staff, not by hired freelancers. However, he is willing to accept whatever stories the heroes tell him as long as they promise to get him out of the facility. Gilder is eager to take the ruse to the next stage and pass on socalled vital secrets that will lure Organa and his agents into a trap.
Admiral Gilder is fairly guarded about the specifics of his imprisonment. Unsure of who the heroes are, he doesn’t want to reveal too much, but he confirms that he is a former Imperial Admiral who has been funneling information to “interested third parties” for some time now. He says that he was captured a short while ago and is being held at the Felucian prison facility until the proper Imperial authorities can arrive to retrieve him.
Admiral Gilder agrees to help the heroes escape from the facility, but he’s not terribly interested in helping them fight. He can give them advice, but he is reluctant to pick up a blaster, even in his own defense. If pressed, he lends his aid, but in combat he usually provides the heroes with tactical assistance rather than shooting at anyone.
Admiral Nathan Gilder
Medium humanoid, lawful dark
- Armor Class 11
- Hit Points 54 (12d8)
- Speed 30 ft.
STR DEX CON INT WIS CHA 8 (-1) 12 (+1) 10 (+0) 20 (+5) 16 (+3) 16 (+3)
- Saving Throws Dexterity +6, Intelligence +9, Wisdom +7
- Senses passive Perception 26
- Skills Deception +11 (Expertise), Demolitions Kit +9, Insight +11 (Expertise), Investigation +13 (Expertise), Lore +9, Perception +16 (Expertise), Persuasion +7
- Languages Galactic Basic, High Galactic
- Challenge 9 (5000 XP)
Defiant. Admiral Gilder can add a d4 to a skill check or saving throw, after rolling but before the outcome is known. He must then finish a short or long rest before he can use this feature again.
Inspiring Leader. Admiral Gilder can spend 10 minutes inspiring his companions, shoring up their resolve to fight. When he does so, choose up to six friendly creatures (which can include him) within 30 feet of him who can see or hear him and who can understand him. Each creature can gain temporary hit points equal to 15. A creature can’t gain temporary hit points from this feat again until it has finished a short or long rest.
Academic Superiority. Admiral Gilder knows how to apply his studies in practical ways known as maneuvers. His maneuvers are fueled by special dice called superiority dice. He has 6 superiority dice, which are d10s. A superiority die is expended when he uses it. He regains all of his expended superiority dice when he finishes a short or long rest. Some of his maneuvers require his target to make a saving throw to resist the maneuver’s effects. The saving throw DC is 17.
Admiral Gilder knows the following maneuvers from the SW5e Player's Handbook:
Commander's Strike, Deliberate Movement, Heads Up, Measured Action, One Step Ahead, Riposte, Scholar's Parry, Targeted StrikeCritical Analysis. Admiral Gilder is able to analyze a target, develop a plan on how to best overcome any potential obstacle, and execute that plan with ruthless efficiency. As a bonus action on his turn, he can analyze a target he can see within 120 feet of him. For the next minute, or until he analyzes another target, he gain the following benefits:
When he analyzes a hostile creature, attack and damage rolls made with vibroweapons wielded in onehand or blaster weapons against that target may use his Intelligence modifier instead of Strength or Dexterity.
When he analyzes a friendly creature, the target may use its reaction and end your Critical Analysis to add 5 to 1 attack roll, ability check, or saving throw.
Dicovery. Admiral Gilder's studies have helped him discover new practices he can apply to his skills. He knows the following scholar discoveries from the SW5e Player's Handbook:
Contingency Plan, Firing Command, Observant Leader, Running on Fumes, Tactical Retreat, Unbound CommanderFire as One. Admiral Gilder can focus his target down with the help with an ally. Whenever the creature that is the target of his Critical Analysis feature is attacked by someone other than him, he can use his reaction to make one weapon attack against them.
Battlefield Survey. When Admiral Gilder spends 10 minutes observing an area that is within 120 feet of him, or by using a detailed map, select 5 creatures. He and those selected allies ignore any known difficult terrain, and have advantage on Dexterity (Stealth) checks in that area.
Can't Get Out That Way!
When the heroes have retrieved Admiral Gilder (and possibly planted the explosives in the communications center), they likely make their way back to the ventilation grate they used to enter the facility. However, two developments threaten their plans. First, they come upon a disturbing sight—just outside the grate, a large number of stormtroopers stand around the crumpled body of their Felucian guide, and an AT-ST stomps around the exterior of the facility. Second, Captain O'Keefe sends a message over the heroes’ comlinks — the Banshee is operational again, and they can leave the planet whenever they are ready. If the heroes don’t remember the second floor of the facility (which they should have seen from the outside), Admiral Gilder mentions that some of the Imperials he dealt with mentioned the presence of a command center on the second floor. He suggests that they make their way up there and attempt to reach the roof. From there, they can call Captain O'Keefe for a pickup and avoid the Imperial presence outside.
Turbolift Cluster
This cluster of four standard turbolifts ferries troops and officers between the two floors of the prison facility. Unlike the rest of the computers in the facility, the computers that operate the turbolifts are hostile to anyone without a particular code cylinder—specifically, the one possessed by Lieutenant Aden. If the heroes have retrieved Aden’s code cylinder, they can insert it in a port inside the turbolift, making the control computers helpful and gaining access to the command center on the second floor.
P5: Command Center - CR 4
Once the heroes reach the second floor, they find themselves face to face with Captain Vischera, the mastermind behind the cruel experiments being performed on captured Felucians. From the command center, Captain Vischera monitors the interactions among many Imperial facilities on Felucia, including his own.
The low level of security in the prison allows the heroes to move about without Vischera knowing exactly where they are, but by the time they reach the second floor, he almost assuredly knows of their presence. Unless the heroes managed to stop all of the Imperials in the facility from sounding an alarm (a difficult prospect, given the layout of the detention block), Vischera is waiting for them to arrive, attended by two bodyguards—mutated Felucians that have been molded into terrifying fighting machines. See “Command Center” for more information on running this encounter.
When the heroes reach the command center, their primary goal should be getting to the roof. They can do so via two large platforms that rise up through hatches in the roof, allowing the Imperials to load and unload cargo. Each platform is controlled by a pad embedded in the wall adjacent to it, though the pads must be unlocked by using one of the computer terminals in the room.
Setup
The encounter begins with Captain Vischera and Kargrek, one of his mutated Felucian bodyguards, standing near the holographic display table in the southwest corner of the room. Hagark, the other bodyguard, stands near the eastern wall, while the four prison guards are spaced evenly throughout the command center. At least two guards are watching the turbolift cluster when the encounter begins.
Read-Aloud Text
When the heroes arrive in the command center, read the following text aloud:
Though a four-pod turbolift cluster fills the center of the room, this large chamber—obviously a command center—is alive with activity. Large banks of computers line the walls, showing tactical displays of multiple Imperial facilities, including this one. The room seems to be designed to allow officers to monitor multiple situations at once, with displays and holographic projections showing many locations simultaneously. Two large cargo platforms sit in one corner of the room, providing access to the roof.
Captain Vischera
The cruel genius behind the horrible experiments being conducted on the Felucians, Captain Vischera is a dangerous man. Slender and with slightly spiky graying hair, Captain Vischera has a brilliant mind tainted by a sadistic streak that makes him perfect for Imperial service. Vischera has hollow cheeks and sunken eyes, giving the impression that he is malnourished and doesn’t get enough sleep, and his Imperial uniform (though conforming to all standards) looks as though it is hanging off his body. Vischera wants nothing more than to continue his experiments, and as such he will defend the facility to his death.
The tall, sickly Imperial officer appears to be in dire need of both food and sleep. A dark malevolence flits across his eyes, and his hands curl into twisted, angry claws. His graying hair would give him an almost distinguished appearance if it weren’t for the cruelty so plain on his face.
Captain Vischera
Medium humanoid, lawful dark
- Armor Class 13 (Heavy Combat Suit)
- Hit Points 22 (5d8)
- Speed 30 ft.
STR DEX CON INT WIS CHA 10 (+0) 12 (+1) 10 (+0) 14 (+2) 11 (+0) 13 (+1)
- Senses passive Perception 13
- Languages Galactic Basic, Bocce, Durese, High Galactic
- Challenge 1/4 (50 XP)
Brave. Captain Vischera has advantage on saving throws against being frightened.
Actions
Blaster Pistol. Ranged Weapon Attack: +4 to hit, range 40/160 ft., one target. Hit 4 (1d6+1) energy damage. Reload 12.
Vibrodagger. Melee Weapon Attack: +4 to hit, reach 5ft., one target. Hit: 3 (1d4+1) kinetic damage.
Reactions
Leadership (Recharges after a Short or Long Rest). Captain Vischera can utter a special command or warning whenever a nonhostile creature that it can see within 30 feet of it makes an attack roll or a saving throw. The creature can add a d4 to its roll provided it can hear and understand the Lieutenant. A creature can benefit from only one Leadership die at a time.
Captain Vischera's Tactics
When the encounter begins, Captain Vischera immediately commands Kargrek and Hagark to defend him, then orders the guards to take down the intruders. Whenever possible, Vischera uses his blaster pistol, taking the help action as needed to help the guards hit any heroes who have high AC.
Kargrek and Hagark
Unaware of the true depth of their mutation, these two Felucians have been twisted to believe that they are loyal servants of Captain Vischera. Each of them has been horribly altered, even further than the Felucians in the medical research bay, and both are larger and stronger than all of their brethren. Additionally, Kargrek and Hagark have received combat training overseen by Captain Vischera himself, and as such they are far more dangerous than any other foe in the prison facility.
This towering monstrosity was once a Felucian, but now it more closely resembles a beast than a sentient being. Its right arm has been replaced by a bone blade fused into the elbow joint, and its muscles ripple with unnatural strength. Chitinous plates have been grafted onto the creature’s body, and each lumbering step it takes causes the floor to rumble with its weight.
Kargrek and Hagark
Medium humanoid, neutral balanced
- Armor Class 13
- Hit Points 57 (6d8+30); DR 5
- Speed 30 ft.
STR DEX CON INT WIS CHA 22 (+6) 13 (+1) 20 (+5) 8 (-1) 11 (+0) 8 (-1)
- Skills Stealth +4
- Senses passive Perception 13
- Languages None
- Challenge 1/2 (100 XP)
Amphibious. Felucians breathe air and water.
Mask of the Wild. Felucians may attempt to hide even when they are only lightly obscured by foliage, heavy rain, falling snow, mist, and other natural phenomena.
Actions
Fused blade. Melee Weapon Attack: +9 to hit, reach 5ft., one target. Hit 11 (1d10+6) kinetic damage.
Mighty Swing. The Felucian can spend their bonus action to add an additional damage dice to their melee attack. This dice is doubled on a critical hit.
Burst. The Felucian causes the earth to burst from beneath their feet. Each creature within 5 ft., other than them, must succeed on a DC 10 Dexterity saving throw or take 1d6 kinetic damage.
Kargrek and Hagark’s Tactics
Both of the modified Felucians have incredible strength and know how to use it. They attempt to neutralize any threats with their melee attacks. Kargrek and Hagark know to stay within Captain Vischera’s line of sight and will not stray far from the officer.
Imperial Prison Guard (4)
Imperial Prison Guard
Medium humanoid, lawful balanced
- Armor Class 12 (Heavy Combat Suit)
- Hit Points 18 (4d8)
- Speed 30 ft.
STR DEX CON INT WIS CHA 12 (+1) 11 (+0) 11 (+0) 10 (+0) 10 (+0) 10 (+0)
- Senses passive Perception 12
- Languages Galactic Basic
- Challenge 1/8 (25 XP)
Actions
Blaster Rifle. Ranged Weapon Attack: +2 to hit, range 100/400 ft., one target. Hit 4 (1d8) energy damage. Reload 12.
Suppress. The guard sprays a 10-foot-cube area within normal range of its rifle with shots. A creature in the area takes the weapon's normal damage, or half damage on a successful DC 10 Dexterity saving throw. This action consumes 6 ammunition.
Stock Strike. Melee Weapon Attack: +3 to hit, reach 5ft., one target. Hit: 3 (1d4+1) kinetic damage.
Frag Grenade. Ranged Weapon Attack: DC 12 Dexterity save, range 35 ft., 10 ft. radius. Hit: 7 (2d6) kinetic damage, half on save.
Conclusion
When the encounter has concluded, the heroes can escape to the roof using the cargo platforms. With Captain Vischera defeated, the Imperial prison facility no longer has a leader, and the chances of reinforcements arriving are minimal.
Encounter Map

Features of the Area
The walls of the command center feature numerous banks of computers, but the most important pieces of technology in the room are the two cargo platforms. Each platform can rise up through the roof. To operate a platform, a hero must first use the computer terminal to unlock the platform’s control pad, and then use the pad to raise the platform. It takes 2 rounds for a platform to move up to the roof.
Concluding the Adventure
When the heroes finally make their way to the roof of the facility with Admiral Gilder, Captain O'Keefe brings the Banshee swooping in to rescue them. As laser fire spatters ineffectually against the ship’s shields, the heroes can climb into the transport via the extended landing ramp. If the heroes planted the explosives in the communications center, the first round of explosions begin tearing through the facility, growing louder and closer with each passing second. Once everyone is on board, Captain Okeefe blasts off, and within moments the ship is safely away from the lush fungal world and into hyperspace.
Instead of returning to Alderaan, Captain O'Keefe tells the heroes that she has been instructed to rendezvous with a starship in the remote and uninhabited Zandrax System. She goes out of her way not to mention Bail Organa’s name, especially not in front of Admiral Gilder, and explains that their benefactor has set up a refuge for them. Upon exiting hyperspace, the heroes are greeted with the impressive vision of the Resurgence, a brand-new Nebulon-B frigate that will serve as a mobile safe house for the Admiral.
Captain O'Keefe lands the Banshee in one of the Resurgence’s docking bays, and once they disembark, they meet the captain of the frigate, Adrian Verana. Captain Verana is a tall and slender man with jet-black hair and a finely trimmed beard that hugs his square jaw. He is dressed in the sterile uniform of an Alderaanian officer, and his dark eyes seem to weigh each hero carefully as he speaks to them. Captain Verana tells the heroes that they have been assigned quarters on the Resurgence, and that the ship’s facilities (including the medical bay) are available at any time. Moreover, the agreed-upon credits have been transferred into their bank accounts, and they are free to confirm the transaction on terminals in their quarters.
Admiral Gilder is escorted away by several Alderaanian Security agents, who look at the former Imperial with a mix of suspicion and interest. Once Gilder is gone, Captain Verana tells the heroes that Senator Organa is thankful for their assistance and forever grateful that they went to such risks to aid him. If the heroes are willing, Verana offers them permanent quarters aboard the Resurgence in exchange for their assistance in the near future. Depending on the results of Gilder’s debriefing, Verana believes that the Senator might have further need of clandestine agents to act on his behalf. He urges the heroes to keep as quiet as possible about the Senator’s involvement. Even though Gilder has been communicating with Organa on a regular basis, now that they have taken overt action against the Empire, they do not wish to incriminate the Senator in any way.
If the heroes mention the message regarding Inquisitor Varth’s visit to Felucia, Captain Verana becomes troubled and mutters that they might have uncovered something far more involved than a simple Imperial traitor. An Imperial Inquisitor should be a significant concern for any Jedi or Force-using characters as well—the chief concern of the Inquisitorius is hunting down, capturing, and killing Force-sensitive beings of all stripes.
Next Adventure: A Wretched Hive
A Wretched Hive, the next adventure in the Dawn of Defiance campaign, will take the heroes to the planet Cato Neimoidia, where they encounter a Hutt crime lord and are drawn into his world of vice and violence. Not only will the heroes need to ingratiate themselves with the vile gangster Darga the Hutt, but they will also discover new secrets about Imperial projects and meet a Jedi Master who will play an integral role in the unfolding campaign.