
Tot’s Kingdom’s
Guide to Slaying
Iymrith
A King Protects His People
Tot’s Kingdom’s
Guide to Slaying
Iymrith

Credits
Artwork
All artwork is a product of Wizards of the Coast.
Publishing
This is a product of Tot’s Kingdom Publishing Co., LLC
Chris, Keely, Ken, and Matt - Thank you for being a patient and wonderful group of players that continue to surprise me to no end. I have loved every second of sharing a table and a story with you all. I can’t wait to see how you get me to break next.
Ali and George - You two will forever be my first DMs, and yours will always be the world that opened my skeptical eyes to how beautiful collaborative storytelling can be.
Connor and Rohit - From letting me bounce ideas off of you guys to playtesting my final fight, you guys are straight up scallops.
Steve - This thing wouldn’t have gotten off the ground without your encouragement. May there be Meteor Swarms aplenty.
The contents of this document is unofficial Fan Content permitted under the Fan Content Policy. Not approved/endorsed by Wizards. Portions of the materials used are property of Wizards of the Coast. ©Wizards of the Coast LLC.

Introduction
Running Storm King’s Thunder over two and a half years with an amazing group of friends has been nothing short of a blessing. As a first time DM, this module gave me a foundation that allowed me to focus all of my energy on running the game rather than trying to piece together my own story from scratch.
As I grew more comfortable as a DM, the looser plot structure of the module let me slowly pull the rails off of the world. The narrative of the module eventually turned into one unique to my table.
During that time, I used countless resources that people in the community created so that my table could have a great time. As I started mapping out what I wanted my final encounter against Iymrith to look like, I knew I wanted to give something back to the community that helped me so much over these past few years.
While I write this guide for myself and as an ode to my players, I selfishly hope that even one person finds something of use in these ramblings of mine. Nothing could make this fledgling storyteller more content.
Welcome to Tot’s Kingdom
During my party’s first session in Nightstone, they captured one of the goblins that was chasing after some chickens in town (Southwell Farm, Area 4C!). That goblin’s name? Tot. They invited Tot along on their adventures where he quickly went on to become the favorite NPC of the campaign.
Despite not truly understanding what was happening around him or even what the Ordning was, nothing made Tot, the self-proclaimed “Goblin King”, happier than traveling the world with his friends.
Ultimately, Tot’s story came to an end when he gave his life to give the party the push they needed to defeat Iymrith. Never in 1000 years would I have imagined the death of a throwaway goblin written into a module would be the reason my table broke down in tears during our final fight.
The party have since created Tot’s Kingdom - an Adventurer’s Guild in honor of their friend. I suppose you could call this guide the start of their publishing branch.
For use with Storm King’s Thunder
This guide is meant to be a supplement to the fifth edition adventure Storm King’s Thunder.
If you have not played through the adventure or are unfamiliar with the overall plot structure and characters involved, some of what is written in here may not make sense to you.
I assume you are familiar with topics and characters such as the Storm Giants of Maelstrom, Iymrith, the Ordning, and the Thousand Year War.

Chapter 1
About My Table
Everyone’s table is different, and many of my design choices are based on the type of game that my players and I enjoy. In this chapter, I’ve included information about my table, resources I found helpful when running the game, and some additional choices related to this final scenario of the campaign that impacted my game.
Difficulty Level
I ran this encounter for a group of 4 players and a sidekick. The party was at level 14 and was outfitted with many powerful magic items including artifacts. My players all built very tanky characters with high Health and AC in addition to the damage resistances.
This setup meant that the group was extremely difficult to kill with pure damage. Because of that, the damage numbers here are very high, and this was all designed to be extremely deadly. Adjust as needed to match what works best for you and your table.
The Party, Totztotz
Of course, my players chose to name themselves after Tot. Totztotz is a direct reference to both Tot as well as Scott’s Tots from The Office.
Those of you unfamiliar with Scott’s Tots can see that train wreck of a scene here.
Corwen of the Fey Realm
Eladrin Paladin 14 (Oath of the Ancients)
Curious Fish
Tabaxi Barbarian 5 (Path of the Totem Warrior) Fighter 9 (Battle Master)Lori Lightfoot
Human Fighter 14 (Rune Knight)
Pewter of House Cannith
Warforged Artificer 14 (Battle Smith)
Tot, the Goblin King
Goblin Sidekick 14 (Expert)

Useful Resources
Below are some resources that I found particularly useful. While this isn’t an exhaustive list of everything I referenced, these in particular were useful while planning Iymrith’s lair and while running the campaign.
Storm King’s Thunder Community
SKT Subreddit | SKT Discord
The Storm King’s Thunder community is fantastic! If you’re running the campaign and have yet to join the discord, I highly recommend that you do. There are a ton of great people in there that are always more than happy to toss ideas back and forth.
5 Room Dungeon Methodology
5 Room Dungeons
The 5 room dungeon is a great way to outline an adventure or dungeon crawl, especially for newer DMs. A 5 room dungeon can be a traditional dungeon crawl, a trek through a jungle, or even exploring a new city. Adopting this methodology has streamlined the way I do my game preparation.
Matt Colville’s Skill Challenges
[ Skill Challenges | Running the Game]
Colville Skill Challenges Infographic
I used this video as the basis for the skill challenge approach on Iymrith’s Lair. If you have never run a skill challenge before, I suggest you at least glance through the summary infographic to get an idea of the system.
Sly Flourish’s Article
The Villains of Storm King’s Thunder: Iymrith
As always, Sly Flourish delivers. I heavily leaned on his article for Iymrith’s statblock, specifically the Force Burn and Arcane Feedback abilities.
Desperation Moves
Desperation Moves - A Boss’s Final Attack
This reddit post is the foundation upon which I designed the final stage of my fight against Iymrith.
Eventyr Games’ SKT Resource
Doom of the Desert - a SKT Resource
This resource for Storm King’s Thunder on DMs Guild is what I used very loosely as the basis of the “colossus-style” stage of my final fight against Iymrith.
Duration
My group ran all of this over the course of 4 sessions of 3 hours each with the exception of the final session which we ran as a full day for the finale.
You can shorten this by taking out parts of the dungeon crawl that seem less interesting to you, or removing certain stages of the fight.
Recruiting Allies
I opted to allow the players to recruit as much help as they wanted. Since Iymrith would have an army of her own, the allies would be able to help the party carve a path through the lair and towards Iymrith.
While I planned the fight against Iymrith to not include any of the NPCs, these allies could instead be a way to save the party from needing to use too many resources during the dungeon crawl. To what degree you want the NPCs involved in is up to you, but make sure you keep the players in the limelight even with their allies around.
I definitely encourage you to let the players decide who to recruit rather than simply giving them a group of Storm Giants, as is written in the module. NPCs taking hits and even sacrificing themselves so the party can move forward are much more meaningful when they are people with whom the players have established relationships throughout the course of the campaign.
More CHICKEN please! Your KING is hungry

Chapter 1 | Table Context
Chapter 2
Iymrith’s Goals
I used the Thousand Year War as a major historical event that a lot of lore from Storm King’s Thunder could be tied back to. I had Iymrith be the descendant of a dragon from that war who attempted to ascend to becoming a Greatwyrm. Her ritual was stopped when both sides of the war agreed to a ceasefire to stop this threat. Now Iymrith plans to recreate her ancestor’s ritual in order to claim Faerun for herself.
In this chapter, we will lay out what is involved in the Greatwyrm Ascension ritual and see examples of how we can lean into the gargoyle flavor typically associated with blue dragons. Understanding Iymrith’s goals lets us foreshadow her presence early in the story and keep her motivations in mind as more of the unrest around the Storm Giants in Maelstrom is revealed to the players.
Greatwyrm Ascension Ritual
The inspiration for the ritual pulls heavily from Fizban’s Treasury of Dragons. In order to become a Greatwyrm, Iymrith must absorb her souls from other worlds and realities. There are three key aspects to the ritual which are outlined in this section.
Step 1: Giant Divinity
First, Iymrith needs to absorb the divinity of a Giant associated with her dragon type. In this case, that would be a Storm Giant.
Chapter 2 | Iymrith’s Goals
If we have King Hekaton be a descendant of Stronmous, a Storm Giant Lesser Deity, Iymrith has the perfect reason to have Hekaton captured and kept aboard the Morkoth: she needs him to stay alive while she slowly drains his divinity.
We can extend this to Princess Serissa as well. Iymrith captures Serissa from Maelstrom and keeps her in her lair so that when King Hekaton dies, Serissa as his daughter then gains Storm Giant divinity which Iymrith can absorb. Think of this step of the ritual as Iymrith becoming the Storm Queen
Step 2: Capture Souls
In order to absorb her souls from other worlds, Iymrith needs to bring them together. She can do this using artifacts associated with herself from other worlds!
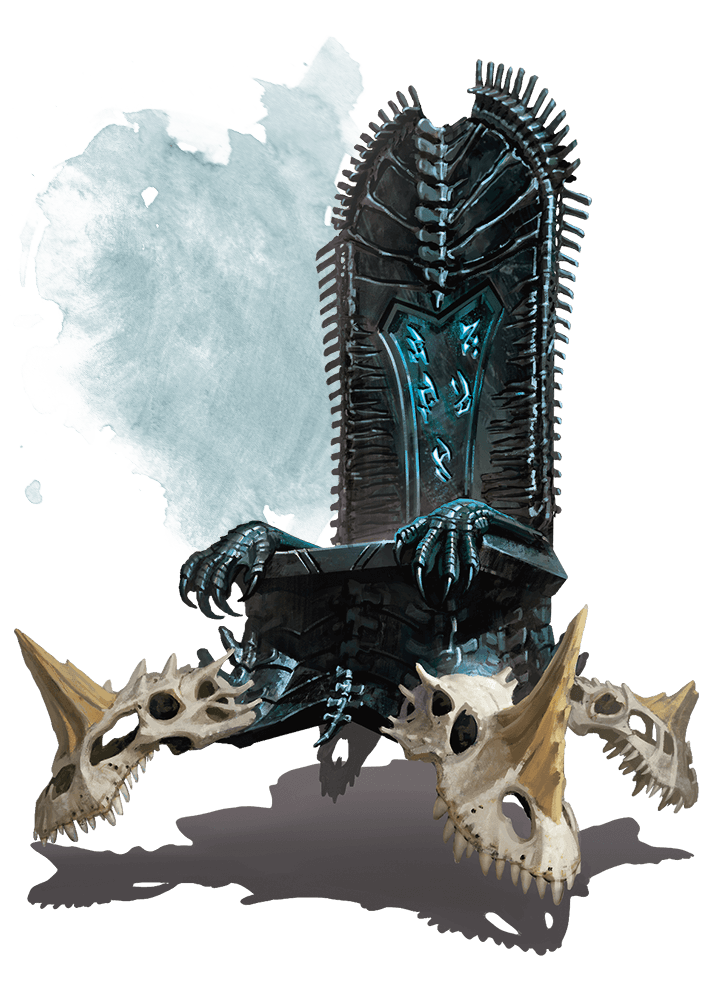
The Wyrmskull Throne is a great candidate for this. Perhaps the skulls on the throne are actually the skulls of Iymrith from other realities and have the power to contain souls.
This suddenly gives us a reason for Iymrith to attack Maelstrom and teleport away with both Serissa and the throne. In one fell swoop she can gather everything she needs for the first two steps of the ritual.
Step 3: Consume and Ascend
After Iymrith has both fully absorbed Hekaton and Serissa’s divinity and captured souls from other realities to the Wyrmskull Throne, her final step is to absorb the souls within the throne. This can become a bit of a fun combat mechanic. I’ll go into more detail later, but Iymrith will spend her turns during combat to summon her incarnations from the throne and then to consume them.
Of course as DMs we want Iymrith to become a Greatwyrm, but we can still let the players interfere with the ritual. We’ll be giving the party opportunities to interrupt parts of the ritual and potentially make Iymrith weaker during the final fight.

Chapter 2 | Iymrith’s Goals
Gargoyles Soldiers
Throughout the campaign I seeded gargoyles as a constant presence so that when Iymrith showed up with her gargoyle minions the players didn’t feel like she came out of nowhere. They saw gargoyles watching them from afar as they defeated the Giant Lords, battled Gargoyles on the road sent to test their strength, and had a few encounters with a gargoyle simulacra Iymrith used to interact with the party on a few occasions.
In keeping with that theme, you’ll see a lot of that same gargoyle flavor in this guide. See the Appendix for detailed statblocks.
Soldiers
Full statblocks for Iymrith’s soldiers are included in the Appendix. Many of these creatures are from the Monster Manual or have slight reflavoring.
Gargoyle Dragons
I reflavored the Chardalyn Dragon from Rime of the Frostmaiden as a Gargoyle Dragon. I described it to be a construct made of of smaller gargoyles melded together.
Bonus points here for reflavoring the breath attack to be a petrifying breath similar to the spell Flesh to Stone.
Giant Four Armed Gargoyles
What’s better than a gargoyle with two arms? A gargoyle with four arms! And what could be better than a four-armed gargoyle you ask? A giant four-armed gargoyle.
Anaxaster and Chezzaran
If Iymrith’s children are still around, have her use them to protect her. Otherwise, you can use more Gargoyle Dragons. If your party previously defeated her children, I could definitely see Iymrith combining their corpses with gargoyles to keep them as her soldiers.
Sand Mounds
This is a great one to keep hidden in the sand to surprise your players. I modeled this creature after the Shambling Mound and buffed the stats a bit.
Treasure Elementals
Put Iymrith’s coins and treasure to use by having sand and lightning elementals cover themselves in Iymrith’s hoarde. I used Air Elemental Myrmidons here, but you could easily use any elemental statblock.

Chapter 2 | Iymrith’s Goals


Chapter 3
Iymrith’s Lair
The module has the players make their way to Iymrith’s lair while dodging some potential attacks from enemies. Once there, the players either end up in the tunnels below ground or in the amphitheatre above where they go on to fight Iymrith.
I think we can do a little better than that. This section encompasses three different encounters the party needs to get through before they can fight Iymrith.
First, we’ll use a Skill Challenge to describe how the party approaches Iymrith’s lair while dealing with an onslaught of attacks.
Second, the party will need to deal with some traps Iymrith has set at the entrance to the ruins that she has made her home.
Finally, we crawl through the tunnels below where we will finally come across Iymrith in the process of completing her ritual
Skill Challenge Approach
Running this Section
I highly encourage you to review the Matt Colville material for running skill challenges (See Useful Resources). In general, I would make sure to keep the following pieces in mind:
Make sure to explain the rules to the skill challenge to the players. You want them to have as much information coming into this as possible.
Your goal here is to really sell the fact that the NPC allies are trying to protect the players. Push the idea that their allies will do anything to make sure the party can stop Iymrith.
Failures should always target the NPCs rather than the players. While the PCs will be unharmed, their allies will be weaker towards the later sections of the dungeon crawl.
Skill Challenge Rules
The players have to close a 5 mile stretch of battlefield and defenses to make it to Iymrith’s lair. The Skill Challenge will have 4 increasingly difficult tiers of challenges. Each tier, the players need to reach a certain number of successes before 3 failures.
The DMs Role
At the start of each tier, the DM will announce the number of successes required in addition to the DC the players need to beat.
Each round, the DM announces the current number of successes and failures for the tier and then describes the threat facing the party.
Player skill checks
Players must use skills they are proficient with. They should announce which skill they are using and describe how they are using it. A player cannot repeat a skill until they have gone through all of their skill proficiencies
Automatic Successes
A player can automatically pass their check by expending a limited resource. The resource used should be of a value appropriate to the DC, and the player should explain how they are using it.
Failures
Failures occur when a player fails an individual skill check as well as when the party fails one of the tiers of the challenge.
Failing a Skill Check. When a player fails a skill check, choose an NPC ally to take damage from one of the threats of the current tier.
Failing a Tier. If players fail a tier by receiving 3 failures before the required number of successes, describe how an NPC ally sacrifices themselves, potentially dying in the process. The intent is to make sure this ally is not available for the rest of the dungeon crawl.
Failing the Final Tier (Optional). You can further increase the risk of failing the skill challenge by having the players go through a round of combat if they fail the final tier of the challenge. Consider having the party fight against a group of Purple Worms or Gargoyle Dragons.
Chapter 3 | Iymrith’s Lair
Skill Challenges by Tier
| Tier | Successes | DC | Challenge | Damage |
|---|---|---|---|---|
| 1 | 3 | 16 | Gargoyles attack | 4d12+10 bludgeoning |
| Heavy winds and sand obscuring vision | ||||
| 2 | 5 | 19 | Lightning strikes aimed at the party | DC 20 Dex Save; 8d6 lightning; Half on save |
| Trebuchets tossing boulders | 6d10 bludgeoning | |||
| Sandstorm engulfs the party | ||||
| 3 | 7 | 22 | Lightning strikes a distant dust tornado, sending crystallized shards of glass flying at the party | 5d8 piercing + 5d8 lightning |
| Trebuchets tossing boulders made of gargoyles | 6d10 bludgeoning; Follow up gargoyle damage: +12 to hit; 4d12 bludgeoning | |||
| Swarm of gargoyles form a curving pillar of solid stone and barrel towards the party | 8d10 bludgeoning | |||
| 4 | 9 | 25 | Lightning strikes the sand below, causing glass pillars to instantly form | 6d10 piercing + 6d10 lightning |
| One of Iymrith’s children uses a breath attack at range | DC 20 Dex Save; 12d10 lightning; Half on save | |||
| Purple Worms erupt from the ground, slamming into the party | 10d10 bludgeoning | |||
| Gargoyle dragons flying at the party and erupting into molten sand and rock | 4d10 fire + 4d10 bludgeoning; disadvantage on next skill check |
Modifying this Section
Feel free to change numbers as needed. You can make tiers easier by lowering the DC or the number of successes required to move on to the next one!
If you party doesn’t have any allies with them or you plan to have those allies as part of the final fight, you can lower the damage for failed checks. You could even make it so damage is only taken after failing a tier instead of each check.
Let the Players be Heroic!
Let the players get creative and have fun with your descriptions! Let them bend the rules here for their skill checks and give them inspiration for creative ways to use forgotten items or not as useful class abilities.
Have fun with your descriptions and be over the top! No barbarian will be upset about catching a boulder in mid-air.
Example Skill Checks
- The Ranger makes a Survival check to find the safest path through heavy and obscured winds
- A Barbarian goes into a rage, expending a limited resource for an Automatic Success to send a trebuchet attack flying off in another direction
- The Warlock fails their Persuasion check to ask their patron to intervene. An allied Storm Giant atop of Roc flies in the way of an incoming boulder, protecting the Warlock in exchange for breaking their arm.
- After failing a tier, an ally is swarmed by gargoyles and dragged down to the ground. The party has no choice but to keep on moving, uncertain if their friend will make it out alive.

Chapter 3 | Iymrith’s Lair
Ruins Entrance and Puzzle
Running this section
There are two aspects to the entrance. First, making it past a door which is lined with Glyphs of Warding. Second, a puzzle on the other side of the door that Iymrith has in place to slow intruders and make them weaker.
The puzzle you choose here doesn’t really matter. I ended up using one I found on reddit. If your table dislikes puzzles, you can easily skip this portion. The goal is to make the players and NPCs expend resources.
Door: Glyphs of Warding
Iymrith has placed many Glyphs of Warding around the walls of the entrance. The players will need to find a way to destroy the glyphs or to get through with limited casualties.
Every 5 feet around the doorway is covered in Glyphs of Warding. A creature that targets a glyph must make a DC 20 Dex Save or take 8d6 acid damage. A creature that succeeds on the saving throw takes half damage.
The players can solve this by finding a way to disable or disarm the glyphs. A spell such as Wall of Force would let them walk through unharmed. The real issue for my party was actually getting the NPC Giants through the doorway without taking too much damage.
Puzzle: Blood Ritual
A trap set by the civilization that used to live here, Iymrith has kept this defense around to protect against intruders. As the party steps through the doors and past the glyphs, they find themselves in a looping hallway with a single discernable landmark - a Sphinx bust. In their head, they hear a riddle.
The key exists inside your head
Wield the key to paint me red
Be aware of what you spurn
What was taken shall be returned
Solving the Puzzle
In order to escape this looping hallway, the players and NPCs need to provide 100hp worth of Blood to Sphinx bust. They could possibly get around this through options such as Remove Curse, Lay on Hands, Dispel Magic, or other methods of lifting curses on each person.
After the group has filled the Sphinx bust with enough health, blood replicas of each person that gave HP are summoned to fight the party. These replicas use the statistics of whoever’s blood was used and are at full health.
Coming up with Puzzles
Having trouble coming up with puzzles of your own? Not to worry!
Reddit is a great place to search for curated puzzles to use in your game.
The puzzle outlined here was found on Reddit! The original post can be found here.

Chapter 3 | Iymrith’s Lair
Underground Tunnels
Running this Section
After the entrance to Iymrith’s Lair, we’re going to drop our players off at the bottom of the underground tunnels - right by the purple wormlings. From there, the party will need to find a way to push through Iymrith’s soldiers where they will find her mid-ritual at the end of this section.
Think of this section of the lair as having three distinct zones - the Purple Wormling nursery, the narrow tunnels, and the treasure room. Each room will be a different type of challenge.
Map References
In this section, we will be referencing specfic sections of the map of Iymrith’s Lair provided in the Storm King’s Thunder module. The map in particular is the Underground Level of Map 12.1: Iymrith’s Lair.
Purple Wormling Nursery. See Area 5.
Narrow Tunnels. See the passageway leading from Area 4 to Area 5.
Treasure Room. See Area 4.
Running NPC Allies
During the Skill Challenge approach to the lair we established that the NPC allies will do anything to deliver the party to Iymrith. Let’s make sure to keep that theme strong during this section of the lair.
Don’t be afraid to start killing NPCs here. We want to push a heightened sense of despair.
Purple Wormling Nursery
Looking at the map, we see the obvious pit of purple wormlings in the middle - yikes. We can think of that as impassable terrain unless the party can fly. There also seem to be four pillars in this room. Those seem like great candidates to be gargoyles. We’ll have these pillars be made of Gargoyle Dragons and Giant Four-Armed Gargoyles.
Enemy Tactics
The enemy tactics here will be fairly simple. Gargoyle Dragons will use their Petrifying Breath (See Gargoyle Soldiers) while the other gargoyles get in melee. We could even crank it up a notch by having petrified creatures turn into Gargoyles under Iymrith’s control later on (hint hint).
Ally Tactics
Our allies are going to use the Purple Wormling pit in the middle to their advantage by staying in the front where they will be targets rather than our party. Make them the targets of these gargoyles while your party attacks from the back.
Sense of Finality
How else can we make the threat more immediate? We don’t want our party running away to try and take a long rest somewhere.
As Iymrith’s Greatywyrm Ascension ritual is underway, describe arcane shockwaves rushing through the caverns. We want to use Iymrith’s ritual in addition to the desperation of the allies to give this sense of finality.
If Hekaton is with you, have him realize his Storm Giant divinity is being drained. As far as he knows, he could only have minutes left before he dies.

Chapter 3 | Iymrith’s Lair
Narrow Tunnels
Now this section is perfect for some stealth and hit-and-run tactics. We’re going to hide some Sand Mounds in these tunnels where they will be waiting to grab anything that is going to come through.
While the party is dealing with that, we can have one of Iymrith’s children burrowing around and using their breath attack before burrowing out again.
Adjust the Difficult as Needed
You can make this section go by really quickly by only having a few enemies here and having only one breath attack go off, or you can amp up the difficulty by making the group push through walls of enemies while moving through sand that acts as difficult terrain.
Treasure Room
After exiting the tunnels, the party will find themselves in a room full of coins and treasures. Unfortunately for the party, this room is also filled with Treasure Elementals and however many other Gargoyle Dragons and other soldiers from the lair you would like.
Think of this room as having swarms of weaker gargoyles alongside a few stronger ones. This should feel overwhelming due to the sheer amount of numbers facing our heroes.
Last Words
We’re going to essentially skip this room by having the NPCs hold off this room of enemies so the party can get to the next room where Iymrith is waiting for them.
Have your NPCs give their last words of encouragement as they prepare to take on a losing battle to let the party make it to Iymrith. Think of this as one last roleplay-focused moment.
After the Party Leaves
Depending on how weak the NPCs are, they might not have a chance at actually holding these enemies off. There are a few ways we can do this.
Fight it out. Maybe they have a chance to clear the room and join the party against Iymrith later. You could find out by actually running the combat and seeing who comes out on top. If the allies do, then the party is rewarded for bringing their allies and keeping them safe with some help later on. If Iymrith’s soldiers are victorious, then Iymrith will have backup to look forward to.
Which narrative do you like more? Do you know for sure you want the party to have backup? Then simply decide how many rounds into the fight you want reinforcements for either side to join.


Chapter 4
Desert Doom
As someone that grew up playing JRPGs, I wouldn’t be able to sleep at night if the climax of the campaign didn’t involve our players fighting Iymrith across multiple phases and forms.
In this chapter, we go into detail about the four phases of our fight against Iymrith. We’ll also see how we can incorporate Iymrith’s ritual into the fight, lay out some goal-oriented combats for our players, and finally take a look at some statblocks the Desert Doom.
The 4 phases are as follows:
- Greatwyrm Ascension Ritual
- Against Colossus Iymrith
- Greatwyrm Iymrith vs. Giant Party
- Desperation Throes
Phase One: Greatwyrm Ascension Ritual
Running this Section
In this first phase, our players make their way to Iymrith in her underground cavern where she is mid-ritual. We laid out the individual steps of her ritual in Chapter 2: Iymrith’s Goals, so make sure to review that chapter if you need any reminders of Iymrith’s goals. Iymrith is going to mainly take a back seat during this first fight while her children and soldiers fight for her.
That’s right, Serissa is here! We’ll amp up the stakes of the combat by having Serissa held captive inside one of Iymrith’s soldiers. Any damage against the soldier will also be damage against Serissa.
Iymrith’s Goals
Iymrith is going to focus entirely on furthering her ritual. First, she needs to absorb Storm Giant Divinity. Then she will capture her incarnations from other realities. Finally, Iymrith will consume those souls of herself in order to become a Greatwyrm.
Iymrith’s Preparations
Iymrith knows the party is coming, and is in fact counting on it - our dragons is vain and wants an audience.
Iymrith will already be under the effects of the Foresight spell. Think of this as her gaining Dragonsight by seeing the different realities from the souls of herself that are being absorbed.
Step 1: Giant Divinity
Iymrith, Storm Giant
For this first stage of the fight, Iymrith is seated atop the Wyrmskull Throne in her Storm Giant form.
Iymrith has two Storm Giants she is looking to absorb power from - King Hekaton and Princess Serissa. If Hekaton is alive in the previous room, we’ll have Iymrith wait for him to fall. His passing means that Princess Serissa becomes the new vessel of Storm Giant Divinity. Iymrith will start draining divinity from Princess Serissa as Hekaton’s power passes to her.
Action Economy
We’ll have Iymrith use her Action to absorb the divinity from her target. Based on when you have Hekaton fall in the previous room, if at all, we’ll have Iymrith decide to begin using this ability.
Chapter 4 | Desert Doom
Step 2: Capture Souls
Now that Iymrith has completed the first step of her ritual, she needs to start capturing her incarnations inside of the Wyrmskull Throne.
Action Economy
Iymrith uses an Action on her turn to use the throne’s ability to summon a spectral dragon. Over the next three turns, Iymrith uses her Action each turn to complete this part of the ritual. While Iymrith is using her actions to further the ritual, her children and soldiers will be trying to keep the party at bay.
Step 3: Consume
Iymrith, Ancient Blue Dragon
At the beginning of Iymrith’s first turn after she has summoned the three spectral dragons, let’s have her transform into her Ancient Blue Dragon form.
Action Economy
With the incarnations present, Iymrith can spend an Action to consume one of her spectral incarnations. Each soul that she consumes will progress the ritual forward.
Moving Aboveground
Once Iymrith decides she is ready to move on to her next step in the ritual, have her escape aboveground either by using movement or casting Teleport. The party will have to chase after her where their final encounter in the amphitheater will begin.
Interrupting the Ritual
Ideally, Iymrith consumes the souls over 3 turns and then teleports aboveground where she completes her Greaywyrm ascension. This, however, is where we will give our players a chance to interrupt Iymrith’s ritual.
If they can find some way to stop Iymrith from consuming her incarnations - possibly through taking away some other artifacts in the room or through pure damage output - then Iymrith will need to complete her Greatwyrm ascension prematurely. If forced to complete her ritual early, Iymrith will have less of her resources available to her in her Greatwyrm form.
Give Your Players Agency
If Iymrith is unable to consume enough souls, she may be missing some abilities. Here are some options for you to consider when thinking about how you want her to be weakened by the players.
- Breath weapon is uncharged in her Greatwyrm form.
- 9th level spell slots are unavailable.
- Force Burn is not available or perhaps targets fewer creatures.
- The wings of her Greatwyrm form are not yet fully formed for the first few rounds of combat, keeping her grounded.
Chapter 4 | Desert Doom
Phase Two: Against Colossus Iymrith
Running this Section
Iymrith has successfully completed her ritual and has ascended to her Greatwyrm form. This combat takes place in the amphitheater aboveground.
At the start of combat, either have gargoyles bring Serissa away from the party or have Iymrith teleport away with Serissa in the previous stage.
Goal-Oriented Combat
In this phase of the fight, our players will not have the power to harm Iymrith in a way that matters. The goal of this combat is to have the players reach Princess Serissa who will sacrifice her life to give the last of her Giant Divinity to the players. In doing so, they will temporarily gain divinity themselves, growing to Giant size so they can properly fight Iymrith in her Greatwyrm form.
Princess Serissa’s Sacrifice
Make it extremely clear to your players that they cannot harm Iymrith here and that they need to make their way to Serissa in order to stand a chance. You can sell this by having Serissa desperately crying out to the party, saying that they need to get to her.
Colossus-Style Initiative
We’re going to take inspiration from games like Shadow of the Colossus and have Iymrith act across multiple initiatives due to her size.
We’ll add an additional threat here by adding a knockback effect to Iymrith’s attacks. Anyone hit by one of Iymrith’s attacks will also be pushed back 40 feet. This will be the main method that Iymrith will have to keep the party away from Serissa
In this phase, we won’t have Iymrith casting spells or using her Legendary Actions.
Iymrith’s Initiative by Body Part
| Initative | Limb | Threat | Notes |
|---|---|---|---|
| 30 | Head | Breath Weapon | May not be available if the party kept Iymrith from fully completing her ritual |
| 25 | Body | Frightful Presence | See Ancient Blue Dragon |
| 20 | Lair | Summon Gargoyles | Add in other lair actions for more variety |
| 15 | Legs | Move and Claw Attacks | For an easier fight, choose to either move or attack |
| 10 | Wings | Wing Attack | Important for pushing enemies around the battlfield |
| 5 | Tail | Tail Attack | Optionally, push enemies back rather than knocking them prone |
Passing of Divinity
Once the players make contact with Princess Serissa, she transfers the remaining bits of her fading Storm Giant Divinity in addition to her life to the party. In doing so, the party grows to Giant Size so they can finally face off against Iymrith on equal footing.
Narrative Moments
Use this moment as a chance for one last conversation between Serissa and the party. Give them a moment to talk amongst each other so she can explain what is happening and the cost of the power they are about to receive.
A common theme of this guide has been that of the NPC allies the party brought pushing them forward. This will be the final push.
Boons of Giant Divinity
By now, your party is most likely pretty spent from the previous phases of the fight as well as the encounters leading up to this. You can help them recover at this moment by giving them a Short rest. A full long rest makes any saved resources and the NPC sacrifices less impactful.
If you really want to give the party another boon, you can give them the effects of the Potions of Giant Strength from the module.

Chapter 4 | Desert Doom

Phase Three: Greatwyrm Iymrith
Running this Section
I’m sure most of you decided to skip straight to this section. I can’t say I blame you. You will find my statblock for Iymrith on the following page.
Finally, we have our party’s final encounter against Iymrith. The party has absorbed Princess Serissa offering and temporarily gained divinity themselves. After an entire campaign of fighting against giants, our heroes will fight as Giants against our villain.
Designing Iymrith
Keep in mind that this statblock is extremely deadly and will likely destroy most parties. I started with the Greatwyrm from Fizban’s and added thematic spells and special features and spiced up the lair actions.
There are a few parts of her statblock worth calling out as they may seem concerning at a glance
Health Pool. Iymrith’s health is probably the first thing that sticks out in here. All I really did was take the hit point maximum and also combine the Mythic health with the main health.
Mythic Form. Instead of adding a Mythic form to this fight, we can think of Iymrith becoming a Greatwyrm as her Mythic Form.
Multiple 9th level spell slots. This was a choice I made almost purely for the over the table reaction that would come from Iymrith having more than one 9th level spell.
Make Their Sacrifices Matter
Against an impossibly difficult opponent, you can make the sacrifices of Princess Serissa and the other allies push the party further forward.
We’ve been relentless about endangering the party’s friends, so here are some examples of how we can give the party mid-combat boons to aid them against an impossibly strong enemy:
- A Rogue with a strong bond to Zephyros channels their memories of him and casts a high level spell.
- The Barbarian’s grief over losing Harshnag gives them a use of Action Surge or extends their crit range.
- A friend of Serissa’s feels the blessing of Queen Neri from the grave, granting them immunity to lightning damage for one round.
Adjusting Difficulty
This version of Iymrith is ridiculously powerful. Here are a few ways you can adjust the encounter to be more in line with your table’s expectations:
Force Burn
Have Force Burn target only one creature. Alternatively, make it a one time use ability.
Saving Throw DCs
While I used the DCs from the Blue Greatwyrm statblock, these are very high and your players may never be able to succeed on a saving throw. You can always adjust these to a lower number.
Health Pool
Iymrith’s health consists of her own HP, the Mythic HP we added, and her Shield Guardians that absorb damage for her. You can lower the difficulty of the encounter by removing some of these sources.
Spells as Legendary Actions
Removing Iymrith’s ability to cast spells as Legendary Actions will limit her casting to only on her turn. This way, she’ll need to choose between casting a spell, using a Breath Weapon, and Force Burn on her turn.
9th Level Spells
Taking these away greatly weakens Iymrith. You can remove Foresight from her ritual and give our villain a single use of Meteor Swarm.
Chapter 4 | Desert Doom
Greatwyrm Iymrith
Gargantuan Dragon
- Armor Class
- 23
- Hit Points
- 1205
- Speed
- 60ft., burrow 60ft., fly 120ft., swim 120ft.
| STR | DEX | CON | INT | WIS | CHA |
|---|---|---|---|---|---|
| 30 (+10) | 14 (+2) | 30 (+10) | 21 (+5) | 20 (+5) | 26 (+8) |
- Saving Throws
- DEX+10, CON+18, WIS+13, CHA+16
- Skills
- Intimidation +16, Perception +21, Stealth +10
- Damage Immunities
- Lightning
- Condition Immunities
- Charmed, Frightened, Poisioned
- Senses
- Truesight 120ft., Passive Perception 31
- Languages
- Common, Draconic
- Challenge
- 27 Proficiency Bonus +8
Legendary Resistance (4/Day). If the dragon fails a saving throw, it can choose to succeed instead.
Metamagic. Subtle Spell and Quickened Spell. 2 uses of each.
Bound. Iymrith is magically bound to two Shield Gargoyles. Half of any damage Iymrith takes (rounded up) is transferred to one of the Shield Gargoyles.
Arcane Feedback. When Iymrith casts Counterspell, in addition to the normal effects of the Counterspell spell, Iymrith deals 7d6 psychic damage against the targeted caster.
Actions
Multiattack. The greatwyrm makes one Bite attack and two Claw attacks.
Bite. Melee Weapon Attack: +18 to hit, reach 15 ft., one target. Hit: 21 (2d10 + 10) piercing damage plus 13 (2d12) force damage.
Claw. Melee Weapon Attack: +18 to hit, reach 10 ft., one target. Hit: 19 (2d8 + 10) slashing damage. If the target is a Huge or smaller creature, it is grappled (escape DC 20) and is restrained until this grapple ends. The greatwyrm can have only one creature grappled this way at a time.
Tail. Melee Weapon Attack: +18 to hit, reach 20 ft., one target. Hit: 19 (2d8 + 10) bludgeoning damage. If the target is a creature, it must succeed on a DC 26 Strength saving throw or be knocked prone.
Force Burn (Recharge 5-6). Iymrith reaches into the weave, forging the arcane magic into beams of raw magical energy that fly from the tips of her wings and horn. Make a spell attack against each creature in a 20 foot radius sphere. On a hit, each beam inflicts 70 (20d6) force damage, and the target loses 1d4 spell slots beginning with lower level spell slots and working up.
Breath Weapon (Recharge 5-6). Iymrith can choose to use either her Lightning Breath or Concussive Breath.
Lightning Breath. The greatwyrm exhales a blast of energy in a 300-foot line that is 15 feet wide. Each creature in that area must make a DC 26 Dexterity saving throw. On a failed save, the creature takes 88 (16d10) lightning damage. On a successful save, the creature takes half as much damage.
Concussive Breath. The greatwyrm lets loose a roar thunderous roar in a 300-foot cone. Each creature in that area must make a DC 26 Constitution saving throw. On a failed save, the creature takes 44 (8d10) lightning damage and is stunned until the end of the dragon’s next turn. On a successful save, the creature takes half as much damage.
Spellcasting. Iymrith casts one of the following spells, requiring no spell components and using Charisma as the spellcasting ability (Spell Save DC 24; Spell Attack Mod +18):
9th Level (2 slots): Meteor Swarm (lightning), Foresight
8th Level (1 slot): Earthquake
7th Level (2 slots): Teleport
6th Level (2 slots): Chain Lightning, Bones of the Earth
5th Level (3 slots): Hold Monster, Destructive Wave
4th Level (3 slots): - - -
3rd Level (3 slots): Thunder Step, Lightning Bolt, Counterspell, Dispel Magic
2nd Level (3 slots): Hold Person
1st Level (4 slots): Shield, Detect Magic
Cantrips: Lightning Lure
Legendary Actions
The greatwyrm can take 3 legendary actions, choosing from the options below. Only one legendary action option can be used at a time and only at the end of another creature’s turn. The greatwyrm regains spent legendary actions at the start of its turn.
Attack. Iymrith makes one Claw or Tail attack.
Cast a Spell (Costs 2 Actions). Iymrith casts a spell.
Wing Attack (Costs 2 Actions). The greatwyrm beats its wings. Each creature within 30 feet of it must succeed on a DC 26 Dexterity saving throw or take 17 (2d6 + 10) bludgeoning damage and be knocked prone. The greatwyrm can then fly up to half its flying speed.
Lair Actions
On initiative count 20 (losing initiative ties), Iymrith takes a lair action to cause one of the following effects; Iymrith can’t use the same effect two rounds in a row:
- 1d4 Gargoyles are called to the battlefield
- A Giant Four-Armed Gargoyle joins the battle in the likeness of a fallen NPC ally.
- Choose a creature you can see. Until the start of the next Lair Action, the target cannot be resistant to Lightning or Thunder Damage. Immune targets instead become resistant.
- Lightning arcs, forming a 5-foot-wide line between two of the lair’s solid surfaces. They must be within 120 feet of Iymrith and 120 feet of each other. Each creature in that line must succeed on a DC 20 Dexterity saving throw or take 36 (9d6) lightning damage.

Phase Four: Desperation Throes
One Final Skill Challenge
When Iymrith is at 1HP, we enter the final phase of our fight. On death’s door, Iymrith calls on all of her power in a desperate attempt to stay alive. Our players will have to work together to get in position to deal one final blow against Iymrith.
Just like the approach to the lair, make sure you explain to the players this is a Skill challenge. Unlike before, there will be no stacking successes or failures. In this case, success means victory and failure means death.
See “Desperation Moves” under Useful Resources for the original inspiration behind this phase.
Iymrith’s Defenses
We need to make sure she has enough defenses to account for guaranteed ways to deal damage. Adjust her defenses based on your party’s strengths and tactics.
Raging Winds and Gargoyles
The storms around the lair rage as impossibly strong winds buffet the players. Smaller gargoyles start swarming the battlefield and flying into the party to block their path. The battlefield currently counts as extra difficult terrain as the players move at ¼ speed.
Buffeting Wings
Iymrith’s wings buffet the players. Ranged attacks automatically miss Iymrith.
Chapter 4 | Desert Doom
Cinematic Killing Blow
Make sure you go over the top here with your descriptions. This is the last step towards victory, and their victory will have been hard earned if they attain it.
- Describe Iymrith focusing and wielding her unstable energy. Describe the player’s movements as large and impactful.
- At the end of each round of initiative, summarize what happened to paint a scene of the players working together and pushing towards their victory.
Giant Runic Shields
Iymrith’s Giant Divinity protects her from elemental magic. If Iymrith would normally take half damage from succeeding on a saving throw, she instead takes no damage. In addition, she can cast the Shield spell.
Iymrith’s Offenses
Iymrith acts on three different initiatives for this combat. If the players can’t get to her fast enough, these attacks threaten to end the party.
25: Roaring Breaths Attacks
Iymrith begins roaring and screaming as she begins randomly letting out breath attacks and Force Burns in a rage all around her. Have Iymrith randomly target players with her breath weapons and uses of Force Burn.
15: Frightful Presence
Iymrith exudes her presence on the battlefield. Have the players roll to attempt to withstand being overtaken by Iymrith’s force of will.
5: Gargoyle Petrification
Gargoyle swarm the battlefield in an attempt to hold the party in place. Players must make DC 23 Con saving throws or be restrained until the end of their next turn.

Chapter 5
Anvil and Hammer
As our battle comes to a close, our players have one last decision to make. Iymrith is slain, but our work is not done yet. With their last remaining essence of Giant Divinity, our players have the power to shape the world.
While magical artifacts and treasure make for fantastic loot, such gifts might not matter if this is the end of your story. In that case, let’s do one better by handing over the narrative to our players.
Power to Create
Our players find themselves standing in the sky, looking down on the world. The mountaintops look almost like an anvil, and their divinity takes the shape of a hammer for them to wield together. Around them, they see two distinct groupings of energy.
The Ordning
Floating around each other, in no clear order or pattern, we see the six runes of the Ordning formed from a number of materials.
Uvar. Stilled lightning, slightly pulsating.
Haug. Bits of levitating dust and earth.
Ild. A flame flickers, dancing in the wind.
Vind. Wisps of cloud slowly move through the space.
Ise. A jagged piece of ice chills the air around it.
Stein. Precious gems condense, reflecting light.
Soul of the Departed
A single mass of energy is off by itself, taking no clear shape or form. It is dying out, barely present.
Touching or approaching it gives the immediate smell of the ocean and shells. The characters recognize this as the soul of Princess Serissa.
Decision
As Annam is the god of Creation, our players have a single moment in which they can create something.
Our players have two obvious choices - they can either recreate the Ordning to their will, or they can take the slivers of Princess Serissa’s soul and reforge it to give her life once again, leaving the Ordning shattered.
Perhaps there are other souls you wish to give them the opportunity to reforge. If so, incude their souls in this moment.
What is Important?
Consider what impactful choices your player may want to make. What is something unique to your story? Either way, hand the reigns to your party and give them the space to decide how this chapter of the story closes.
Chapter 5 | Anvil and Hammer
Appendix
While not directly related to Iymrith, in this section I have included rough statblocks for the Giant Lords that I ran in my campaign. Just as with Iymrith, these are designed to be much deadlier encounters than written in the module.
Feel free to take what suits your table and your tastes. The intent with these Giant Lords was to give each fight a unique feeling specific to the Lord. For example, Chief Guh consumes her fallen allies. Jarl Storvald’s military mind has him directing his soldiers to victory, enabling them to move at his command.
Appendix A: Chief Guh
Chief Guh, the Large
Huge Giant
- Armor Class
- 9
- Hit Points
- 200
- Speed
- 0ft.
| STR | DEX | CON | INT | WIS | CHA |
|---|---|---|---|---|---|
| 21 (+5) | 1 (-5) | 19 (+4) | 5 (-3) | 9 (-1) | 6 (-2) |
- Skills
- Perception +2
- Senses
- Passive Perception 12
- Languages
- Common, Giant, Goblin , though her vocabulary is limited to monosyllabic words.
- Challenge
- 5 Proficiency Bonus +3
Legendary Resistance (3/Day). If Chief Guh fails a saving throw, she can choose to succeed instead.
Last Stand (1/Day). At the start of her turn, Chief Guh can cause Giant Runes appear across belly, chest, and arms. She gains resistance to Bludgeoning, Piercing, and Slashing damage. She can also use the Action Surge ability one time.
Actions
Multiattack. Chief Guh makes two greatclub attacks.
Greatclub. Melee Weapon Attack: +8 to hit, reach 20 ft., one target. Hit: 18 (3d8 + 5) bludgeoning damage.
Rock. Ranged Weapon Attack: +8 to hit, range 60/240 ft., one target. Hit: 21 (3d10 + 5) bludgeoning damage.
Legendary Actions
Chief Guh can take 3 legendary actions, choosing from the options below. Only one legendary action option can be used at a time and only at the end of another creature’s turn. Chief Guh regains spent legendary actions at the start of its turn.
Greatclub. Chief Guh makes a greatclub attack.
Rock (Costs 2 Actions). Chief Guh makes a rock attack.
SQUASH!!! (Costs 2 Actions). Chief Guh commands another Hill Giant to SQUASH an enemy within 5 feet of it. +8 to hit, reach 5 ft., one target. Hit: 26 (6d6 + 5) bludgeoning damage. On a hit, the Hill Giant lands prone in the target’s space, and the target is grappled and prone until the target escapes the grapple or the giant stands up.
Consume (Costs 2 Actions). Chief Guh grabs a dead ally within 20 feet and begins eating its flesh, regaining health equal to 1d6 x the number of hit die the creature had when alive.
Appendix
Appendix B: Jarl Storvarld
Jarl Storvald, Admiral of Moving Ice
Huge Giant
- Armor Class
- 18
- Hit Points
- 343
- Speed
- 60ft.
| STR | DEX | CON | INT | WIS | CHA |
|---|---|---|---|---|---|
| 23 (+6) | 9 (-1) | 21 (+5) | 12 (+1) | 18 (+4) | 12 (+1) |
- Saving Throws
- CON +11, WIS +10, CHA +7
- Skills
- Athletics +12, Perception +10, Survival +16
- Damage Resistances
- Fire
- Damage Immunities
- Cold
- Senses
- Passive Perception 20
- Languages
- Common, Giant
- Challenge
- 20 Proficiency Bonus +6
Legendary Resistance (3/Day). If Jarl Storvald fails a saving throw, he can choose to succeed instead.
Pack Tactics. Jarl Storvald has advantage on attack rolls against a creature if at least one of his allies is within 10 feet of the creature and the ally isn’t incapacitated.
Actions
Multiattack. The giant makes two Sword of Winter attacks.
Sword of Winter (2 Handed). Melee Weapon Attack: +14, reach 10 ft., one target. (3d10 + 8) cold damage.
Rock. Ranged Weapon Attack: +12; to hit, range 60/240 ft., one target. Hit: 28 (3d10 + 6) bludgeoning damage.
Whirlwind Attack. Jarl Storvald makes a melee attack against any number of creatures within 10 feet of him, with a separate attack roll for each target.
Shredding Hail (Recharge 5-6). Jarl Storvald hefts a chunk of ice into the air and smashes it with his fists, shattering it into pieces and sending shards flying outward. Every creature in a 60ft cone must make a DC18 Dexterity Saving throw, taking 12d8 cold damage on a failed save, or half as much on a successful one.
Spellcasting. Jarl Storvald is a 17th level spellcaster. Its spellcasting ability is Wisdom (spell save DC 18; +10 to hit with spell attacks). It has the following spells prepare:
Precast: water walk, freedom of movement
At will: ray of frost
1x per day each: grasping vine, steel wind strike, wall of ice, plant growth
2x per day: absorb elements, zephyr strike
Legendary Actions
Jarl Storvald can take 3 legendary actions, choosing from the options below. Only one legendary action option can be used at a time and only at the end of another creature’s turn. Jarl Storvald regains spent legendary actions at the start of its turn.
Sword of Winter. Jarl Storvald makes an attack with the Sword of Winter.
Rock. Jarl Storvald makes a rock attack.
Commander’s Strike (Costs 2 Actions). Jarl Storvald commands another Frost Giant Giant to take up to its full movement and then attack an enemy within range with its Greataxe. Greataxe. Melee Weapon Attack: +9 to hit, reach 10 ft., one target. Hit: 25 (3d12 + 6) slashing damage.
Shredding Hail Recharge (Costs 2 Actions). Jarl Storvald recharges his Shredding Hail and immediately uses it.
Cast a Spell (Costs 2 Actions). Jarl Storvald casts a spell using his remaining spell slots.
Commander Actions
On initiative count 20 (losing initiative ties), Jarl Storvald gives his soldiers orders based on the current round number.
Round 1: What are you waiting for?! - Jarl Storvald commands all allies of his to take the offensive. Any ally that can hear Jarl Storvald can either make a single attack roll or take the Dash action without taking attacks of opportunity.
Round 2: Focus Fire! - Jarl Storvald points at a single enemy creature and commands all allies of his to move forward. Allies may use the Dash action to move towards that enemy without taking attacks of opportunity.
Round 3: Kill them! - Jarl Storvald commands all allies of his to strike. Any ally that can hear Jarl Storvald may use the Attack action against a creature within range. Creatures with Multiattack can make multiple attacks.
Appendix
Appendix C: Duke Zalto
Duke Zalto, the Inferno of Ironslag
Huge Giant
- Armor Class
- 18
- Hit Points
- 340
- Speed
- 40 ft.
| STR | DEX | CON | INT | WIS | CHA |
|---|---|---|---|---|---|
| 27 (+8) | 12 (+1) | 25 (+7) | 17 (+3) | 14 (+2) | 13 (+1) |
- Saving Throws
- DEX +7, CON +13, CHA +7
- Skills
- Athletics +14, Perception +8
- Damage Immunities
- Fire
- Senses
- Passive Perception 18
- Languages
- Common, Elvish, Giant
- Challenge
- 17 Proficiency Bonus +6
Legendary Resistance (3/Day). If Duke Zalto fails a saving throw, he can choose to succeed instead.
Improved Critical. The giant’s weapon attacks score a critical hit on a roll of 19 or 20.
Actions
Multiattack. Duke Zalto makes two attacks with his Giant Iron Maul.
Giant Iron Maul. Melee Weapon Attack: +14 to hit, reach 10 ft., one target. Hit: 28 (6d6 + 7) bludgeoning damage
Rock. Ranged Weapon Attack: +14 to hit, range 60/240 ft., one target. Hit: 29 (4d10 + 7) bludgeoning damage.
Spellcasting. Duke Zalto is a 17th level spellcaster. Its spellcasting ability is Intelligence (spell save DC 17; +9 to hit with spell attacks). It has the following spells prepare:
1st level (4 slots): absorb elements, burning hands, wrathful smite, cure wounds
2nd level (3 slots): heat metal
4th level (2 slots): dimension door
Bonus Actions
Immolating Blow (Recharge 5-6). Duke Zalto focuses his strength and his fiery nature on a single mighty blow. After successfully hitting with a weapon attack, Duke Zalto can use a bonus action to cause raw fiery power to burst forth from his weapon as the blow lands. All creatures within 10 feet of the target, including the target itself, must make a DC 19 Dexterity save or take 35 (10d6) points of fire damage on a failed save, or half as much damage on a successful one. Any creature failing its saving throw is set alight from the flames. Until a creature takes an action to douse the fire, the target takes 10 (3d6) fire damage at the start of each of its turns.
Legendary Actions
Duke Zalto can take 3 legendary actions, choosing from the options below. Only one legendary action option can be used at a time and only at the end of another creature’s turn. Duke Zalto regains spent legendary actions at the start of its turn.
Giant Iron Maul. Duke Zalto makes a Giant Iron Maul attack.
Rock. Duke Zalto makes a rock attack.
Dash. Duke Zalto takes the dash action.
Inferno Strike (Costs 2 Actions). Duke Zalto channels the flames of Maegera and causes a 10 feet radius, 40 foot high pillar of magma to erupt from the ground at a point he can see. All creatures in the pillar must make a DC 19 Dexterity saving throw taking 32 (8d6) fire damage or half as much damage on a successful save. A pool of magma remains where Inferno Strike was used. Any creature that touch the magma takes another 8d6 fire damage.
Mythic Actions
Upon entering the Adamantine Forge, Duke Zalto channels the power of Maegera through his own body, temporarily gaining control over the Vonindod. In this form Duke Zalto has the following changes: Duke Zalto gains access to the Vonindod Lair Actions, Immolating Blow, and Inferno Strike.
Dawn Titan’s Shield (1/Day). Flames of the forge surround Duke Zalto, causing his body to give off intense heat. Duke Zalto becomes incapacitated for the next round. During this time, he cannot take damage or by affected by any spells or magical abilities. During the round, his body steadily becomes heating up to higher temperatures. At the start of his next turn, Duke Zalto releases the flames and gains control over his body again. Each creature within 20 feet of Duke Zalto much make a DC 19 Dexterity saving throw or take 42 (12d6) fire damage. If a creature succeeds, they instead take half damage.
Lair Actions
On initiative count 20 (losing initiative ties), Duke Zalto takes a lair action to cause one of the following effects; Duke Zalto can’t use the same effect two rounds in a row:
Magma pools created by Inferno Strike increase in radius by 10 feet. All creatures in the room take 1d10 fire damage on initiative count 20
Inferno Strike. Duke Zalto uses the Inferno Strike legendary action.
Vonindod Slam. Melee Weapon Attack: +18 to hit, reach 20 ft., one target. Hit: 29 (3d12 + 10) bludgeoning damage, and the Vonindod can push the target up to 20 feet away from it.
Grounding Ray. The Vonindod heightens gravity in a 30-foot-radius, 100-foot high cylinder. All creatures in the area must make a DC 21 Strength Saving throw or are knocked prone and become restrained. A creature can make the saving throw again at the start of its turn. The effect wears off after the current round
Appendix D: Countess Sansuri
Countess Sansuri, Lady of Masks
Huge Giant
- Armor Class
- 20
- Hit Points
- 432
- Speed
- 50 ft.
| STR | DEX | CON | INT | WIS | CHA |
|---|---|---|---|---|---|
| 27 (+8) | 10 (+0) | 22 (+6) | 22 (+6) | 16 (+3) | 16 (+3) |
- Saving Throws
- CON +12, WIS +9, CHA +9
- Skills
- Insight +9, Perception +8
- Senses
- Truesight 120ft, Passive Perception 19
- Languages
- Common, Giant
- Challenge
- 20 Proficiency Bonus +6
Legendary Resistance (3/Day). If Countess Sansuri fails a saving throw, he can choose to succeed instead.
Staff of Power. Sansuri wields the staff of power.
Obsidian Simulacra. Sansuri has created two Obsidian Simulacra of herself which stand guard motionless on either side of the audience chamber. The Simulacra appear as mundane statues unless Sansuri uses her Mythic Action. These Obsidian Simulacra possess spell slots up to level 4.
Actions
Multiattack. Sansuri makes two spear attacks.
Mythril Spear +3. Melee Weapon Attack: +15 to hit, reach 10 ft., one target. Hit: 21 (3d8 + 11) piercing damage.
Rock. Ranged Weapon Attack: +12 to hit, range 60/240 ft., one target. Hit: 30 (4d10 + 8) bludgeoning damage.
Spellcasting. Sansuri casts one of the following spells, requiring no material components and using Intelligence as the spellcasting ability (spell save DC 22; +14 to hit with spell attacks):
At will: detect magic, fog cloud, light, fly
1st Level (4 slots): shield
2nd Level (4 slots): misty step, invisibility
3rd Level (3 slots): counterspell, hypnotic pattern, dispel magic
4th Level (2 slot): ice storm
5th Level (2 slots): –
6th Level (2 slot): scatter
7th Level (1 slot): prismatic spray
8th Level (1 slot): power word stun
9th Level (1 slot): power word kill
Legendary Actions
Countess Sansuri can take 3 legendary actions, choosing from the options below. Only one legendary action option can be used at a time and only at the end of another creature’s turn. Countess Sansuri regains spent legendary actions at the start of its turn.
Swift Strike. Sansuri makes an attack with either her Mythril Spear or a Rock
Fly Like the Wind. Sansuri flies up to her speed without provoking opportunity attacks. She must land on the ground at the end of this movement unless she has a fly speed granted from another effect.
Enrage the Nightstone (Costs 2 Actions). Sansuri immediately triggers a Lair Action.
Cast a Spell (Costs 2 Actions). Sansuri casts a spell she has prepared.
Mythic Actions
When Countess Sansuri falls to 0 HP, her soul is transferred into a nearby prepared Obsidian Simulacra of herself at the beginning of her next turn. She regains some HP and spell slots. Sansuri cannot use lair actions while waiting for her soul to enter the Simulacra.
Lair Actions
On initiative count 20 (losing initiatives ties), Countess Sansuri takes a lair action to cause one of the following effects. Sansuri can’t use the same effect two rounds in a row. These Lair Actions are powered by a connection between Sansuri, the Adult Bronze Dragon Felgolos, and the Nightstone.
- Sansuri casts fog cloud without requiring concentration that she and other Cloud Giants can see through. The fog cloud lasts one full round.
- Howling winds swirl around the edge of the battlefield, closing inwards and growing more violent to form a cyclone. Each creature of Sansuri’s choice that isn’t a cloud giant or wearing the Skye Rune must make a DC 22 Strength saving throw or be pushed 20 feet towards the center of the battlefield.
- Sansuri releases an atmospheric charge from the Nightstone, casting lightning bolt at 7th level (12d6), targeting up to 3 creatures. These bolts are single target.
- A wave of arcane energy is released from the Nightstone, subjecting the entire battlefield to the effects of the reverse gravity spell until initiative count 20 on the following turn. Alternatively, Sansuri can end this effect if it is already active.
Appendix
Appendix E: Iymrith’s Soldiers
Gargoyle Dragon
Huge Construct
- Armor Class
- 17
- Hit Points
- 147 (14d12 + 56)
- Speed
- 30 ft., fly 90 ft.
| STR | DEX | CON | INT | WIS | CHA |
|---|---|---|---|---|---|
| 24 (+7) | 11 (+10) | 19 (+4) | 10 (+0) | 10 (+0) | 3 (-4) |
- Saving Throws
- STR +11, CON +8
- Damage Resistances
- Radiant; Bludgeoning, Piercing, and Slashing from Nonmagical Attacks
- Damage Immunities
- Cold, Poison
- Condition Immunities
- Charmed, Exhaustion, Frightened, Paralyzed, Petrified, Poisoned
- Senses
- Darkvision 120 ft., Passive Perception 10
- Languages
- Common, Giant, Draconic
- Challenge
- 11 Proficiency Bonus +4
Immutable Form. The dragon is immune to any spell or effect that would alter its form.
Magic Resistance. The dragon has advantage on saving throws against spells and other magical effects.
Siege Monster. The dragon deals double damage to objects and structures.
Unusual Nature. The dragon doesn’t require air, food, drink, or sleep, and it gains no benefit from finishing a short or long rest.
Actions
Multiattack. The dragon uses its Malevolent Presence. It then makes three attacks: two with its claws and one with its tail. If the dragon isn’t flying, it can also make one attack with its wings.
Claw. Melee Weapon Attack: +11 to hit, reach 5 ft., one target. Hit: 14 (2d6 + 7) slashing damage.
Tail. Melee Weapon Attack: +11 to hit, reach 10 ft., one target. Hit: 18 (2d10 + 7) bludgeoning damage.
Wings. Melee Weapon Attack: +11 to hit, reach 10 ft., one target. Hit: 12 (2d4 + 7) bludgeoning damage.
Malevolent Presence. Any creature with an Intelligence of 4 or more that is within 30 feet of the dragon must succeed on a DC 16 Wisdom saving throw or be charmed by it for 1 minute. A creature can repeat the saving throw at the end of each of its turns, ending the effect on itself on a success. If a creature’s saving throw is successful or the effect ends for it, the creature is immune to the dragon’s Malevolent Presence for the next 24 hours. A creature charmed in this way fixates on another creature or object that the dragon mentally chooses and must, on each of its turns, move as close as it can to that target and use its action to make a melee attack against it. If the dragon doesn’t choose a target, the charmed creature can act normally on its turn.
Petrifying Breath (Recharge 5–6). The dragon exhales a ray of energy in a 120-foot line that is 5 feet wide. Each creature in that line must make make a saving throw against the effects of the spell Flesh to Stone as if cast by Iymrith targeting multiple creatures.
Giant Four-Armed Gargoyle
Large Elemental
- Armor Class
- 17
- Hit Points
- 147 (14d10 + 70)
- Speed
- 30 ft., fly 60 ft.
| STR | DEX | CON | INT | WIS | CHA |
|---|---|---|---|---|---|
| 19 (+4) | 11 (+10) | 20 (+5) | 6 (-2) | 11 (+0) | 9 (-1) |
- Saving Throws
- WIS +4
- Skills
- Perception +4
- Damage Resistances
- Bludgeoning, Piercing, and Slashing from Nonmagical Attacks that aren’t Adamantine
- Damage Immunities
- Poison
- Condition Immunities
- Exhaustion, Petrified, Poisoned
- Senses
- Darkvision 60 ft., Passive Perception 14
- Languages
- Draconic
- Challenge
- 10 Proficiency Bonus +4
False Appearance. While the gargoyle remains motionless, it is indistinguishable from an inanimate statue.
Actions
Multiattack. The gargoyle makes five attacks: one with its bite and four with its claws.
Bite. Melee Weapon Attack: +8 to hit, reach 5 ft., one target. Hit: 11 (2d6 + 4) piercing damage.
Claw. Melee Weapon Attack: +8 to hit, reach 5 ft., one target. Hit: 9 (2d4 + 4) slashing damage.
Appendix
Sand Mound
Large Elemental
- Armor Class
- 15
- Hit Points
- 136 (16d10 + 48)
- Speed
- 20 ft., burrow 20ft.
| STR | DEX | CON | INT | WIS | CHA |
|---|---|---|---|---|---|
| 18 (+4) | 8 (-1) | 16 (+3) | 5 (-3) | 10 (+0) | 5 (-3) |
- Skills
- Stealth +2
- Damage Resistances
- Cold, Fire
- Damage Immunities
- Lightning
- Condition Immunities
- Blinded, Deafened, Exhaustion
- Senses
- Blindsight 60 ft. (blind beyond this radius), Passive Perception 10
- Languages
- –
- Challenge
- 5 Proficiency Bonus +3
Lightning Absorption. Whenever the sand mound is subjected to lightning damage, it takes no damage and regains a number of hit points equal to the lightning damage dealt.
Actions
Multiattack. The sand mound makes two slam attacks. If both attacks hit a Medium or smaller target, the target is grappled (escape DC 14), and the shambling mound uses its Engulf on it.
Slam. Melee Weapon Attack: +7 to hit, reach 5 ft., one target. Hit: 13 (2d8 + 4) bludgeoning damage.
Engulf. The sand mound engulfs a Medium or smaller creature grappled by it. The engulfed target is blinded, restrained, and unable to breathe, and it must succeed on a DC 14 Constitution saving throw at the start of each of the mound’s turns or take 13 (2d8 + 4) bludgeoning damage. If the mound moves, the engulfed target moves with it. The mound can have only one creature engulfed at a time.
Treasure Elemental
Medium Elemental
- Armor Class
- 18
- Hit Points
- 117 (18d8 + 36)
- Speed
- 30ft., fly 30ft. (hover)
| STR | DEX | CON | INT | WIS | CHA |
|---|---|---|---|---|---|
| 18 (+4) | 14 (+2) | 14 (+2) | 9 (-1) | 10 (+0) | 10 (+0) |
- Damage Resistances
- Lightning, Thunder; Bludgeoning, Piercing, and Slashing from Nonmagical Attacks
- Damage Immunities
- Poison
- Condition Immunities
- Paralyzed, Petrified, Poisoned, Prone
- Senses Darkvision
- 60 ft., Passive Perception 10
- Languages
- Terran
- Challenge
- 7 Proficiency Bonus +3
Actions
Multiattack. The elemental makes three flail attacks.
Flail. Melee Weapon Attack: +7 to hit, reach 5 ft., one target. Hit: 8 (1d8 + 4) force damage.
Lightning Strike (Recharge 6). The elemental makes one flail attack. On a hit, the target takes an extra 18 (4d8) lightning damage, and the target must succeed on a DC 13 Constitution saving throw or be stunned until the end of the myrmidon’s next turn.
Appendix
What is a King Without His Word?
Tot’s Kingdom’s Guide to Slaying Iymrith is the labor of love of a Dungeon Master and table of amazing players. While all campaigns eventually come to an end, ours will hopefully live on through this book.
In these pages, you will find the resources and game design that you can use to design a dungeon crawl and final encounter against Iymrith, the Desert Doom.
You also may notice a few scattered notes from the party as well as some “insights” from Tot, the Goblin King.
Side effects of consuming this content may include and are not limited to a love for raw poultry, traces of obsidian poisoning, manifestation of multiple personalities, vigorous rhythmic movement, a preference towards Feel Holes, and a burning desire to invite everyone you meet to join your party.
For use with the fifth edition adventure
module Storm King’s Thunder.
I’m not really sure
what’s going on, but
you guys are pretty great
Tot, The Goblin King